Disabling System Restore
Windows utilizes a restore utility that backs up selected files automatically to the C:\_Restore folder. This means that an infected file could be stored there as a backup file, and VirusScan will be unable to delete these files. You must disable the System Restore Utility to remove the infected files from the C:\_Restore folder.
Windows ME
- Right-click the My Computer icon on the Desktop and click Properties.
- Click the Performance tab.
- Click the File System button.
- Click the Troubleshooting tab.
- Put a check mark next to Disable System Restore.
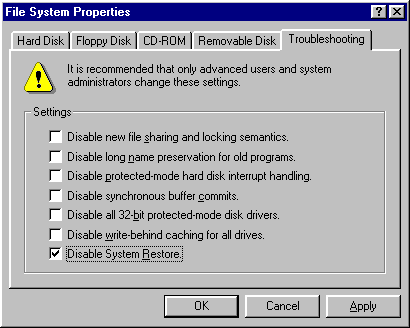
- Click OK.
- Click Yes when prompted to restart. Note: To re-enable the System Restore Utility, follow the steps above, but remove the check mark next to Disable System Restore.
Windows XP
Disabling the System Restore Utility (Windows XP Users).
- Right-click the My Computer icon on the Desktop and click Properties.
- Click the System Restore tab.
- Put a check mark next to Turn off System Restore on All Drives.
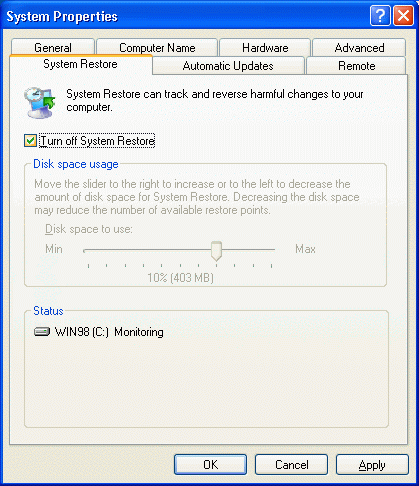
- Click OK.
- Click Yes when prompted to restart. Note: To re-enable the System Restore Utility, follow the steps above, but remove the check mark next to Turn off System Restore on All Drives.
Windows Vista
- Click the Start button.
- Click Control Panel.
- Click System and Maintenance.
- Click System.
- In the left pane, click System Protection. If prompted, enter your Administrator password or click Continue.
- Uncheck the box next to the disk on which you wish to disable System Restore.
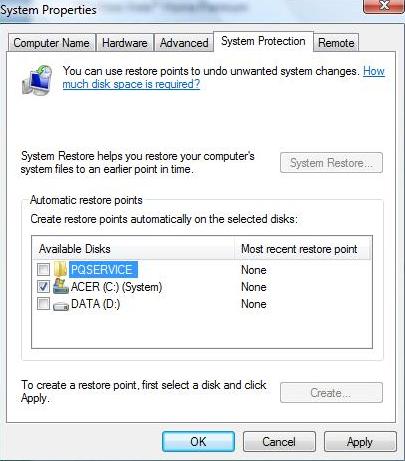
- Click OK. Note: Disabling System Protection will delete all existing restore points. To re-enable the System Restore Utility, follow the steps above, but check the box next to the disk on which you wish to enable System Restore.
Windows 7
- Click the Start button.
- Click Control Panel.
- Click System.
- In the left pane, click System Protection. If prompted, enter your Administrator password or click Continue.
- Click the Configure button on the disk on which you wish to disable System Restore.
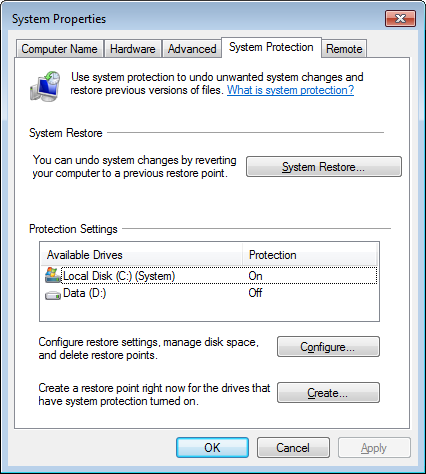
- Select the option Turn off system protection.
- Click OK. Note: Disabling System Protection will delete all existing restore points. To re-enable System Protection, follow the steps above, but check the box next to the disk on which you wish to enable System Protection.
Resources
How to Use StingerBuilding a Culture of Security
Businesses have too much to lose if they don't prioritize security at every entry level. With more data to protect and cyberthreats evolving, everyone must play a part in creating a culture of security. Let our Free Tools help implement a security-first mindset across your entire company.
Need a little more protection for your business?