Blogs
The latest cybersecurity trends, best practices, security vulnerabilities, and more
ARCHIVED STORY
What’s in the Box?
By Sam Quinn · February 25, 2019
2018 was another record-setting year in the continuing trend for consumer online shopping. With an increase in technology and efficiency, and a decrease in cost and shipping time, consumers have clearly made a statement that shopping online is their preferred method.

In direct correlation to the growth of online shopping preferences is the increase in home delivery, and correspondingly, package theft. Though my initial instinct was to attempt to recreate YouTuber Mark Rober’s glitter bomb, I practiced restraint and instead settled on investigating an innovative product called the BoxLock (BoxLock Firmware: 94.50 or below). The BoxLock is a smart padlock that you can setup outside of your house to secure a package delivery container. It can be opened either via the mobile application (Android or iPhone) or by using the built-in barcode scanner to scan a package that is out for delivery. The intent is that delivery drivers will use the BoxLock to unlock a secure drop box and place your package safely out of reach of package thieves. The homeowner can then unlock the lock from their phone using the app to retrieve their valuable deliveries.
Since I am more of a hardware researcher, the first step I did when I got the BoxLock was to take it apart to view the internals.
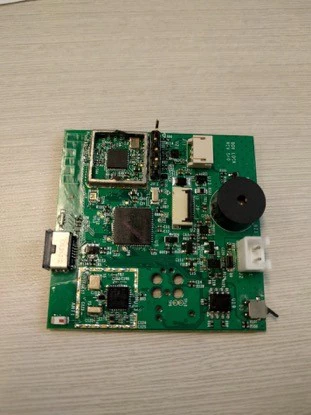
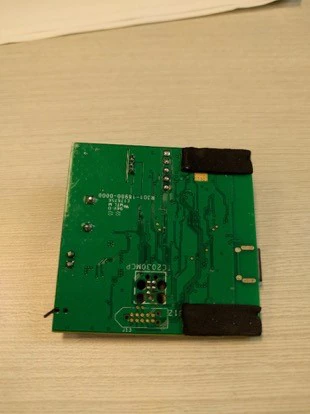
With the device disassembled and the main PCB extracted, I began to look for interesting pins, mainly UART and JTAG connections. I found 5 pins below the WiFi module that I thought could be UART, but after running it through a logic analyzer I didn’t see anything that looked like communication.
The BoxLock uses a SOC (System-on-a-Chip) which contains the CPU, RAM, ROM, and flash memory all in one. However, there was still an additional flash chip which I thought was odd. I used my Exodus Intelligence hardware interface board to connect to the SPI flash chip and dump the contents.
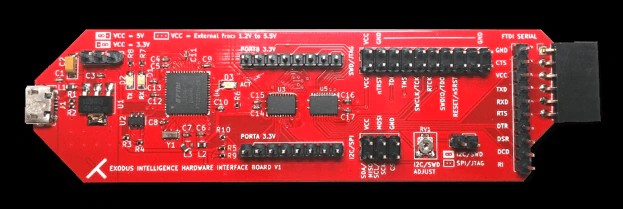
The flash chip was completely empty. My working theory is that this flash chip is used to store the barcodes of packages out for delivery. There could also have been in issue with my version of Flashrom, which is the software I used to dump flash. The only reason I question my version of Flashrom is because I had to compile it myself with support for the exact flash chip (FT25H04S), since it is not supported by default.
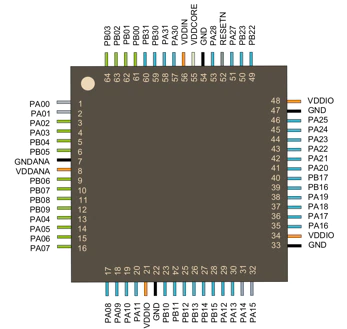
Even though I couldn’t get anything from that flash chip, my main target here was the SOC. On the underside of the Process Control Board (PCB), I identified two tag-connect connection ports. I identified the SWD (Serial Wire Debug) pins located on the SOC (Pin 57 and 58 on the image above) and very slowly and carefully visually traced the paths to the smaller Tag-Connect connection.
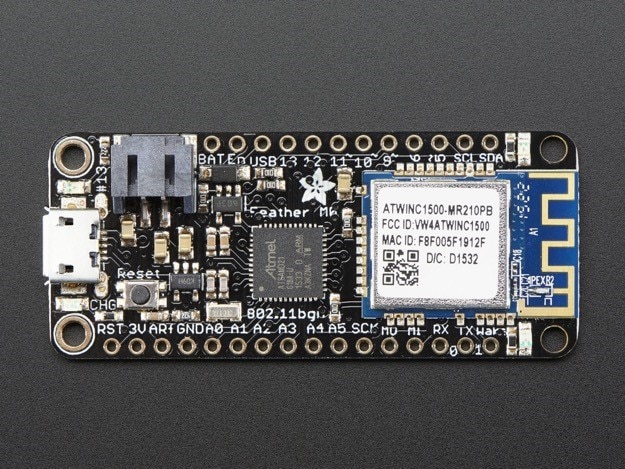
Since I have not done much JTAG analysis before, I grabbed an Adafruit Feather M0 that we had in our lab for testing, since the Feather uses the exact same SOC and WiFi chip as the BoxLock. The Adafruit Feather has excellent documentation on how to connect to the SOC via SWD pins I traced. I used Atmel Studio to read the info off the ATSAMD21 SOC; this showed me how to read the fuses as well as dump the entire flash off the Adafruit Feather.
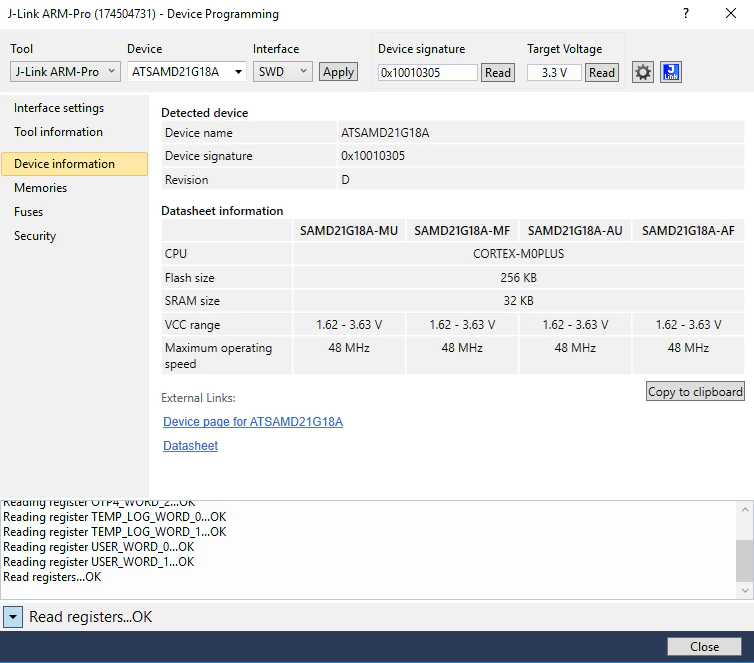
Atmel Studio also will let you know if the device has the “Security Bit” enabled. When set, the security bit is used to disable all external programming and debugging interfaces, making memory extraction and analysis extremely difficult. Once the security bit is set, the only way to bypass or clear the bit is to completely erase the chip.

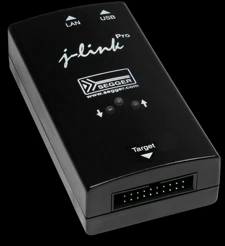
After I felt comfortable with the Adafruit feather I connected the BoxLock to a Segger JLink and loaded up Atmel Studio. The Segger JLink is a debugging device that can be used for JTAG and SWD. I was surprised that the developers set the security bit; this is a feature often overlooked in IOT devices. However, with the goal of finding vulnerabilities, this was a roadblock. I started to look elsewhere.
After spending some time under the microscope, I was able to trace back the larger Tag-Connect port to the BLE (Bluetooth Low Energy) module. The BLE module also has a full SOC which could be interesting to look at, but before I began investigating the BLE chip I still had two vectors to look at first: BLE and WiFi network traffic.
BLE is different to Bluetooth. The communication between BLE devices is secured by the use of encryption, whose robustness depends on the pairing mode used and BLE allows a few different pairing modes; the least secure “Just Works ” pairing mode is what the BoxLock is using. This mode allows any device to connect to it without the pin pairing that normal Bluetooth connections are known for. This means BLE devices can be passively intercepted and are susceptible to MITM (Man in The Middle) attacks.
BLE roles are defined at the connection layer. GAP (Generic Access Profile) describes how devices identify and connect to each other. The two most important roles are the Central and Peripheral roles. Low power devices like the BoxLock follow the Peripheral role and will broadcast their presence (Advertisement). More powerful devices, such as your phone, will scan for advertising devices and connect to them (this is the Central role). The communication between the two roles is done via special commands usually targeted at a GATT (Generic Attributes) services. GATT services can be standard and generic, such as the command value 0x180F, which is the Battery Service. Standardized GATT services help devices communicate with one another without the need for custom protocols. The GATT services present on the BoxLock were all custom, which means they will be displayed as “Unknown Service” when enumerated in a Bluetooth/BLE app. I chose Nordic’s NRF Connect, available in both the Apple and Android app stores or as a desktop application.
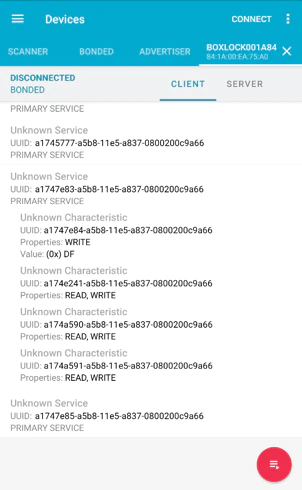
Since the BoxLock was using custom GATT commands I decided to disassemble the Android APK to see if I could find any more information on the “Unknown” UUIDs. I used a tool called “dex2jar” to disassemble the Android APK and then ran the JavaScript code through JSBeautify to clean up the code.
Next, I began searching for UUIDs and the keyword “GATT”. I was able to find the entire list of GATT services and what they pertain to.
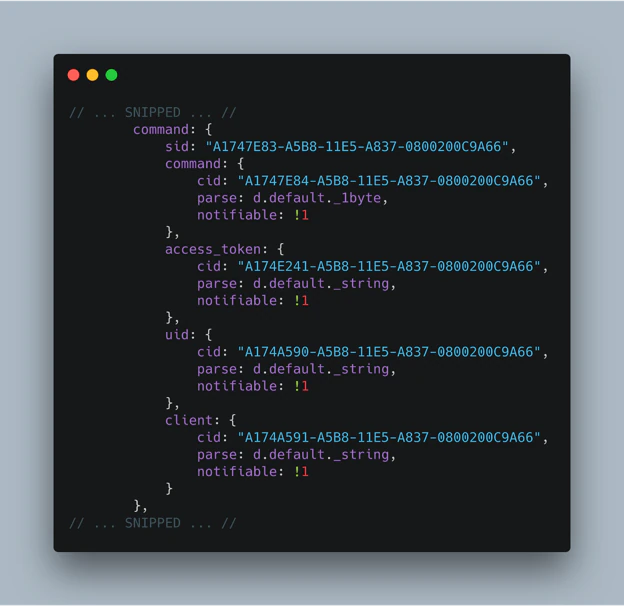
The one I was most interested in was labeled as “Command Service”, where the unlock GATT command is sent to. To try it out, I used the NRF Connect application to send a GATT “sendOpenSignal” command with an attribute value of “2”.
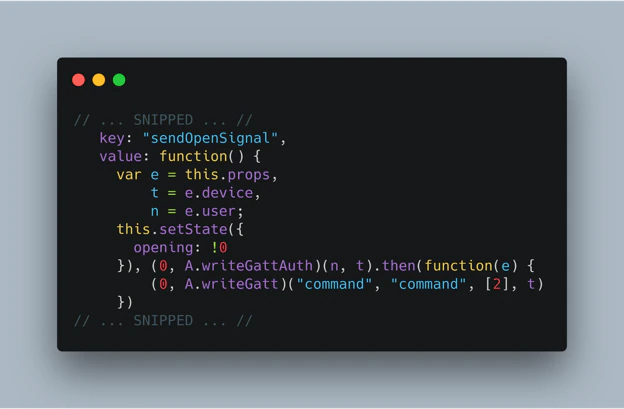
It was just that simple; lo and behold, the BoxLock unlocked!
I was amazed; the phone that I used to send the GATT command over had never connected to the BoxLock before and did not have the BoxLock application installed, yet it was able to unlock the BoxLock. (The vulnerable application version is v1.25 and below).
Continuing to explore the other GATT UUIDs, I was able to read the WiFi SSID, access token, user’s email, and client ID directly off the device. I was also able to write any of these same values arbitrarily.
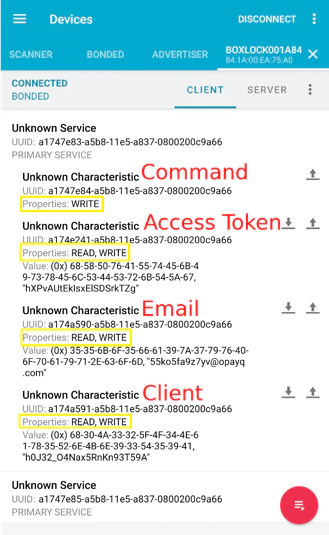
The mandatory identifiers required for the BoxLock to unlock are the access token, user email, and client ID. If those values are not present the device will not authenticate via the cloud API and will not unlock.
The most glaring issue with having all these fields readable and writeable is that I was able to successfully replay them on the device, ultimately bypassing any authentication which led to the BoxLock unlocking.
From my testing, these values never expired and the only way I found that the device cleared the credentials necessary to authenticate was when I removed the battery from the BoxLock. The BoxLock battery is “technically” never supposed to be removed, but since I physically disassembled the lock, (which took a decent amount of effort), I was able to test this.
Even though I was able to unlock the BoxLock, I still wanted to explore one other common attack vector. I analyzed the network traffic between the device and the internet. I quickly noticed that, apart from firmware updates, device-to-cloud traffic was properly secured with HTTPS and I could not easily get useful information from this vector.
I do not currently have an estimate of the extent of this product’s deployment, so I cannot comment on how wide the potential impact could have been if this issue had been found by a malicious party. One constraint to the attack vector is that it requires BLE, which communicates from a distance of approximately 30 or 40 feet. However, for someone looking to steal packages this would not be a challenge difficult to overcome, as the unlocking attack could be completed very quickly and easily, making the bar for exploitation simply a smart phone with Bluetooth capability. The ease and speed of the exploit could have made for an enticing target for criminals.
I want to take a moment to give some very positive feedback on this vendor. Vulnerability disclosure can be a challenging issue for any company to deal with, but BoxLock was incredibly responsive, easy to work with and immediately recognized the value that McAfee ATR had provided. Our goal is to eliminate vulnerabilities before malicious actors find them, as well as illuminate security issues to the industry so we can raise the overall standard for security. BoxLock was an excellent example of this process at work; the day after disclosing the vulnerability, they set up a meeting with us to discuss our findings, where we proposed a mitigation plan. The BoxLock team set a plan in place to patch not only the BoxLock firmware but the mobile applications as well. Within a week, the vendor created a patch for the vulnerability and updated the mobile apps to force mandatory update to the patched firmware version. We tested the firmware and app update and verified that the application properly clears credentials after use on the vulnerable firmware. We also tested the new firmware which clears the credentials even without the mobile app’s interaction.
IoT security has increasingly become a deciding factor for consumers. The process of vulnerability disclosure is an effective method to increase collaboration between vendors, manufacturers, the security community and the consumer. It is our hope that vendors move towards prioritizing security early in the product development lifecycle. We’d like to thank BoxLock for an effective end-to-end communication process, and we’re pleased to report that this significant flaw has been quickly eradicated. We welcome any questions or comments on this blog!
RECENT NEWS
-
Jun 17, 2025
Trellix Accelerates Organizational Cyber Resilience with Deepened AWS Integrations
-
Jun 10, 2025
Trellix Finds Threat Intelligence Gap Calls for Proactive Cybersecurity Strategy Implementation
-
May 12, 2025
CRN Recognizes Trellix Partner Program with 2025 Women of the Channel List
-
Apr 29, 2025
Trellix Details Surge in Cyber Activity Targeting United States, Telecom
-
Apr 29, 2025
Trellix Advances Intelligent Data Security to Combat Insider Threats and Enable Compliance
RECENT STORIES
Get the latest
Stay up to date with the latest cybersecurity trends, best practices, security vulnerabilities, and so much more.
Zero spam. Unsubscribe at any time.