Blogs
The latest cybersecurity trends, best practices, security vulnerabilities, and more

Automagic Reverse Engineering
By Trellix · July 1, 2025
This blog was written by Max Kersten
Over the last few years, I have looked into methods to improve the reverse engineering process. This saves essential time during the analysis, which helps while defending from well prepared threat actors. In 2023, I wrote about the automatic recovery of function names, types, and strings within Golang binaries. In 2024, I dissected how to recover function symbols based on Function ID databases and BSim signatures in bulk. You can also watch a recording of the DEFCON 32 talk if you prefer an audiovisual explanation over a textual one. With the background information given, let’s dive into the next step: automagic reverse engineering!
The updated methodology expands where the previous version of the methodology ends. The rest of this blog will dive into the specifics of loading and unloading FIDBs, using multiple BSim databases sequentially, and using graph theory and an LLM to further contextualize the functions in the binary, as well as the execution of scripts to enhance the analyst’s experience in the graphical user interface. Before diving into the next steps, we will first briefly recap the previously presented methodology, after which the changes are explained. The changes are then demonstrated using a practical case of a wiper malware sample that was found in the wild.
Summary
By making it easier to load Function ID databases (albeit temporarily), while also using multiple BSim databases, you can streamline the function recovery process. Next, you can use GhidrAI to use an LLM of your choice to rename functions and local variables, while also obtaining a summary of the function. The code’s context for the LLM is maximized by using Ghidra’s built-in complexity graph and traversing it from the bottom upwards, as also described by Emproof’s Tim Blazytko and Moritz Schloegel in their talk “The Future of Reverse Engineering with Large Language Models” from REcon 2024. These steps automate the reverse engineering process without compromising on the accuracy.
Last, the manual analysis is improved by marking calls to complex functions bright red while marking non-complex functions dark red. Additionally, we will go over a script to propagate external function parameters for x86_64 binaries based on Karsten ‘struppigel’ Hahn’s modification of a standard Ghidra script, which I’ve improved upon.
You can run these scripts both headless and from the graphical user interface, making the implementation flexible and suitable for any workflow you might have.
You can find the mentioned Ghidra scripts on our GitHub. The main scripts mentioned in this blog are Automagic, GhidrAI, and ColouriseByComplexity. You can also find the FunctionID and BSim databases and signatures in different repositories under the same organization.
A recap of the methodology
Last year, I wrote about the methodology, and how it can help you during your analysis. This is the basis for the approach explained in this blog. You can find the previously defined methodology in the figure below.
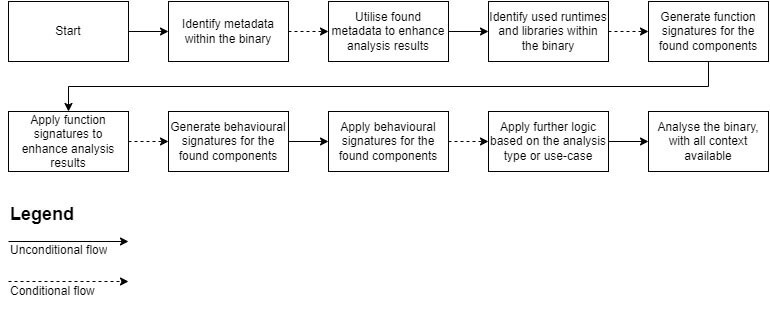
So far, I referenced mostly Golang binaries when talking about metadata within binaries. This metadata data can, if present, be used to recover function names, structures, and/or strings, as the Golang scripts have shown. ESET’s Alexandre Côté Cyr and Rene Holt dove into Nim’s internals to figure out how to demangle and handle function names and strings. They published their findings in a tool called NimFilt, which is also available for Ghidra after Alexandre Lavoie ported the code.
This goes to show that more languages can benefit from additional research along with tool development. Some languages are already supported within the major analysis tools, such as C++, but they too can be improved.
The methodology itself was, previously, mainly focused on the application of Function ID databases (FIDBs) and Behavior Similarity (BSim) signature databases. I shoehorned the latter into a bulk function recognition database, while this was not the original intention of BSim. In this case, the entire methodology is entirely supported by a script. This allows for easier automation of certain steps, and allows you to modify the script for specific file types, while running the script for any given file you load into Ghidra.
You can repurpose the logic of the script for other tools, such as IDA Pro or Binary Ninja, but you will have to alter the Ghidra specific components, such as BSim or some of the elements borrowed from Ghidra’s source code. This blog will only focus on Ghidra with regards to the implementation of the methodology.
The updated methodology
The updated methodology further clarifies the Apply further logic based on the analysis type or use-case step in the flowchart. The other steps, such as using the metadata from a given binary, as well as the creation and application of FunctionID and BSim signatures are explained in detail in the previous blog, and will not be covered here. The focus here will be on the updated methodology.
The updated methodology consists of loading and unloading FIDBs, using multiple BSim databases sequentially, and using graph theory and an LLM to further contextualize the functions in the binary, as well as the execution of scripts to enhance the analyst’s experience in the graphical user interface.
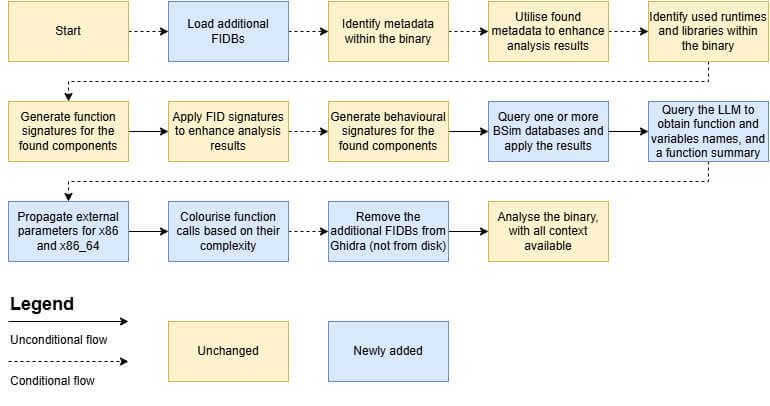
The yellow steps within the flowchart have not changed in the newer version, whereas the blue ones have been newly added. This makes it easy to differentiate between the two versions. If you are interested in the reasoning behind some of the design decisions within the Ghidra scripts, you need to better understand Ghidra’s internals. You can find this explanation in Appendix A.
The blog’s next section dives into a case study via which the newly added sections in the flowchart are explained. The sample in question is CaddyWiper V1.
Case study: CaddyWiper
The wiper itself consists of 10 functions, one of which is the program’s entrypoint. In short, the malware resolves Windows API functions dynamically, after which it checks if the current machine is a domain controller. If this is not the case, it recursively wipes all drives and logical volumes. The strings within the binary are stack strings, some of which are typed as ASCII strings while some are unicode strings.
Normally, you would open Ghidra, run the default analyzers, and dive into the code. Now, we first check if our FIDB folder contains anything useful for Ghidra to use, and maybe you have some BSim databases laying around with function signatures you suspect might occur.
Temporary FID databases
Ghidra needs to be told which Function ID databases to use, if any. This feature allows you to load all FIDBs from a given folder at the start of the analysis of a file, and unload them once the analysis has finished. This allows you to add (and/or remove) databases between the analysis of files and/or different (headless) Ghidra runs.
This might not be the world’s most innovative feature, but it can come in handy when dealing with the bulk ingestion and analysis of files while also automatically making FIDBs.
Alas, none of the functions within the CaddyWiper are found within any of my FIDB databases; maybe the bulk querying of BSim databases will yield a better result?
Accessing BSim databases in bulk
Using the BSimFunctionRenamer script, you can use a single BSim database to look for function matches based on the given similarity threshold. This creates a dilemma when analyzing files: do you put all your BSim signatures into a single database, or do you create multiple databases?
Putting it all into a single database might sound great, as it's easy to use, but the downside is that a H2 database is limited in terms of the maximum number of signatures. That is even ignoring the fact that H2 databases get really slow due to their architecture.
Using a single database also has a different issue: you set the similarity threshold for all matches. In some cases, you are likely having different levels of trust for sets of binaries. As such, you probably want to store them in different databases so you can specify different similarity thresholds once you query the database. This script allows you to do exactly that.
You provide a CSV file to the script, which creates a BSimExecutionConfig object from each line within the file that does not start with a hashtag. The format is given below.
#databaseUrl,lowerSimilarityBound,maximumMatches,renameSingleMatches,renameMultiMatches,renameGenericMatches,prefix
C:\BSim\myDatabase,1,1,true,true,true,myPrefix_
The example would load the local H2 database, for the path is given without the double file extension. It will match only exact matches and will look for no more than a single match in the database per function. It will rename single, multi, and generic matches, prefixing generic matches with myPrefix_.
Multiple databases can be added on separate lines. Note that having a file path which contains one or more commas will skip that line, as the expected number of values is neither 6 nor 7. If generic matches should not be renamed, you do not need to provide a prefix.
Much like the lack of FIDB results, my BSim databases return no matches either. Normally, you can play around with the similarity threshold, but in this case I knew no matches would be found. Having exhausted the ground truth methods, it's now time to venture into less explored waters: LLMs.
Ghidra and LLMs: GhidrAI
The increased capability of LLMs and the numerous advantages users have when using these models cannot be ignored. That is not to say that the output from models can be trusted without further inspection. To avoid mistakes, we can provide as much context as possible. This is where the previously mentioned graph theory comes into play.
The future work section in the No Symbols? No Problem! blog mentions the talk by Emproof’s Tim Blazytko and Moritz Schloegel titled “The Future of Reverse Engineering with Large Language Models” from REcon 2024. Using Graph theory, which is already present within Ghidra (see Appendix A for more information), we can create a complexity graph based on all functions within the current binary.
The childless nodes in the graph are the ones at the bottom which the complexity depth graph provides. Moving from the bottom to the top of the graph, the LLM can be used to rename functions where the calls within said function have a descriptive name, rather than the name Ghidra gives to unknown functions by default. A descriptive name would be convertString rather than the Ghidra default naming scheme which uses the function’s starting address as part of its name: FUN_218974.
The GhidrAI script does not interact directly with a LLM API; instead, it connects to a Python-based proxy. You can find template Python code for the LLM API in Appendix B. This is done for multiple reasons. Firstly, Python is better suited for LLM interaction given the numerous packages and scripts for it. Secondly, splitting the logic to interact with Ghidra and the logic to interact with a LLM makes maintenance easier. It also allows the LLM related code to be hosted centrally, which can be great when using a local model or if you do not want to deal with API key management per user and simply want to use a single API key within the Python script. Thirdly, you can define multiple endpoints for different LLM models.
You can easily expose a HTTP API via Python packages (i.e. using FastAPI) and interact with the Java-based script for Ghidra over HTTP. The GhidrAI script connects to a HTTP endpoint using multiple threads, allowing you to simply wait for the LLM’s response while decreasing the waiting time depending on the rate limit of the LLM.
So, what can the LLM improve? The current script renames functions which haven’t been renamed yet. In other words, the FUN_ADDRESS functions are renamed, functions which have been identified by FunctionID and BSim thus far are omitted. This saves time and decreases the LLM’s workload. Additionally, it will rename function and local variables, and it will provide a summary of the code at hand. The changes are also logged in the function’s comment.
In the figure below, the same method within the CaddyWiper sample is shown. The left-hand side shows the output from Ghidra based on the default analysis options, whereas the right-hand side shows the reworked method with a new name and new local variable names.
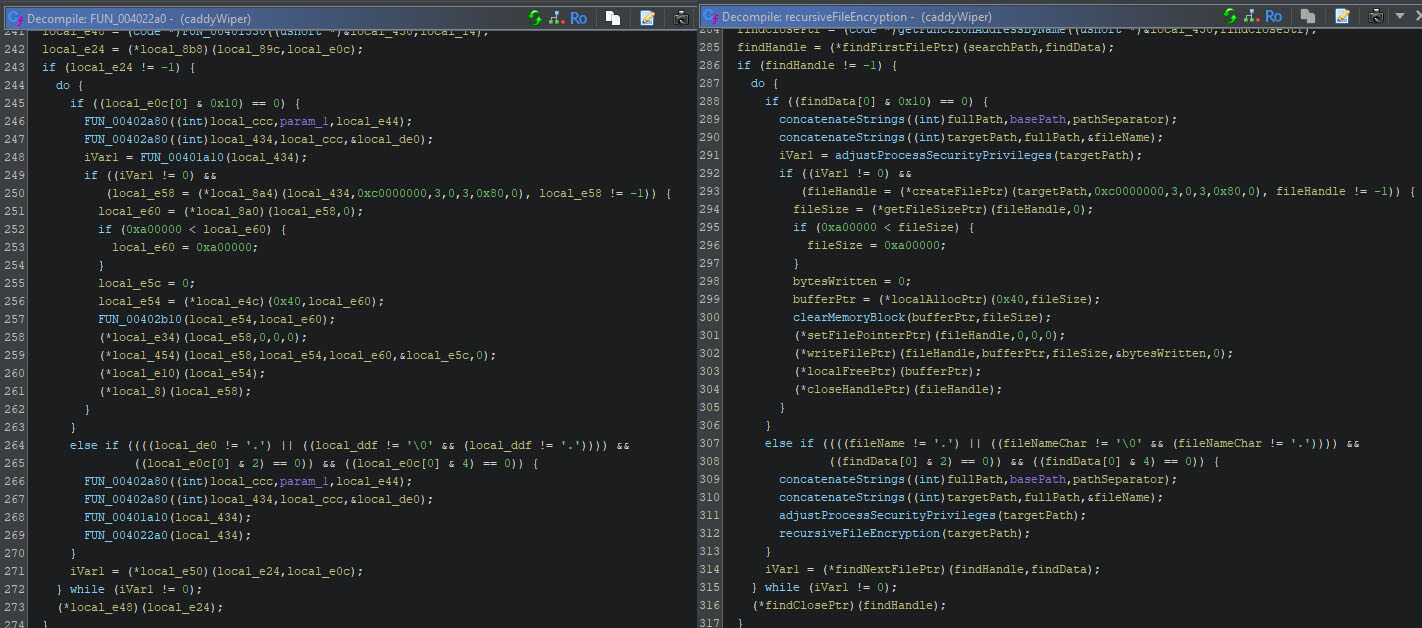
The changes are added to the function’s comment, allowing you to review them. This is especially helpful if you run this script over a function you already partially analysed by hand. The figure below shows the output for the recursive wipe method.
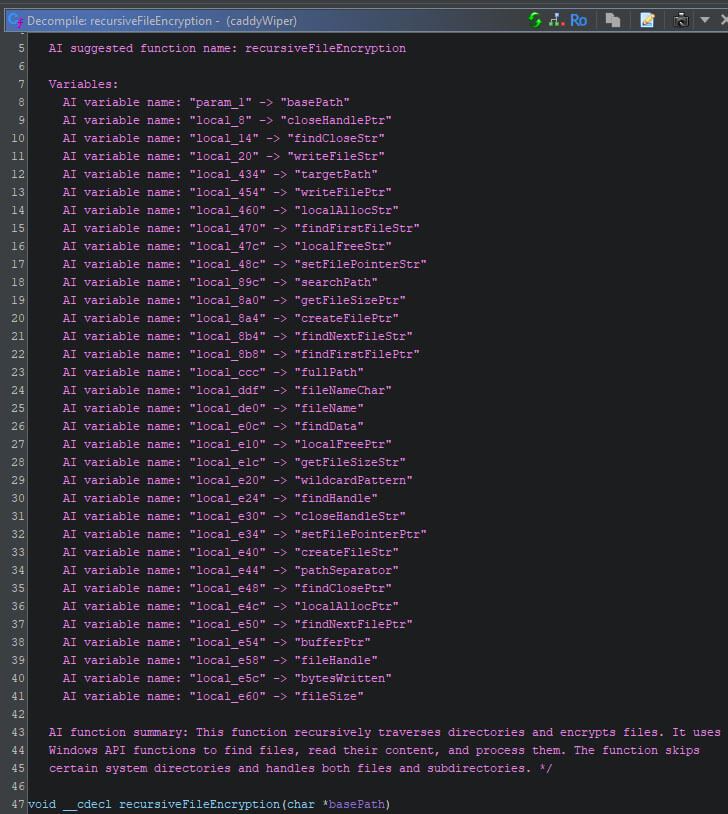
This overview allows you to use the LLM while also retaining the accuracy you would have when manually analysing the entire function. So far, you have seen several methods to retrieve symbols from metadata, different types of signatures, and with the help of a LLM. The next step is manual analysis, but this can be improved too.
Aesthetic user experience
Talking about the manual analysis: there is no point in trusting the complete process without manually identifying the mistakes and following the breadcrumbs. These automagic steps are there for your convenience, not to replace your work. So far, this blog has focused on automating time consuming tasks to streamline them, and to ensure they can run at night while you grind to the top 0.1% ELO on your favourite esport game get a good night’s rest. This last section focuses on how automation can help you during your manual analysis. In other words: graphic design is (now) my passion!

When viewing a function, you are often left guessing how interesting any of the function calls within are. Some might be there just to concatenate a string, while another might be the command and control handling function which calls dozens of other functions. Yet, the imaginary FUN_1 and FUN_2 do not show any indications of their purpose nor their complexity. Sometimes, function arguments can provide some insight, but this generally isn’t too helpful.
With the same complexity depth algorithm from the Ghidra team as I used in the GhidrAI script, we can again determine the complexity of every function. In turn, we can add colours in the disassembly view where we mark the calls to methods based on their relative complexity. Note that the decompiler view does not support colour coding in this way. Relative is to say that the colour coding is based on no complexity being essentially coloured black, whereas the most complex functions are coloured bright red.
This results in differences between two binaries. One might have a lot of complex functions, whereas the most complex function in the other binary wouldn’t even be close to the least complex method in the other binary. In both cases, the most complex function is coloured bright red. This is by design, since your current analysis will also be based on the relative complexity of functions within the current binary.
The example below contains the same code in a side-by-side overview. The left-hand side is before the colourisation is added, whereas the right side contains the colourisation.
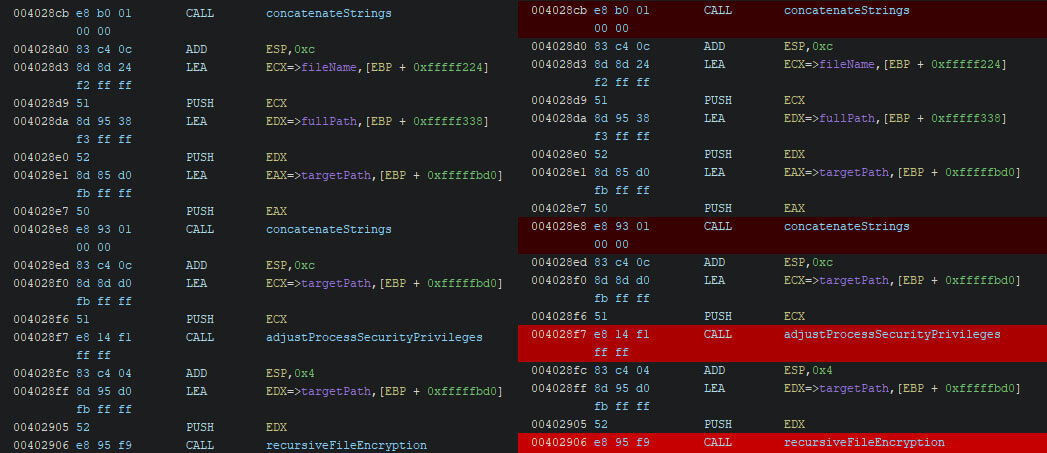
In some cases, the most complex functions are the most likely to be interesting, whereas in some cases it is more difficult to discern the difference. An example when they are is when the code uses very little code other than what the malware author wrote, as is the case with CaddyWiper. In other cases, where the code heavily depends on libraries and/or runtime related code, you will find that a seemingly simple action uses dozens of methods internally.
The other helper script is one to add the function argument types and names for external functions (i.e. references to the Windows API). Ghidra has support for x86 binaries in the PropagateExternalParametersScript script, but there is no support for x86_64 binaries by default. Karsten ‘struppigel’ Hahn ported the initial code from the x86 script to create a script for x86_64 binaries. I have modified this version, which was later merged by Karsten via my pull request.
The output of the script clarifies the code, as is shown in the figure below for x86.
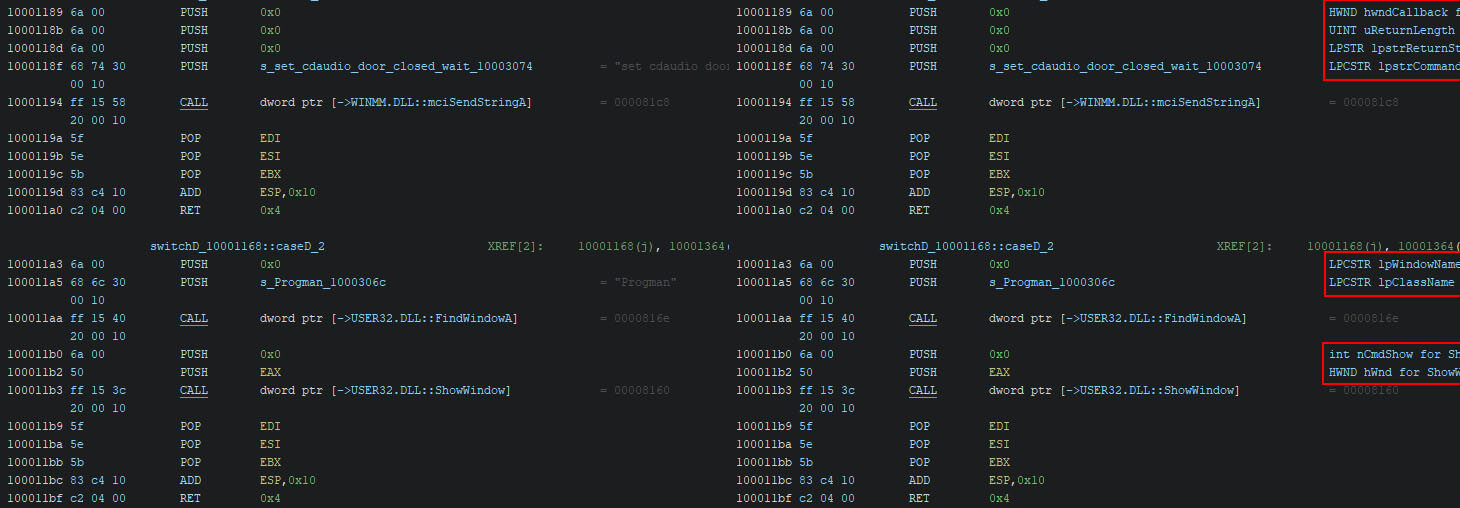
For x86_64, you can now find the same helpful information. Not all calling conventions are supported within the script, but you can always submit a pull request with your findings.

Future work
While there are always features to be added and improvements to be made, I feel that the improvement which can be made, is to define constraints for a BSim database. As such, it would only load and query a given BSim database if other criteria are met. This can be done using BSim’s internals or by creating an external file with rules per BSim database.
Conclusion
The updated methodology has significantly improved not only the automation but also the manual reverse engineering experience. The main limitation on this research is that the accuracy may not degrade due to automated measures, which ensures the analyst faces the ground truth from which conclusions can be drawn.
Overall, the required time to analyse a binary goes down with this approach, as a lot of manual tasks have been automated. Being able to run these scripts headless allows you to integrate them into your workflow of choice, making the methodology as flexible as possible.
Appendix A—Ghidra’s internals
This section briefly describes some of the internals that are referenced and/or used within the scripts. It's not meant as an exhaustive description of the framework’s layout.
Headless execution
All scripts can be executed headless, making them suitable to be used in your custom analysis pipeline. The only downside with regards to the headless execution is the usage of some of Ghidra’s internals. While these could be obtained by calling the getState().getTool().getService(String) within the GhidraScript class, this is only possible when Ghidra is not running headless. If Ghidra is running headless, the getTool function returns null. More information about the how and why can be found in this GitHub issue, but the gist of it is that the tool and the service are coupled together. Decoupling is possible, but not on Ghidra’s current roadmap, which is why some of the scripts will contain larger code segments taken from Ghidra’s source code.
Analyzers and scripts
Bluntly put, Ghidra allows you to create three types of extensions: loaders, analyzers, and scripts. Loaders are used to load a binary, which is something out-of-scope for this blog.
Analyzers are the ones you see in the default analysis screen. They need to be (re)compiled prior to their installation. They can integrate Ghidra’s user interface if desired, and allow them to specify the priority of their execution. To illustrate, you only want to execute the Function ID analyzer to run once the file has been disassembled and functions have been defined, otherwise there are no functions to iterate over. Analyzers are also started in the background based on triggers. The creation of a function will trigger multiple analyzers to analyze the stack, infer types using the compiler, along with other tasks.
Scripts are based on the GhidraScript class and are compiled by Ghidra when it is already running. They cannot integrate in the same way as an analyzer can, and while one script can run multiple other scripts, there can be concurrency issues when a script kicks off an analyzer while also starting a new script. Ghidra handles this to the best of its ability, but you might want to ensure there is no issue, even if this means that the analysis takes slightly longer.
To do this, the Automagic script contains several helper methods, which we will cover in more detail below. The first one is the runScriptAndWait method.
This method ensures the script to be executed, along with possible arguments, is logged. The script’s arguments can be null if no arguments are required. Exceptions thrown by the script are always printed, but can be caught to avoid interrupting the analysis flow. You can decide this on a case-by-case basis. The runScript method resides within the GhidraScript class and is unsurprisingly used to run a script.
The waitUntilAutoAnalysisCompletes method is used to pause the execution until the analyzers have completed their job. The method is given below.
The while loop iterates as long as the automatic analysis is ongoing, while allowing the user to cancel the script’s execution in-between. The one second sleep is called every loop to avoid hogging the CPU while frantically iterating over this loop.
So far, the related code is talking about scripts, which is what you will mainly use, and the newly published code for this blog is focused on, but the Automagic script does use an existing analyzer, which also needs to complete before the script continues.

This method gets the analyzer by its defined name and schedules it for a single run. Next, the same wait method is used to ensure it completes before moving on to the next bit of the code.
Graph theory
Let’s be honest, you weren’t expecting graph theory to be included in this blog. Realistically speaking, neither was I. If you’re expecting the next section to be filled with mathematical symbols and explanations, then you’re out of luck. The Ghidra team was kind enough to already implement the required algorithm, although it is somewhat hidden within Ghidra. The only thing you need to memorize is that a graph consists of nodes and lines. The nodes are referred to as vertices while the lines are referred to as edges. You will find these terms within the code.
In this case, we are interested in the complexity depth of a given function. This allows us to define if a function calls a lot of other functions, or if it does not call any, and anything in-between. The built-in method can be found by right clicking on the root node of the Program Trees, selecting Modularize By, and selecting Complexity Depth, as is also shown in the figure below.
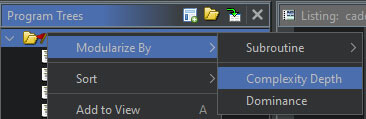
This will create levels with a number behind it within the Program Trees view. I have repurposed this code within the GhidrAI and ColouriseByComplexity scripts to obtain a list of functions. By reversing the list, or by iterating over the list in reverse order, we can start with the functions that have the least references to other functions.
Appendix B—The Python-based LLM API script
The Python-based LLM API script is given below. You need to update the LLM API connection based on your preferred LLM, with your preferred model.
from fastapi import FastAPI, HTTPException, Request
from pydantic import BaseModel
from typing import Any, Dict
import boto3
import json
from botocore.exceptions import ClientError
from botocore.config import Config

#AWS credentials
aws_access_key_id = 'KEY'
aws_secret_access_key = 'KEY'

config = Config( read_timeout=2000, connect_timeout=2000, retries={'max_attempts': 5}, max_pool_connections=10)
client = boto3.client( "bedrock-runtime", region_name="us-west-2", aws_access_key_id=aws_access_key_id, aws_secret_access_key=aws_secret_access_key, config=config)

app = FastAPI()

@app.post("/antropic/claude")
async def process_claude_request(request: Request) -> dict:
    try:
        body = await request.body()
        prompt: str = body.decode('utf-8')
        #print(prompt)
        model_id = "anthropic.claude-3-5-sonnet-20241022-v2:0"
        native_request = {
            "anthropic_version": "bedrock-2023-05-31",
            "max_tokens": 4096,
            "temperature": 0.0,
            "messages": [
                {
                    "role": "user",
                    "content": [{"type": "text", "text": prompt}],
                }
            ]
        }
        #print(native_request)
        jsonRequest = json.dumps(native_request)
        #print(jsonRequest)
        response = client.invoke_model(modelId=model_id, body=jsonRequest)
        model_response = json.loads(response["body"].read())

        response_text = model_response["content"][0]["text"]
        #print("---------------RESPONSE------------")
        #print(response_text)
        return json.loads(response_text)
    except Exception as e:
        raise HTTPException(status_code=400, detail=str(e))
    except (ClientError, Exception) as e:
        print(f"ERROR: Can't invoke '{model_id}'. Reason: {e}")

if __name__ == "__main__":
    import uvicorn
    uvicorn.run(app, host="0.0.0.0", port=8000)
RECENT NEWS
-
Mar 02, 2026
Trellix strengthens executive leadership team to accelerate cyber resilience vision
-
Feb 10, 2026
Trellix SecondSight actionable threat hunting strengthens cyber resilience
-
Dec 16, 2025
Trellix NDR Strengthens OT-IT Security Convergence
-
Dec 11, 2025
Trellix Finds 97% of CISOs Agree Hybrid Infrastructure Provides Greater Resilience
-
Oct 29, 2025
Trellix Announces No-Code Security Workflows for Faster Investigation and Response
RECENT STORIES
Latest from our newsroom
Get the latest
Stay up to date with the latest cybersecurity trends, best practices, security vulnerabilities, and so much more.
Zero spam. Unsubscribe at any time.